


4 Press EQ to complete the 4-point ad-
justment.
The adjusted position data is saved.
# Do not turn off the engine while saving the ad-
justed position data.
5 Press EQ to proceed to the 16-point ad-
justment.
The 16-point touch panel adjustment screen
appears.
# To cancel the adjustment, press and hold
VOLUME/MUTE.
6 Gently touch the center of the + mark
displayed on the screen with the touch
panel adjustment pen.
After you touch all the marks, the adjusted po-
sition data is saved.
# Do not turn off the engine while saving the ad-
justed position data.
7 Press and hold VOLUME/MUTE to com-
plete the adjustment.
Using the AUX source
A separately sold auxiliary device such as VCR
or portable device can be connected to this
unit. When connected, auxiliary device is auto-
matically recognized as AUX source and as-
signed to AUX.
About AUX connection method
You have two methods to connect auxiliary de-
vice to this unit.
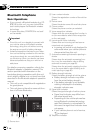
Mini pin plug cable (AUX 1)
When connecting auxiliary device using a mini
plug cable
Insert the stereo mini plug into the AUX input
jack on this unit.
! If an iPod with video capabilities is con-
nected to this unit via 3.5 mm plug (4 pole)
cable (e.g., CD-V150M), you can enjoy the
video contents of the iPod.
! It is possible to connect a portable audio/
video player by using a 3.5 mm plug (4
pole) to RCA cable, which is sold sepa-
rately. However, depending on the cable, re-
verse connection between Red (right side
audio) cable and yellow (video) cable is re-
quired. Otherwise, audio and video may not
be correctly reproduced.
% Insert the mini plug into the AUX input
jack on this unit.
For more details, refer to What’ s What on page
13.
IP-BUS-RCA interconnector (AUX 2)
When connecting auxiliary device using an IP-
BUS-RCA Interconnector (sold separately)
% Use an IP-BUS-RCA Interconnector such
as the CD-RB20/CD-RB10 (sold separetely)
to connect this unit to auxiliary device fea-
turing RCA output.
For more details, refer to the IP-BUS-RCA Inter-
connector owner’s manual.
# You can only make this type of connection if
the auxiliary device has RCA outputs.
Selecting AUX as the source
% Touch the source icon and then touch
AUX 1/AUX 2 to select AUX as the source.
# If the auxiliary setting is not turned on, AUX
cannot be selected. For more details, see Switch-
ing the auxiliary setting on page 42.
Setting the AUX title
The title displayed for the AUX source can be
changed.
! Each title can be up to 10 characters long.
1 After you have selected AUX as the
source, touch AV MENU and
FUNCTION MENU and then touch
NAME EDIT.
# When the touch panel keys are not displayed,
you can display them by touching the screen.
Operating this unit
En
49
Section
03
Operating this unit