


4
PREPARATION
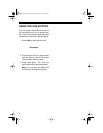
UNPACKING THE
TURNTABLE
When you remove the turntable assem-
bly with its attached dust cover from the
box, be sure to also remove the supplied
rubber mat and 45 RPM adapter before
you store the packing material.
ASSEMBLING THE
TURNTABLE
Note:
The LIN (lead in), RET (auto re-
turn), and SW (tone arm switch) screws
on the bottom of the turntable are set at
the factory and should not be adjusted.
1. Open the dust cover.
2. Rotate the turntable’s platter until
one of the platter’s two larger holes
is above the drive motor spindle on
the turntable’s upper left side.
3. Remove the tape and two ribbons
from the rubber drive belt. Be sure
the belt is not twisted.
4. Using your fingers, center the belt
on the drive motor’s spindle (against
the lower rim) so the belt is securely
seated around the spindle.
5. Plug the turntable’s power cord into
a standard AC outlet.
Caution:
To prevent electric shock,
the plug’s blades are polarized and
fit only one way. If the plug does not
fit easily, turn it over and try again.
Do not force the plug into the AC
outlet.
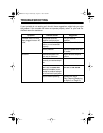
6. Remove the wire tie from the tone
arm, then press
CUE
to raise the
tone arm.
7. Press
PLAY
and let the motor rotate
the turntable six or seven times,
then press
STOP
and check the
location of the belt on the spindle.
If the belt is not securely seated
around the spindle, reposition it
properly and repeat Step 6.
Note:
If the belt slips off the spindle,
do not attempt to remove the platter.
Take it to your local RadioShack
store for assistance.
8. Unplug the turntable’s power cord
from the AC outlet.
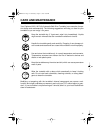
illustration from origi-
nal o/m p. 4 left column
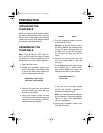
WRONG RIGHT
illustration like p. 8
w/o arrow
42-2023.fm Page 4 Wednesday, August 11, 1999 2:50 PM