


73952779 A
memorex.com
MW550
Guía del usuario
Lea estas instrucciones de forma completa
antes de operar este producto.
memorex.com
MW550
User Guide
Please read these instructions completely
before operating this product.
CAUTION: TO REDUCE THE RISK OF ELECTRIC SHOCK, DO NOT REMOVE COVER (OR BACK). NO USER-SERVICEABLE PARTS INSIDE. REFER SERVICING
TO QUALIFIED SERVICE PERSONNEL.
DANGEROUS VOLTAGE: The lightning flash with arrowhead symbol within an equilateral triangle is
intended to alert the user to the presence of uninsulated dangerous voltage within the product’s enclosure
that may be of sufficient magnitude to constitute a risk of electric shock to persons.
ATTENTION: The exclamation point within an equilateral triangle is intended to alert the user to the
presence of important operating and maintenance (servicing) instructions in the literature accompanying
the appliance.
WARNING: Users of this product are cautioned not to make modifications or changes that are not
approved by Imation Corp, doing so may void the compliance of this product and may result in the loss of
the user’s authority to operate the equipment.
CAUTION: TO PREVENT ELECTRIC SHOCK, MATCH WIDE BLADE OF PLUG TO WIDE SLOT AND FULLY INSERT.
CAUTION
RISK OF ELECTRIC SHOCK
DO NOT OPEN
This device complies with Part 15 of the FCC rules and with RSS-210 of Industry Canada. Operation is subject to the following two conditions: (1) This
device may not cause harmful interference, and (2) This device must accept any interference received, including interference that can cause undesired
operation.
NOTE: This equipment has been tested and found to comply with the limits for a Class B digital device, pursuant to part 15 of the FCC Rules. These limits
are designed to provide reasonable protection against harmful interference in a residential installation. This equipment generates, uses and can radiate radio
frequency energy and, if not installed and used in accordance with the instructions, may cause harmful interference to radio communications. However, there
is no guarantee that interference will not occur in a particular installation. If this equipment does cause harmful interference to radio or television reception,
which can be determined by turning the equipment off and on, the user is encouraged to try to correct the interference by one or more of the following
measures:
• Reorientorrelocatethereceivingantenna.
• Increasetheseparationbetweentheequipmentandreceiver.
• Connecttheequipmentintoanoutletonacircuitdifferentfromthattowhichthereceiverisconnected.
• Consultthedealeroranexperiencedradio/TVtechnicianforhelp.
• Theratinginformationislocatedatthebottomoftheapparatus.
2. Turn your mobile device on and place it within 30 feet (without barrier) of the speaker.
3. Press the Source Button until the Bluetooth Indicator LED is illuminated (blue).
4. Press the Pair Button once. You will hear a single tone. The speaker is now in Pairing mode. The Bluetooth indicator LED will blink
quickly. Upon successful connection a tune will be heard through the speaker. If pairing and connection fail or are not completed
within 3 minutes, the speaker will exit pairing mode, indicated by a long beep.
5. Refer to your mobile device for instructions on enabling Bluetooth. It is usually located in the Settings menu or similar location.
After enabling, “Memorex MW550” will appear as an option. Select it and your mobile device will pair with the Memorex MW550.
When successfully paired the Bluetooth Indicator LED will change from blinking to solidly illuminated.
Notes:
•BluetoothconnectionwillnotterminatewhentogglingbetweenBluetoothandLine-Insources.
•WhenpoweredonandinBluetoothsourcemode,thesystemwillautomaticallyconnecttothemostrecentlyconnecteddevice
if available.
Listen to Music
1. Turn your mobile device on and place it within 30 feet (without barrier) of the speaker.
2.TurnonthespeakerbyturningthePower/VolumeDialclockwiseuntilitclicks.Ifthesystemhasrecentlybeenconnectedwiththe
mobile device, the Bluetooth Indicator LED will illuminate solidly, indicating the connection. If you have not paired the mobile device
or if the indicator blinks slowly, pair them as described in the Pair a Bluetooth-Enabled Mobile Device section above.
3. Play your music on your mobile device and the sound will be heard through the speaker.
4.Thevolumecanbecontrolledusingthevolumesettingonyourmobiledevice,orviathePower/VolumeDial.Turntheknobclockwiseto
increase volume, counter-clockwise to reduce volume or to turn off the speaker.
Listen to Music Using Line-In Source
Insert one end of the audio cable (not included) into the LINE OUT jack on your external audio unit and the other end into the Line-In Jack
on the rear of this unit. With the output device and the MW550 turned on, press the Source Button to select Line-In mode. The
Line-In Indicator LED will be lit. The external audio unit’s output will be heard through the system’s speaker. If you wish to listen to the
Bluetooth-enabled mobile device, press the Source Button to select Bluetooth mode. The Bluetooth LED will illuminate.
To maximize audio quality and minimize sound distortion, set your personal digital music device volume to high and use the volume
control on the MW550 speaker to adjust the listening level.
Sleep Mode
•Theunitenterssleepmodeafter20minuteswithoutaline-insignaloraudiostreamingsignalfromaBluetoothconnection.
The Bluetooth connection is terminated and indicated by a tone.
•Duringsleepmode,theunitwillautomaticallypowerupifaline-inaudiosignalisdetected.Itcanalsobereactivatedbypressingany
buttons,orbyrotatingthePower/VolumeDialto“off”,then“on”again.
Note: The system will automatically try to connect to the most recently connected device if available.
Speakerphone
INCOMING CALLS
1. When a call is received with the mobile device paired and the speaker on, the music will pause and a ring tone will be emitted through
the speaker.
2. Press the Button to answer the call. The speaker and built-in microphone will activate automatically.
3. Press the Button twice to end the call and return to your music.
Notes:
•Simplyansweryourphoneasyounormallywouldtobypassspeakerphoneoperation.
•Ifthephoneringsandyoudonotwanttoanswer,pressandholdtheButton.Thecallwillbedeclinedandthemusic
will continue.
OUTGOING CALLS
1. Press the Button twice to automatically redial the last phone number on your smartphone.
CURRENT CALLS
1. Press Button once during a phone call to activate or deactivate speakerphone functionality.
2. Press Button twice to end a call and return to your music.
Charging
Insert one end of a USB cable (not included) into the USB port on the external audio device and the other end into the “USB Charge Only”
Port on the rear of this unit. The USB Port provides one 5V (1 amp) to charge the external audio device, even when the MW550 unit
is powered off.
•Chargecapabilitiesaredeactivatedwhentheunitisoperatinginbatterymode.
MAINTAINING YOUR SYSTEM FOR CONTINUED ENJOYMENT
• TurnOFFtheMW550andyourexternalaudio/mobiledevicewhennotinusetoextendbatterylife.
•Keeptheunitawayfromdirectsunlightandexcessiveheat.
•Protectyourfurniturewhenplacingtheunitonwoodandlacqueredfinishes.
SURGE PROTECTORS: It is recommended to use a surge protector for AC connection. Lightning and power surges ARE NOT covered under warranty for
this product.
Imation Enterprises Corp
1 Imation Way, Oakdale, MN 55128-3414 USA
© Imation Corp www.memorex.com
Memorex and the Memorex logo are trademarks of Imation Corp and its affiliates. The Bluetooth
®
word mark and logos are registered trademarks owned by
Bluetooth SIG, Inc. and any use of such marks by Imation Corp is under license. All other trademarks are the property of their respective owners.
For additional setup, operating assistance or an electronic version of this user manual, please visit www.memorex.com
For consumer replaceable part(s), verify part number(s) then contact our parts and accessory fulfillment center at: 1-800-321-6993
ADVERTENCIA: PARA EVITAR EL RIESGO DE INCENDIO O DESCARGA, NO EXPONGA ESTA UNIDAD A LA LLUVIA O LA HUMEDAD.
Este aparato digital de Clase B cumple con la norma canadiense ICES-003. Cet appareil numérique de la classe B est conforme à la norme NMB-003 du Canada.
PRECAUCIÓN
RIESGO DE DESCARGA
ELÉCTRICA NO ABRIR
PRECAUCIÓN: PARA REDUCIR EL RIESGO DE DESCARGA ELÉCTRICA, NO QUITE LA CUBIERTA (NI LA PARTE TRASERA). NO CONTIENE PIEZAS EN EL
INTERIOR QUE PUEDAN SER REPARADAS POR EL USUARIO. EL MANTENIMIENTO DEBE SER REALIZADO POR PERSONAL DE MANTENIMIENTO CALIFICADO.
VOLTAJE PELIGROSO: El rayo con el símbolo de la punta de flecha dentro de un triángulo equilátero tiene
como objetivo advertir al usuario acerca de la presencia de voltaje no aislado peligroso dentro de la caja del
producto que puede ser de magnitud suficiente para generar un riesgo de descarga eléctrica para las personas.
ATENCIÓN: El signo de exclamación dentro de un triángulo equilátero tiene como objetivo alertar al usuario
acerca de la presencia de instrucciones de funcionamiento y mantenimiento (servicio) importantes en la
bibliografía que acompaña a la aplicación.
ADVERTENCIA: Los usuarios de este producto están advertidos de que no deben realizar modificaciones o
cambios que no estén aprobados por Imation Corp. Al hacerlo, pueden anular el cumplimiento de este producto y
tener como resultado la pérdida de la autoridad del usuario para hacer funcionar el equipo.
Precaución: para evitar descargas eléctricas, una la clavija ancha del enchufe con la ranura ancha e insértela por completo.
Este dispositivo cumple con la sección 15 de las normas de la FCC y la norma RSS-210 de Industry Canada. El funcionamiento está sujeto a las dos
condiciones siguientes: (1) Este dispositivo no puede causar interferencias perjudiciales y (2) este dispositivo debe aceptar cualquier interferencia recibida,
incluidas las interferencias que puedan ocasionar un funcionamiento no deseado.
NOTA: Este equipo ha sido probado y cumple con los límites correspondientes a un dispositivo digital Clase B, según la parte 15 de las Normas de FCC.
Estos límites están diseñados para proporcionar una protección razonable contra la interferencia dañina en una instalación residencial. Este equipo genera,
utiliza y puede irradiar energía de radiofrecuencia y, si no se instala y usa de acuerdo con las instrucciones, puede generar interferencia perjudicial en
las comunicaciones de radio. Sin embargo, no se garantiza que la interferencia no se produzca en una instalación en particular. Si este equipo genera
interferencia perjudicial en la recepción de radio o televisión, que puede determinarse encendiendo y apagando el equipo, se recomienda al usuario que
intente corregir la interferencia mediante una o más de las siguientes medidas:
• Vuelvaaorientaroubicarlaantenareceptora.
• Aumentelaseparaciónentreelequipoyelreceptor.
• Conecteelequipoauntomacorrientedeuncircuitodistintodelqueestáconectadoelreceptor.
• ConsulteconeldistribuidoroconuntécnicoderadiooTVexperimentadoparaobtenerasistencia.
• Lainformacióndeclasificaciónseencuentraenlaparteinferiordelaparato
PROTECTORES CONTRA SOBRETENSIÓN: Se recomienda utilizar un protector contra sobretensión para la conexión de CA. Los casos de sobretensión
de energía y rayos NO ESTÁN cubiertos por la garantía de este producto.
Wireless Speaker
Portable
I’ll Take Your Tunes Anywhere
Altavoz inalámbrico
1. Read these Instructions.
2. Keep these Instructions.
3. Heed all Warnings.
4. Follow all Instructions.
5. Do not use this apparatus near water.
6. Clean only with a dry cloth.
7. Do not block any of the ventilation openings. Install in accordance
with the manufacturer’s instructions.
8. Do not install near any heat sources such as radiators, heat
registers, stoves, or other apparatus (including amplifiers) that
produce heat.
9. Do not defeat the safety purpose of the polarized or grounding-type
plug. A polarized plug has two blades with one wider than the other.
A grounding-type plug has two blades and a third grounding prong.
The wide blade or the third prong are provided for your safety. When
the provided plug does not fit into your outlet, consult an electrician
for replacement of the obsolete outlet.
10. Protect the power cord from being walked on or pinched particularly
at plugs, convenience receptacles, and the point where they exit
from the apparatus.
11. Onlyuseattachments/accessoriesspecifiedbythemanufacturer.
12. Unplug this apparatus during lightning storms or when unused for long
periods of time.
13. Refer all servicing to qualified service personnel. Servicing is required
when the apparatus has been damaged in any way, such as power-
supply cord or plug is damaged, liquid has been spilled or objects have
fallen into the apparatus, the apparatus has been exposed to rain or
moisture, does not operate normally, or has been dropped.
14. WARNING: To reduce the risk of fire or electric shock, do not expose
this apparatus to rain or moisture. Do not place objects filled with
water, such as a vase, on the apparatus.
15. The AC mains plug is used as the power disconnect device and it
should remain readily accessible and operable during intended use. In
order to completely disconnect the apparatus from power, the mains
plug should be completely removed from the AC outlet socket.
16. CAUTION: To reduce the risk of fire or explosion, do not expose
batteries to excessive heat such as sunshine, fire or other heat
sources.
IMPORTANT SAFETY INSTRUCTIONS
WARNING: TO PREVENT FIRE OR SHOCK HAZARD, DO NOT EXPOSE THIS UNIT TO RAIN OR MOISTURE.
This Class B digital apparatus complies with Canadian ICES-003. Cet appareil numérique de la classe B est conforme à la norme NMB-003 du Canada.
BATTERY PRECAUTIONS
Follow these precautions when using batteries in this device:
1. Warning – Danger of explosion if battery is incorrectly replaced. Replace only with the same or equivalent type.
2. Use only the size and type of batteries specified.
3. Be sure to follow the correct polarity when installing the batteries as indicated in the battery compartment. A reversed battery may cause damage to
the device.
4. Do not mix different types of batteries together (e.g. Alkaline, Rechargeable and Carbon-zinc) or old batteries with fresh ones.
5. If the device is not to be used for a long period of time, remove the batteries to prevent damage or injury from possible battery leakage.
6. Do not try to recharge a battery not intended to be recharged; it can overheat and rupture. (Follow battery manufacturer’s directions.)
7. Remove batteries promptly if consumed.
8. Clean the battery contacts and also those of the device prior to battery installation.
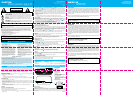
4
1
1
2
10
3
8
5
7
7
7
4
Congratulations on your purchase of the Memorex Portable Wireless Speaker! The MW550, with built-in Bluetooth
®
wireless
technology, makes it easy to take your tunes anywhere. Its full stereo audio produces rich, balanced sound with enhanced bass for a
music experience you can hear AND feel. The built-in microphone lets you take hands-free calls when your phone is connected to the
speaker, and the USB charging port powers your device when connected to AC power. With easy to use controls and super simplified
device pairing, your music is just a beat away. Please follow these operational instruction carefully. Save them for future reference.
AC CONNECTION
Insert the small end of the AC adapter in the DC IN 5V Jack located on the rear of the unit. Plug the other end into a wall outlet having
120V AC, 60Hz.
Notes:
•RemovetheDCplugandtheAC-INplugtodisconnecttheACadapterwhennotinuse.
•OnlyusethesuppliedDC5V,2AACadapter.Othervoltagescoulddamagetheproduct.
BATTERY INSTALLATION
You can use to batteries to power this unit.
1. Open the Battery Compartment Door on the bottom of the unit by sliding i
n direction 1, then lifting it off in direction 2.
2. Insert four (4) “AA” size batteries (not included) into the battery compartment. Be sure to check that the “+” and “-” ends of the batteries
are aligned with the engraving inside the battery compartment. Alkaline batteries are recommended for the longest playing time.
3. Close the battery compartment cover.
Note: The AC adapter must be disconnected from the DC IN 5V Jack in order for the unit to operate on battery power.
OPERATION
Pair a Bluetooth-Enabled Mobile Device
You can listen to your music from a Bluetooth-enabled mobile device wirelessly through this system.
Pair the mobile device as follows:
1.TurnonthespeakerbyturningthePower/VolumeDialclockwiseuntilitclicks.
HOW TO USE THE MEMOREX MW550
9
1
11
AA
AA
1
2
BOTTOM
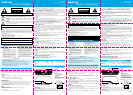
FRONT/TOP
BACK
Front/top image and back of unit image
1.Power/VolumeDial
2. Button
3. Pair Button
4. Source Button
5. Line-In Indicator LED
6. Microphone
7. Bluetooth Indicator LED
8. Line-In Jack
9. DC IN 5V Jack (AC ADAPTER PART
NO. E18-00810-02*)
10. USB Charge Port
11. Battery Compartment (bottom of unit)
(BATTERY COVER PART NO. P14-00289-01*)
* Consumer Replaceable Part (See end of guide to order.)
LOCATION OF CONTROLS
SPECIFICATIONS AND COMPATIBILITY
Power Source (AC) ............................................5V, 2A adapter
Power Source (DC) ............................4 “AA” size 1.5V batteries
Speaker.................................................................2 x 4 ohms
Output Power...............................................................2 x 2W
Weight ............................................................ approx. 2.2 lbs
Dimensions ...................10.12 in (L) x 6.02 in (H) x 3.31 in (W)
Compatibility ................. compatible with v2.1 Bluetooth devices
pair source
Line-in
USB charge onlyDC in Line-in
7
6
4
5
1
9 8
2
3
11
10
1. Lea estas instrucciones.
2. Conserve estas instrucciones.
3. Preste atención a todas las advertencias.
4. Siga todas las instrucciones.
5. No utilice este aparato cerca de agua.
6. Limpie sólo con un paño seco.
7. No bloquee ninguna de las aberturas de ventilación. Instale el
producto de acuerdo con las instrucciones del fabricante.
8. No instale el producto cerca de fuentes de calor, como radiadores,
rejillas de calefacción, estufas u otros aparatos (incluidos los
amplificadores) que generen calor.
9. No rechace el objetivo de seguridad del enchufe polarizado o de
conexión a tierra. Un enchufe polarizado tiene dos clavijas: una más
ancha que la otra. Un enchufe de conexión a tierra posee dos clavijas
y una tercera prolongación de conexión a tierra. La clavija ancha y
la tercera clavija se proporcionan para su seguridad. Si el enchufe
proporcionado no encaja en su tomacorriente, comuníquese con un
electricista para reemplazar el tomacorriente obsoleto.
10. Proteja el cable de alimentación de pisadas o pinchaduras, en
particular en los enchufes, los tomacorrientes y el punto de donde
salen del aparato.
11.Utilicesólodispositivos/accesoriosespecificadosporelfabricante.
12. Desconecte el aparato durante las tormentas eléctricas o cuando no se
utilice durante un período prolongado.
13. El mantenimiento debe ser llevado a cabo por personal de
mantenimiento calificado. Se requiere mantenimiento si el aparato se
dañó de alguna forma; por ejemplo, si se derramó líquido o cayeron
objetos dentro del aparato, si se expuso a la lluvia o a la humedad, si se
cayó, si no funciona normalmente o si se dañó el cable de alimentación
o el enchufe.
14. ADVERTENCIA: Para reducir el riesgo de incendio o descarga eléctrica,
no exponga este aparato a la lluvia o a la humedad. No coloque objetos
con líquidos (p. ej., jarrones) sobre el aparato.
15. El cable de alimentación de CA es el dispositivo para desconectar la
corriente; por lo tanto, debe estar al alcance de la mano y se debe
poder manejar durante el uso previsto. Para desconectar el aparato de
la corriente, el cable de alimentación se debe quitar completamente del
tomacorriente de CA.
16. PRECAUCIÓN: Para reducir el riesgo de incendio o explosión, no
exponga las pilas a calor excesivo, como la luz solar directa, el fuego u
otras fuentes de calor.
PRECAUCIONES DE LAS PILAS
Cuando utilice pilas en el aparato, siga las siguientes indicaciones:
1. Advertencia: Peligro de explosión si se colocan las pilas incorrectamente. Reemplace sólo con pilas equivalentes o del mismo tipo.
2. Utilice sólo el tamaño y tipo de pilas especificados.
3. Cuando instale las pilas en su compartimiento, asegúrese de respetar la polaridad correcta, como se indica. Una pila colocada al revés puede
provocar daños en el dispositivo.
4. No mezcle distintos tipos de pilas (por ejemplo, alcalinas, recargables y de carbono-zinc) ni mezcle pilas viejas con nuevas.
5. Si no va a utilizar el equipo por un largo período de tiempo, extraiga las pilas para evitar daños o lesiones con posibles fugas.
6. No intente recargar una pila que no sea recargable, ya que ésta puede sobrecalentarse y romperse. (Siga las instrucciones del fabricante de la pila).
7. Cuando las pilas se agoten, extráigalas lo antes posible.
8. Antes de instalar las pilas, limpie los dos contactos de la pila y también los del dispositivo.
INSTRUCCIONES IMPORTANTES DE SEGURIDAD
73952779 A
3. Presione el botón Source (Fuente)
4
hasta que se encienda el LED indicador de Bluetooth
7
(azul).
4. Presione el botón Pair (Emparejar)
3
una vez. Escuchará un tono único. El altavoz ahora está en modo de emparejamiento. El
LED indicador de Bluetooth parpadeará rápidamente. Al conectarse exitosamente, se escuchará un tono a través del altavoz. Si el
emparejamiento y la conexión fallan o no se completan en 3 minutos, el altavoz saldrá del modo de emparejamiento, indicado por
un tono largo.
5. Consulte su dispositivo móvil para ver instrucciones sobre la activación de Bluetooth. Usualmente se ubica en el menú de
Configuración o en una ubicación similar. Una vez activado, aparecerá “Memorex MW550” como opción. Seleccione esa opción y su
dispositivo móvil se emparejará con Memorex MW550. Cuando se haya emparejado con éxito, el LED indicador de Bluetooth dejará de
parpadear y se mantendrá encendido de forma permanente.
Notas:
•LaconexióndeBluetoothnosecancelaráalalternarentrelafuentedeBluetoothydeLine-In(entradadelínea).
•CuandoestáencendidoyenmododefuenteBluetooth,elsistemaautomáticamenteseconectaráconelúltimodispositivo
conectado si se encuentra disponible.
Escuchar música
1. Encienda su dispositivo móvil y colóquelo dentro de un radio de alrededor de 30 pies (9 m) (sin obstáculos) del altavoz.
2.EnciendaelaltavozgirandoelindicadorPower/Volume(Encendido/Volumen)
1
en el sentido de las agujas del reloj hasta escuchar
un chasquido. Si el sistema se ha conectado recientemente con un dispositivo móvil, el LED indicador de Bluetooth
7
se iluminará de
forma permanente, indicando la conexión. Si no ha emparejado el dispositivo móvil o si el indicador parpadea lentamente, empareje el
sistema tal como se describe en la sección Emparejar un dispositivo móvil con Bluetooth activado anterior.
3. Reproduzca la música de su dispositivo móvil y el sonido se escuchará desde el altavoz.
4.Elvolumensepuedecontrolarusandoelajustedevolumendesudispositivomóvil,opormediodelindicadorPower/Volume
(Encendido/Volumen).Girelaperillaenelsentidodelasagujasdelrelojparasubirelvolumen;hágaloensentidocontrarioalasagujas
del reloj para reducir el volumen o apagar el altavoz.
Escuchar música usando la fuente Line-In (entrada de línea)
Inserte un extremo del cable de audio (que no se incluye) en el enchufe LINE OUT (SALIDA DE LÍNEA) del equipo de audio externo y el
otro extremo en el enchufe Line-In (Entrada de línea)
8
de la parte trasera de esta unidad. Con el dispositivo de salida y el dispositivo
MW550 encendido, presione el botón Source (Fuente)
4
para seleccionar el modo Line-In (Entrada de línea). Se encenderá el LED
indicador de Line-In (Entrada de línea)
5
. El sonido de salida del equipo de audio externo se escuchará a través de los altavoces del
sistema. Si desea escuchar el dispositivo móvil con Bluetooth activado, presione el botón Source (Fuente) para seleccionar el modo
Bluetooth. El LED de Bluetooth
7
se encenderá.
Para maximizar la calidad del audio y minimizar la distorsión del sonido, configure el volumen de su dispositivo personal de música digital
en “alto” y use el control de volumen en el altavoz MW550 para ajustar el nivel del sonido.
Modo de suspensión
•Launidadentraenelmododesuspensióndespuésde20minutossinseñalenlaentradadelíneaoseñaldetransmisióndeaudio
desde una conexión de Bluetooth. La conexión de Bluetooth se cancela y esto se indica con un tono.
•Duranteelmododesuspensión,launidadseencenderáautomáticamentesidetectaunaseñaldeentradadelínea.Tambiénsepuede
reactivarpresionandocualquierbotón,ogirandoelindicadorPower/Volume(Encendido/Volumen)
1
a la posición “off” (apagado) y
luego “on” (encendido) nuevamente.
Nota: El sistema automáticamente intentará conectarse con el último dispositivo conectado si está disponible.
Teléfono con altavoz
LLAMADAS ENTRANTES
1. Cuando recibe una llamada con el dispositivo móvil emparejado y el altavoz encendido, la música se pausará y se emitirá un tono de
llamada a través del altavoz.
2. Presione el botón
2
para responder la llamada. El altavoz y el micrófono incorporado se activarán automáticamente.
3. Presione el botón
dos veces para finalizar la llamada y volver a la música.
Notas:
•Simplementeatiendasuteléfonocomoloharíanormalmenteparaevitarelfuncionamientodelaltavozdurantelallamada.
•Sielteléfonosuenayustednodeseaatender,presioneymantengapresionadoelbotón
. La llamada será rechazada y la
música continuará.
LLAMADAS SALIENTES
1. Presione el botón dos veces para volver a marcar automáticamente el último número de teléfono en su teléfono inteligente.
LLAMADAS ACTUALES
1. Presione el botón una vez durante una llamada telefónica para activar o desactivar la funcionalidad del teléfono con altavoz.
2. Presione el botón
dos veces para finalizar una llamada y volver a la música.
Carga
Inserte un extremo de un cable USB (no incluido) en el puerto USB del dispositivo de audio externo y el otro extremo en el puerto “Solo
carga USB”
10
en la parte trasera de esta unidad. El puerto USB suministra 5 V (1 A) para cargar el dispositivo de audio externo, incluso
cuando la unidad MW550 está apagada.
•Lascapacidadesdecargasedesactivancuandolaunidadfuncionaenmododebatería.
MANTENER SU SISTEMA PARA UN ENTRETENIMIENTO DURADERO
• APAGUEelMW550ysudispositivodeaudioexterno/dispositivomóvilcuandonoestéenusoparaextenderlavidaútildelasbaterías.
•Mantengalaunidadalejadadelaluzsolardirectaydelcalorexcesivo.
•Protejasusmueblescuandocoloquelaunidadsobresuperficiesdemaderaolacadas.
Imation Enterprises Corp.
1 Imation Way, Oakdale, MN 55128-3414 EE. UU.
© Imation Corp www.memorex.com
Memorex y el logotipo de Memorex son marcas comerciales de Imation Corp. y sus afiliados. La marca y los logotipos Bluetooth
®
son marcas registradas
propiedad de Bluetooth SIG, Inc. y el uso de tales marcas por Imation Corp ha sido autorizado bajo licencia. Todas las demás marcas comerciales pertenecen a
sus respectivos propietarios.
Para obtener asistencia operativa o de configuración adicional, o una versión electrónica de este manual del usuario, visite www.memorex.com.
En el caso de las piezas que puede reemplazar el consumidor, verifique los números de pieza y luego comuníquese con el centro de distribución de piezas y
accesorios llamando al: 1-800-321-6993
¡Felicitaciones por comprar el altavoz inalámbrico portátil Memorex! El MW550, con tecnología inalámbrica Bluetooth
®
incorporada,
le permite llevar sus melodías a todas partes. Su audio completamente estéreo produce un sonido intenso y balanceado con graves
mejorados para una experiencia de música que podrá escuchar Y sentir. El micrófono incorporado le permite realizar llamadas de
manos libres cuando su teléfono está conectado al altavoz y el puerto de carga USB enciende su dispositivo cuando se conecta a la
corriente de CA. Con controles fáciles de usar y un emparejamiento de dispositivos supersimplificado, su música está a tan solo un
acorde de distancia. Siga estas instrucciones de funcionamiento con atención. Consérvelas para referencia futura.
CONEXIÓN DE CA
Inserte el extremo pequeño del adaptador de CA en el enchufe de entrada de CC (DC IN) de 5 V
9
ubicado en la parte trasera de la
unidad. Conecte el otro extremo en un tomacorriente de CA de 120 V, 60 Hz.
Notas:
•RetireelconectordeCCyelconectordeentradadeCAparadesconectareladaptadorCAcuandonoestéenuso.
•UsesolamenteeladaptadordeCCde5VodeCAde2Aprovisto.Otrosvoltajespodríandañarelproducto.
INSTALACIÓN DE LAS BATERÍAS
Puede utilizar baterías para alimentar esta unidad.
1. Abra la puerta del compartimiento para las baterías
11
en la parte inferior de la unidad deslizándolo en la dirección 1 y luego
levantándolo en la dirección 2.
2. Inserte cuatro (4) baterías de tamaño “AA” (no incluidas) en el compartimiento para baterías. Asegúrese de verificar que los extremos “+”
y “-” de las baterías estén alineados con la indicación grabada dentro del compartimiento para baterías. Se recomiendan las baterías
alcalinas para un mayor tiempo de reproducción.
3. Cierre la tapa del compartimiento para baterías.
Nota: Para que la unidad funcione con las baterías, se debe desconectar el adaptador de CA del enchufe de entrada de CC (DC IN) de 5 V.
FUNCIONAMIENTO
Emparejar un dispositivo móvil con Bluetooth activado
Puede escuchar su música desde un dispositivo móvil con Bluetooth activado de manera inalámbrica a través de este sistema.
Empareje el dispositivo móvil siguiendo las instrucciones a continuación:
1.EnciendaelaltavozgirandoelindicadorPower/Volume(Encendido/Volumen)
1
en el sentido de las agujas del reloj hasta escuchar
un chasquido.
2. Encienda su dispositivo móvil y colóquelo dentro de un radio de alrededor de 30 pies (9 m) (sin obstáculos) del altavoz.
CÓMO USAR EL SISTEMA MW550 DE MEMOREX
AA
AA
1
2
PANEL INFERIOR
PANELFRONTAL/SUPERIOR
PANEL TRASERO
Imagen del panel frontal/superior y panel trasero
de la unidad
1.IndicadorPower/Volume(Encendido/Volumen)
2. Botón
3. Botón Pair (Emparejar)
4. Botón Source (Fuente)
5. LED indicador de Line-In (Entrada de línea)
6. Micrófono
7. LED indicador de Bluetooth
8. Enchufe Line-In (Entrada de línea)
9. ENCHUFE DE ENTRADA DE CC (DC IN) 5 V
(ADAPTADOR DE CA PIEZA N.° E18-00810-02*)
10. Puerto de carga USB
11. Compartimiento para baterías (parte inferior de la
unidad) (TAPA DEL COMPARTIMIENTO PARA
BATERÍAS, NÚMERO DE PIEZA P14-00289-01*)
* Pieza reemplazable por el usuario (Consulte la última parte de
la guía para encargarla).
UBICACIÓN DE LOS CONTROLES
ESPECIFICACIONES Y COMPATIBILIDAD
Fuente de alimentación (CA) ....................adaptador de 5 V, 2 A
Fuente de alimentación (CC) ....4 baterías de 1,5 V tamaño “AA”
Altavoz ............................................................... 2 x 4 ohmios
Potencia de salida ........................................................2 x 2W
pair source
Line-in
USB charge onlyDC in Line-in
7
6
4
5
1
9 8
2
3
11
10
Portátil
Llevaré tus melodías a todas partes
Peso ...................................................................Aprox. 2,2 lb
Dimensiones .............10,12 pulg. [25,7 cm] (largo) x 6,02 pulg.
[15,3 cm] (alto) x 3,31 pulg. [8,4 cm] (ancho)
Compatibilidad .compatible con dispositivos con Bluetooth v. 2.1