


Line 6 GearBox 3.1 – Basic Features Guide
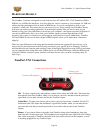
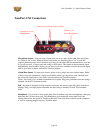
if you are not sure). Connect each mic using an XLR cable. This inputs each microphone signal
independently into GearBox where you can choose your tone, and then route the processed signal
both to your audio software and out the TonePort outputs.
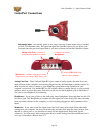
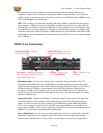
Guitar/Bass Input -To connect your electric guitar or bass, plug it into this input. This
connection routes the instrument’s signal into GearBox where you can choose your tone and route
the processed signal both to your audio software and out the TonePort outputs. This input also
features a Pad switch; engage this switch when using a guitar/bass with high-output or active
pickups, to avoid overdriving the input.
Headphones - If you want to listen to the audio from TonePort using stereo headphones, then
plug them into this 1/4-inch stereo jack. This Headphone jack outputs the same signal fed to the
Analog Outs on the rear panel of TonePort; the audio from your audio software on the computer,
as well as anything plugged into any TonePort input.
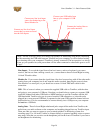
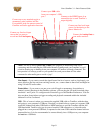
Line Inputs - if you want to record the signal from a line level source, such as a keyboard, your
stereo receiver, the line out from a mixing console, etc., connect them to these Left and Right ins
using 1/4-inch TS audio cables.
*Note – be sure to always power off or mute your speakers or monitoring setup before
connecting and disconnecting the USB cable between TonePort and your computer, as well
as before booting up or shutting down your computer if TonePort is already connected. The
best practice is to always power on your speakers last, and power them off first when
connected to other audio gear to avoid a “pop”.
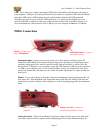
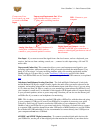
Footswitches - if you want to use one or two on/off toggle or momentary footswitches to
remotely control functions in the GearBox software, you can plug the 1/4-inch footswitch plugs
into these 1 and 2 jacks. To configure each Footswitch, go to the GearBox Preferences. You can
also use these footswitches to trigger recording and playback commands within the included
Ableton Live Lite 5 software!
Expression Pedal - Connect a 1/4-inch TS expression pedal to control Volume, Wah or any other
MIDI CC parameter in GearBox or your recording application. To configure the expression
pedal, go to the GearBox preferences .
USB - This of course is where you connect the supplied USB cable to TonePort, with the other
end going to your computer’s USB port. Note that you should always connect to a separate USB
controller channel from other USB audio or MIDI interfaces to provide TonePort with the full
USB bandwidth. TonePort also gets its power from this USB connection, so it should not be
plugged into a non-powered USB hub, or operated on the same USB controller channel with un-
powered devices. It is also recommended to connect directly into a USB port on your computer
and not into a USB hub.
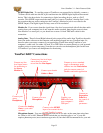
S/PDIF Digital Out - To send the output of TonePort to an external device digitally, connect a
75-Ohm coaxial cable into this RCA jack and then into the S/PDIF digital input on the external
device. This is the best choice for connecting to digital recording devices, such as a DAT
recorder. This S/PDIF output sends the same audio as is sent to TonePort’s Analog Outs* (with
the exception that any audio coming into the TonePort’s Monitor In jack is not routed to the
S/PDIF output). The digital signal is always sent at 24-bit resolution.
Page 33