


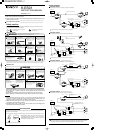
PEAK POWER 160W Upgrade SpeakerSEPARATE CUSTOM FIT SPEAKER K-ES01
INSTRUCTION MANUAL
• Installation
example C
• Installation
example D
Depending on vehicle type, you may install
using -Attachment.
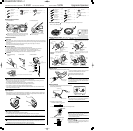
1
Tapping screw
· · · · · × 8
(φ6×20mm)
2
Tapping screw
· · · · · × 8
(φ5×20mm)
3
Tapping screw
· · · · · × 8
(φ4×20mm)
4
Machine screw
· · · · · × 8
(M4×12mm)
5
Self-tapping screw
· · × 6
(φ6×20mm)
6
Washer
· · · · · · · · · · × 8
(φ6)
7
Washer
· · · · · · · · · · × 8
(φ4)
8 Erectro-tap · · · · · · · × 8
9
Sealing tape
· · · · · · · × 2
(thin)
0
Sealing tape
· · · · · · · × 2
(thick)
- Attachment · · · · · · · × 8
= Spacer (rubber) · · · · × 2
~ Connection cord · · · × 2
Parts included (for woofer)
Check that the following parts for the woofer are provided with the product.
Mounting location for woofer
Refer to "Woofer connections" for the connection of vehicle connector and ~Connection cord.
• Installation
example A
• Installation
example B
Vehicle connector
Connect by using
~Connection cord and
8Electro-tap
6 or 7Washer
Factory or
provided screw
Vehicle connector
Connect by using
~Connection cord and
8Electro-tap
6 or 7Washer
-Attachment
Factory or
provided screw
Vehicle connector
Connect by using
~Connection cord and
8Electro-tap
5Tapping screw
Vehicle
connecto
Connect by using
~Connection cord and
8Electro-tap
6 or 7Washer
=Spacer
Factory or
provided screw
Face "side A" to
speaker side and install it.
Depending on vehicle type, you may install
using 5Tapping screw. (When the factory
speaker is being fixed by rivets, the rivets
must be cut.)
Depending on vehicle type, you may install
using 6 or 7Washer.
Depending on vehicle type, you may install
using =Spacer. (Face "side A" to speaker
side and install it.)
Installation preparation Stick 9 and 0Sealing tape, in order to prevent vibration and leak.
0Sealing tape (thick)
Stick 0Sealing tape after fixing the speaker by screws.
9Sealing tape (thin)
• Stick 9 and 0Sealing tape
Be sure to install prod-
uct using provided seal-
ing tape. Installing with-
out using sealing tape
may cause water leak
into a vehicle.
Installation for tweeter
Before work
• Before making holes, check the mounting space with the supplied template (in the inner flap of the carton box).
• To prevent noise pick-up, keep the wiring of this unit away from motors, high voltage leads and other possible
noise sources.
• To prevent short-circuiting, keep all wiring away from moving parts, sharp edges, cut metal, etc.
• Do not switch power ON until wiring is completed.
Installation procedure
1. Select the mounting position, referring to "Mounting location for tweeter".
2. Place the supplied template on the selected position and mark the hole positions with a felt-tip pen.
3. Cut out a hole for letting the cord pass, and make screw holes in the position of the mark.
4. Install 4Mounting bracket using 1 or 2Tapping screw, 3Speed nut and 5Double-faced tape.
5. Join the projections of 4Mounting bracket to the holes at the bottom of a tweeter.
Installation
Caution
• Install the tweeter so that it will not come in contact with the window glass etc.
• When you check the mounting space, check that there is no contact by opening and closing of a door, or
no interference with safeguards, such as an air bag.
• Be careful not to damage the tank and hose, in the case of processing work.
• Do not install the tweeters in locations which may be subject to water or hot air.
• Fix the tweeter in a position which does not hinder the driving operations.
• Do not use any parts other than specified. (Otherwise imperfect installation may cause the tweeter instal-
lation to loosen, and cause it to drop.)
Caution
• Do not adjust to an impossible angle.
• Do not hold front side or cord of the tweeter when adjusting.
• The tweeter adjustment should be operated after having stopped the vehicle at a safe place.
Parts included (for tweeter)
Check that the following parts for the tweeter are provided with the product.
Mounting location for tweeter
1. On the dashboard 2. On the door panel
It may be unable to mount on the door
of some vehicle types.
1
Tapping screw
· · · · · × 4
(φ3×10mm)
2
Tapping screw
· · · · · × 4
(φ3×16mm)
3
Speed nut
· · · · · · · · × 4
(φ3)
4 Mounting bracket · · × 2
5
Double-faced
· · · · · · × 2
tape
6 Connection cord · · · × 2
7
Sound Level
· · · · · · × 2
Adjuster
1. Select the mounting
position.
2. Make holes. 3. Mount tweeter.
Tweeter
1 or
2Tapping screw
4Mounting
bracket
5Double-faced
tape
3Speed nut
Angle adjustment
• After installation, you can adjust direction of this tweeter to an optimum angle for better music
reproduction. As shown in figure, hold the side of the tweeter, change direction of the tweeter slow-
ly, and decide the direction with the best balance of L and R.
Frequent direction adjustment and impossible adjustment may not maintain direction of the
tweeter.
Warning
• When a vehicle has been left under direct sunlight, the surface temperature of the tweeter may rise to a
considerable level. Keep in mind that there is danger of a burn if it is touched.
Decrease enough the internal temperature of a vehicle before adjusting.
Hold the side.
Please face the tweeter on the side of the driver's seat towards
the direction of the passenger seat, and face the tweeter on the
side of the passenger seat towards the driver's seat side.
Set the arrow of the template in the direction of sound.
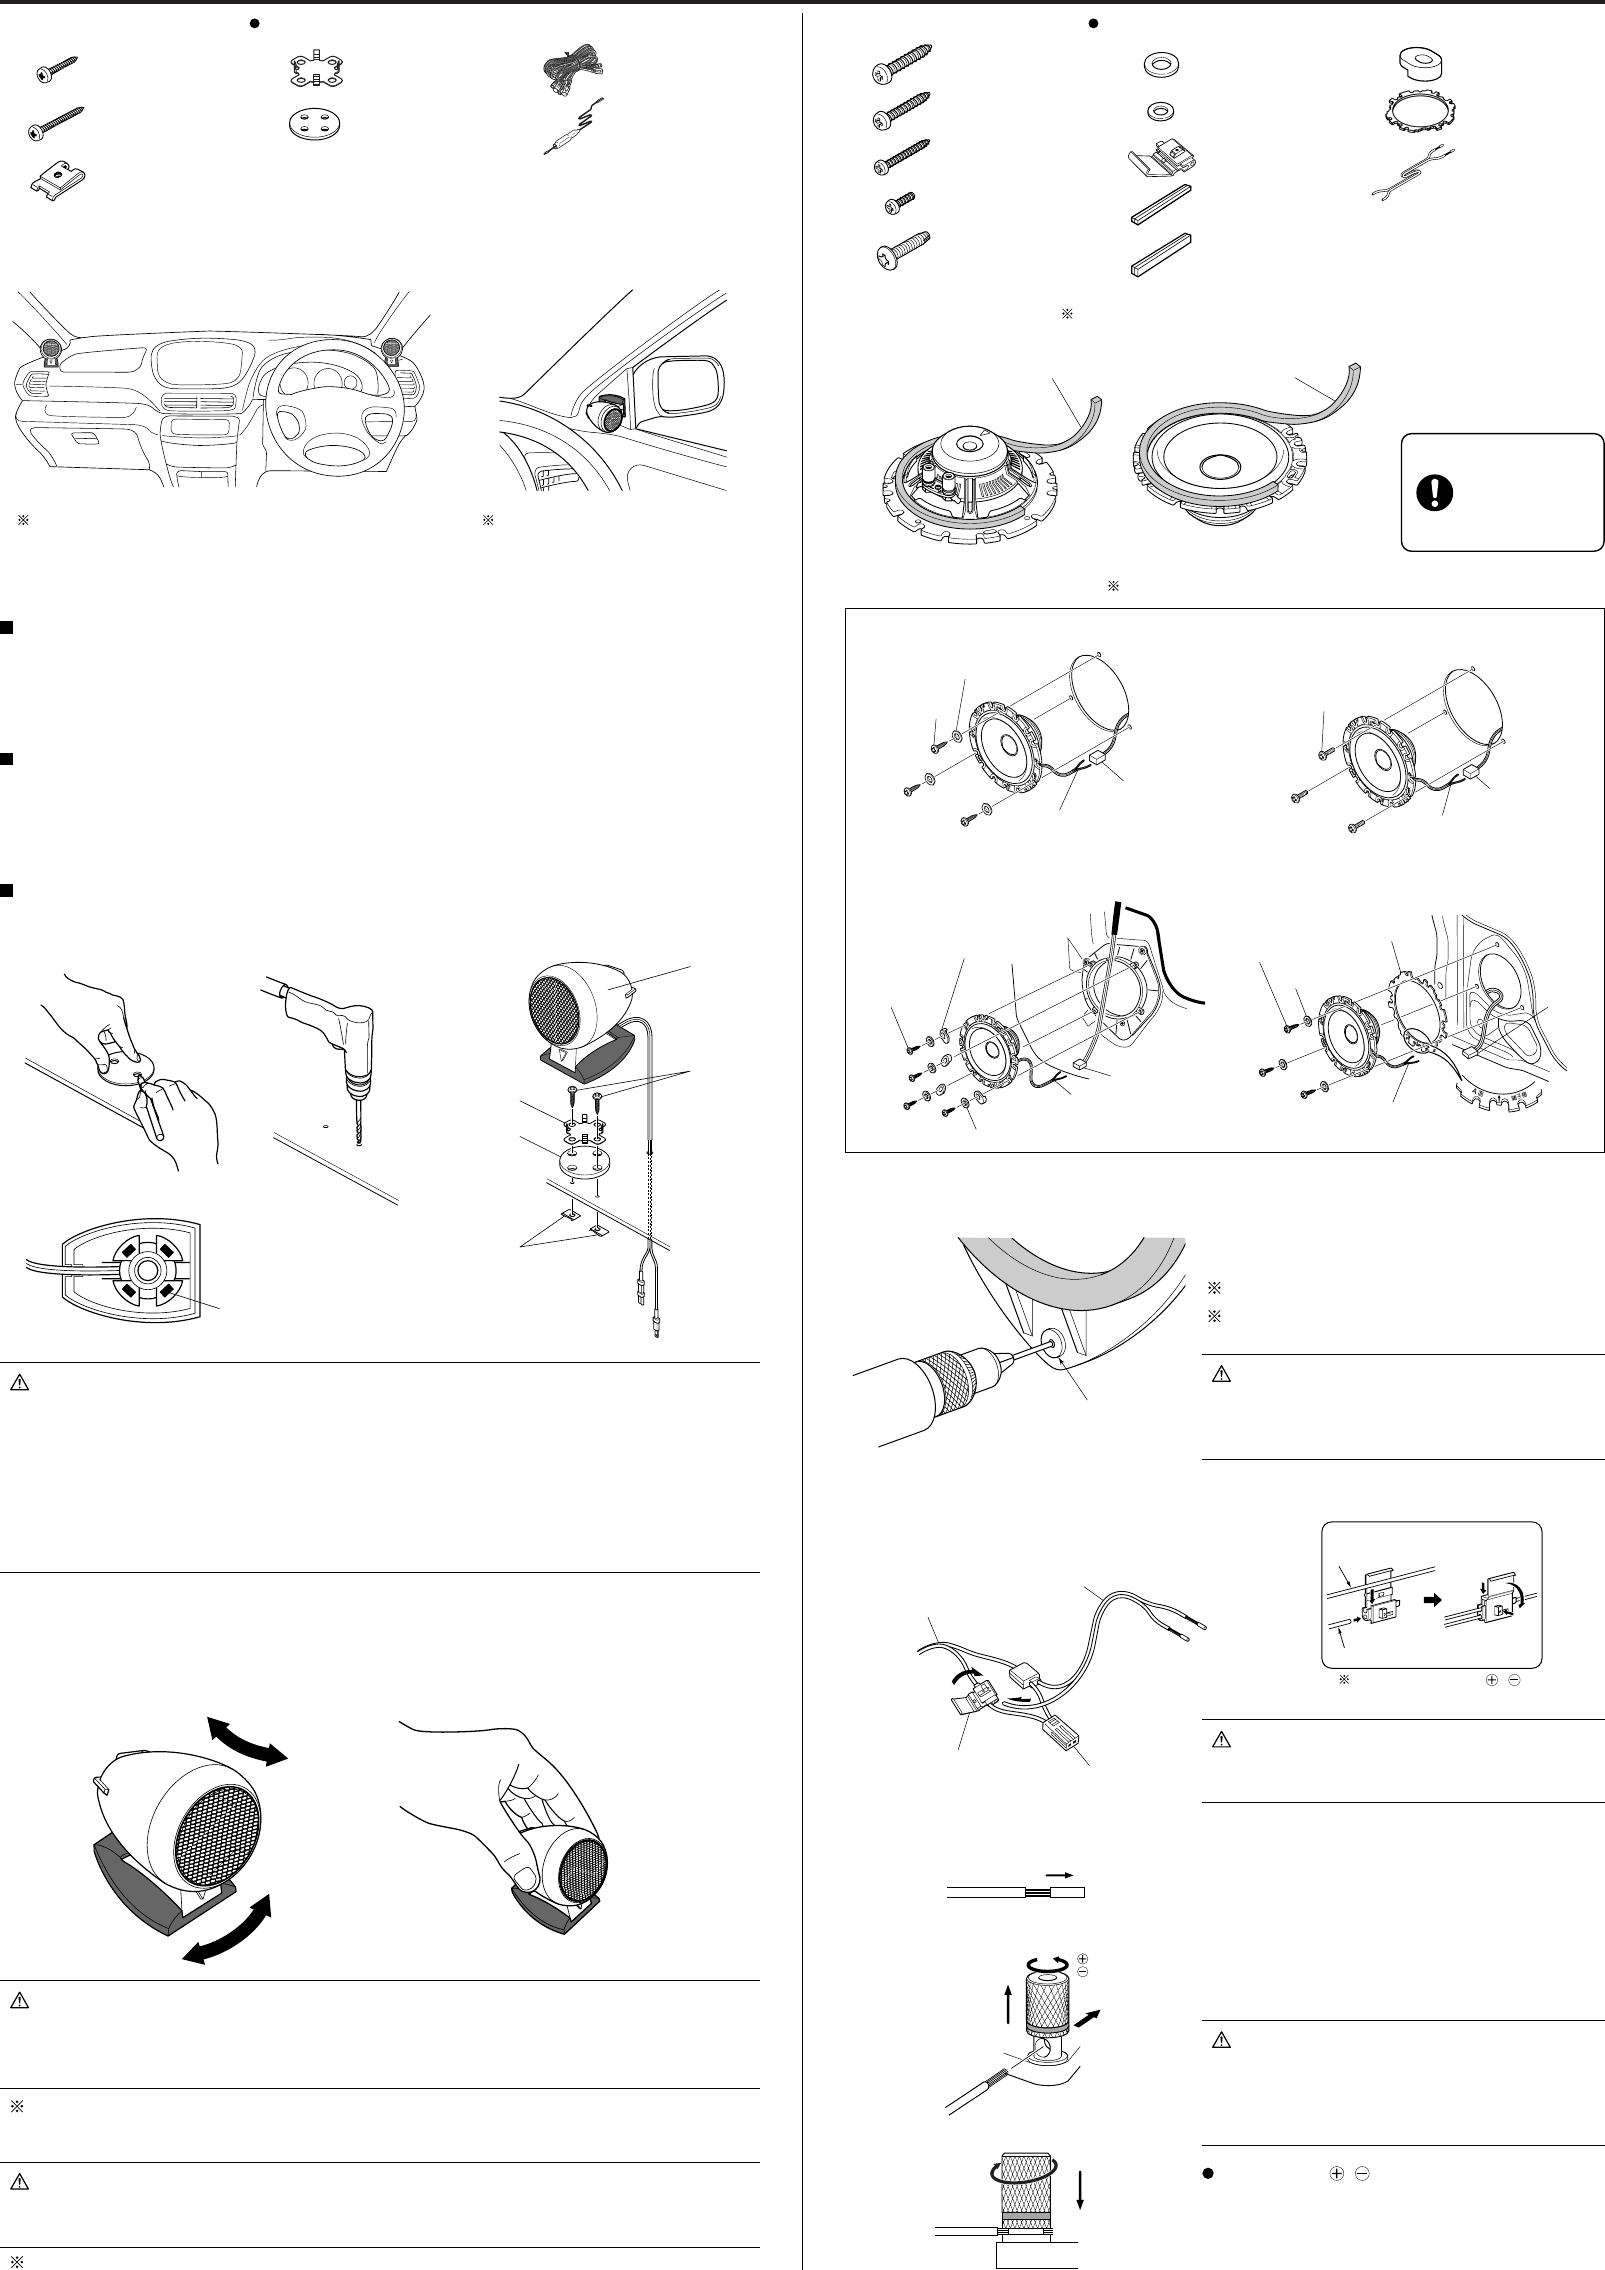
Removal of rivet
• When the factory speaker is being fixed by rivets.
A rivet is removed by making a hole in the lock
portion (the central portion) of it with a drill.
Also remove the fragment of the rivet.
The removed rivet cannot be re-used.
Woofer connections
• Connection of vehicle connector and ~Connection cord
Connect using 8Electro-tap.
• Connection to woofer terminal
1. Remove insulation cover of cord.
2. Loosen the cap of terminal and pass cord through the hole.
3. Close the cap of terminal tightly.
Rivet which is fixing
the factory speaker
Caution
• If the metal part of a door is deformed, the diameter of
the screw hole becomes large and it becomes impossi-
ble to install the woofer.
Pull
Loosen
side : Red line
side : Black line
Tighten
To woofer
terminal
~Connection cord
8Electro-tap
Vehicle connector
Connection cord of vehicle
1
2
3
4
5
Connection cord of vehicle
Connection cord
Clamp using pliers.
How to use the electro-tap
Make each polarity ( , )
match and connect.
Caution
• Connect so that the tip of the connection cord does not
contact metal portions other than terminal.
• Tighten firmly so that the connection cord does not
come off, while driving vehicle.
About polarity ( , )
Connecting with the wrong speaker polarity will not
reproduce with the right sound stage. Be careful of the
polarity and connect properly.
Caution
• The terminal which is not used should be protected by
electrical tape for shorting accident prevention.
Join the projections of 4Mounting bracket to these holes.
Tweeter bottom