


➔➔
➔➔➔
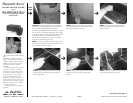
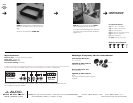
STEP 23: Use a OEM bolt that was just removed
to plug the driver’s side bolt hole.
STEP 27: Secure the front portion of the modified
black inner console to the dash, using the pair of
bolts from STEP 7.
Cont.
From
Previous
Page
Continued on Next Page ➔
➔
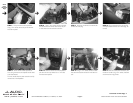
At this time double check the woofer for proper
operation. Also run speaker wire to the enclosures
mounting location and connect to the terminal.
STEP 24: Place the enclosure in the mounting
location.With L-bracket facing to the front of the
Expedition. Use the other OEM bolt that was
removed in STEP 22. Secure the L-bracket to the
floor.
STEP 28: Attach the suppled backing loop tape to
both bottom edges of the modified back inner con-
sole.
This will help to reduce the vibration rattle between
the inner console and the outer walls.
➔
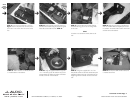
STEP 29: Secure the outer walls to the enclosure
and the modified black inner console.
Use the supplied (2)#6-32x1/2” pan head screws
and (2)#6x3/8” flat washers to secure the outer
walls’ top mounting tabs to the enclosure.
STEP 30: Secure the rear outer console, from
STEP 12.
STEP 25: Using a 7mm socket, secure the wire
harness that was removed in STEP14.
STEP 26: Place the front portion of the modified
black inner console, in front of the enclosure.
Route the wire harness under the driver’s side of
the enclosure and to the inside of the rear mounting
bracket.
SB-F-EXPDCNSL/10W3v2, JL AUDIO, Inc 2004
Sheet SKU#011106 Revision6/30/2004
Page 4
www.jlaudio.com