


5
(+)
(–)
(+)
(–)
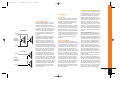
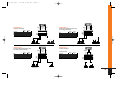
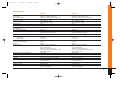
Parallel Wiring
Series Wiring
2 ohms
Nominal
Impedance
8 ohms
Nominal
Impedance
4 ohms
4 ohms
4 ohms 4 ohms
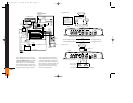
4.3 Remote-In/Out Connection
• The remote power control system turns
the GTQ amplifier off when not in use to
prevent discharging of the vehicle’s bat-
tery. Because the JBL GTQ amplifiers
include Common Sense 2-way turn-on,
when using the speaker-level inputs with
a head unit that includes a BTL power
amp it is not necessary to connect the
remote wire. The amplifier will automati-
cally activate whenever you turn on the
head unit. If you are using the line-level
inputs, or the speaker-level inputs with a
head unit that does not have a BTL power
amp, use the following remote wire con-
nections.
• Using the REM-IN feature – When
+12
volts is applied to the remote IN/OUT ter-
minal the amplifier is turned on. A red
LED on the top panel of the amplifier will
illuminate to indicate the amplifier is on.
If the head unit has a
+12 volt automatic
antenna or amplifier remote activation
wire, connect it to the REM-IN/OUT con-
nector on the GTQ amplifier. When the
amplifier is turned on, there is a time
delay of several seconds (longer in cold
weather) before the amplifier will produce
sound. This eliminates the chance of
annoying noises produced by the radio or
signal processors being amplified and
passed to the speakers when the system
is first activated.
• Some head units have no automatic
antenna or power amp activation wire.
Others have automatic antenna wires that
are “on” only when the radio is used but
not when a tape is played. In such cases,
connect the remote-in turn-on terminal to
an unused accessory terminal in the fuse
block, or any other
+12 volt source that is
turned on and off with the vehicle’s igni-
tion switch. The remote on/off system
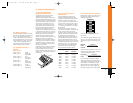
3.2 Signal Sources
The low-level preamp outputs of any
radio/tape deck, CD player, or preamp/
equalizer so equipped can drive the
GTQ360 or GTQ240. The gain controls of
the amplifier are used to match its input
sensitivity to the output voltage of the
source. This matching is important to
keep noise low and is explained in the
“Adjusting the Gain” section of this
manual.
Thanks to Universal Interface Circuitry,
the GTQ360 or GTQ240 can also be con-
nected to power amplifiers, radios or
equalizers that are equipped with only
speaker outputs by connecting them
through the speaker-level input connec-
tor. Inside the GTQ360 and GTQ240, the
speaker-level and preamp-level inputs are
connected through a mixing circuit, which
allows them to be used simultaneously.
Therefore a low-level source, such as a
CD player equipped with a volume con-
trol, may be connected to the preamp-
level inputs at the same time as a pow-
ered radio/tape unit is connected to the
speaker-level inputs. This provides a high-
er performance alternative to an FM mod-
ulator connection when you wish to add
CD capability to a factory cassette stereo.
Switching from one source to the other is
as simple as turning the desired source
on and turning the undesired one off —
no additional switches or relay connec-
tions are needed.
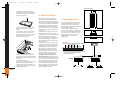
4. Wiring
4.1 Wiring
Proper wiring of the GTQ amplifiers and
the associated components is extremely
important for proper performance and
long-term reliability. Using the proper
type of wire is very important.
Route the wiring through the car carefully.
Do not allow wires to lay against sharp
sheet metal edges or any other surfaces
that might wear away or cut through the
insulation of the wire. Use insulated strain
reliefs, rubber grommets and plastic tub-
ing to protect the wires whenever they are
run through sheet metal panels or are
placed where they might be pulled or
damaged.
4.2 Ground Wire
• Proper grounding is extremely impor-
tant. Use a heat- and oil-resistant stranded
copper automotive wire equivalent to the
size used for the
+12V connection. Crimp
or solder and insulate any wire-to-wire
connections. Keep the ground wire as
short as possible. A ground wire must be
solidly connected to a major sheet-metal
structure of the vehicle such as a panel
near the amp-mounting location. Scrape
all paint and primer off the sheet metal at
the grounding point to ensure a good
electrical connection. Attach the wire to
the grounding point with a nut, bolt and
star washer. The high current demanded
by high-powered amplifiers requires a
more secure ground than the typical
sheet-metal screw will provide. Coat the
connection with silicon sealant for better
long-term reliability.
GTQ 360 new 7/17/98 10:44 AM Page 5