


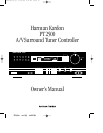

PT2500 rev (G) 10/23/96
4
Front Panel Controls
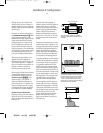
! Bass Control: Turn this control to
adjust the low frequency output of
the left/right channels by as much as
±10dB. Set this control to a suitable
position for your taste and room
acoustics.
@ Treble Control: Turn this control
to adjust the high frequency output
of the left/right channels by as much
as ±10dB. Set this control to a suit-
able position for your taste and room
acoustics.
# Balance Control: Turn this con-
trol to change the relative volume for
the front left/right channels.
NOTE: For normal operation of the
surround modes this control should
be at the midpoint, or “12 O’clock”
position.
$ VCR2 Inputs: This alternate set
of VCR2 Inputs may be used for the
connection of a camcorder or video
game. Select this input by pressing
the VCR2 button 2 on the front
panel.
% Loudness Button: Press this
button when listening at low levels to
activate special circuits that com-
pensate for the response of the
human ear at lower volumes. In the
off position the unit will provide flat
frequency response.
^ Volume Control: Rotate this
control to raise or lower the volume.
Note that this is a motorized control,
and when the volume is changed
using the remote control n it will
move in response to remote
commands.
& Mute/Volume Indicator: In nor-
mal operation this green LED pro-
vides a relative indication of the
unit’s volume level. When the
PT2500 is in the MUTE mode, this
indicator flashes to remind you that
output to the speakers has momen-
tarily been silenced.
* Auto/Man Selector: Press this
button to select AUTO or MANUAL
tuning. In the AUTO mode the tuner
will stop only at stations with a strong
signal. In the MANUAL mode the
tuner will step in 50 kHz increments
for FM and 10kHz increments for AM.
( AM/FM Selector: Press this
button to select AM or FM stations.
Ó Up/Down Tuning Button: Press
the left side
¤
of the button to tune
lower frequency stations and the
right side
⁄
of the button to tune
higher frequency stations. When a
station with a strong frequency is
tuned, the TUNED indicator will illu-
minate in the Information Display .
Ô FM Mode: Press this button to
select the stereo or mono mode for
FM tuning. In the STEREO mode an
FMST indicator will illuminate in the
information display, and stereo
reception will be provided when sta-
tions are transmitting stereo signals.
In the MONO mode the left and right
signals from stereo broadcasts will
be mixed together and reproduced
through all channels. Select the
MONO mode fro better reception of
weak signals.
Information Display: The indica-
tors in this display illuminate to pro-
vide visual display of the unit’s
operation.
Ò Remote Sensor: This sensor
receives the signals from the remote
control to operate the unit. Do not
block this area.
Ú Tuner Memory Button: Press
this button to store an AM or FM fre-
quency in the unit’s memory. The
MEMORY indicator will flash in the
display to remind you to choose a
numeric location using Numeric
Buttons on the front panel or remote
(Ùd). Press this button a second
time to complete the memorization
process. Storing a station in a mem-
ory location that has already been
used will overwrite the existing data.
NOTE: The preset memories are pro-
tected from power loss for two
weeks. If the unit is unplugged for
more than two weeks all stored fre-
quencies will be erased.
Û Preset Scan Button: Press this
button to scan the stations entered
in the unit’s memory. When the
desired station is reached, press
the button again to stop the scan.
Ù Numeric Buttons: Use these
buttons to enter or recall stations
from the tuner memory.
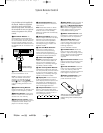
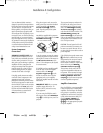
Using the Reference Card supplied with
this manual, familiarize yourself with
each of the controls on the front panel of
the PT2500. This section of the Manual
will also serve as a quick reference to the
operation of any of these controls.
1 Power Switch: Press this button
to turn the PT2500 on or off. In order
to use the power button on the
remote this power switch must be
pressed once and left in the “stand-
by” mode. Note that a green indica-
tor around the switch will illuminate
when the unit is on, and an orange
”standby” indicator will illuminate
when the unit has been turned off
using the remote control.
2 VCR2 Selector: Press this button
to select the front panel VCR2 inputs
rather than the rear panel inputs.
3 Direct Input Selector: Press this
button to select direct input to the
preamp circuits, bypassing all tone
controls and surround processing.
When this feature is activated, the
DIRECT indicator illuminates with-
in the information display.
4 Delay Time Adjust: Press this
button to adjust the delay time
between the front and rear channels.
5 Surround Off: Press this button
to select conventional two channel
stereo reproduction and to cancel
surround processing.
6 Surround Mode Selectors:
Press one of these buttons to select
a surround processing mode.
7 Center Channel Mode Selector:
Press this button to change the cen-
ter channel mode.
8 Test Mode Selector: Press this
button to place the unit in the Test
mode for adjustment of system out-
put levels.
9 Tape 2 Monitor: Press this button
to monitor the output of the tape
deck connected to the Tape 2
Inputs. For normal operation this
control should be in the off position.
) Input Selectors: Press one of
these buttons to select an input
source.
•PT2500(g).qx 10/23/96 7:36 AM Page 5