


OPERATION 29
OPERATION
Front Panel Connections
In addition to rear-panel outputs, the DPR 1001 offers
Harman Kardon’s exclusive configurable front panel
output jack feature. You may switch the front panel
Digital Coax Jack Ò or the Video 4 Jacks Ú
from an input to an output by following these steps:
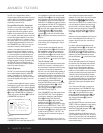
1.Press the
OSD Button to view the MAIN
menu (Figure 1).
2.Press the
Set Button p to enter the
IN/OUT SETUP menu (Figure 2).
3.Press the
¤
Navigation Button n so that
VIDEO 4 or COAXIAL 3 is highlighted in
reverse video, depending on which input you wish
to change to an output. Either input or both may be
changed at any time.
4.Press the
Set Button p and then press either of
the
‹
/
›
Navigation Buttons n so that the word
OUT appears.
5.Press the
Set Button p to enter the change.
6.Press the
OSD Button to exit the menus and
return to normal operation.
Once the setting is made, the appropriate
Input/
Output Status Indicator
will turn red, indicating
that the selected analog or digital jacks are now an
output, instead of in the default setting as an input.
Once changed to an output, the setting will remain as
long as the DPR 1001 is turned on, unless the setting
is changed in the OSD menu system, as described
above. However once the DPR 1001 is turned off, the
setting is cancelled. When the unit is turned on again,
the front panel jacks will return to their normal default
setting as an input. If you wish to use these jacks as
an output at a future time, the setting must be
changed again using the OSD menu system, as
described above.
Output Level Trim Adjustment
Normal output level adjustment for the DPR 1001 is
established using the test tone, as outlined on pages
22 and 23. In some cases, however, it may be desir-
able to adjust the output levels using program material
such as a test disc, or a selection you are familiar with.
Additionally, the output level for the subwoofer can
only be adjusted using this procedure.
When adjusting channel output levels, the EzSet
remote may be used to serve as an SPL meter so that
levels may be set more accurately.To use the remote
in its manual mode for this purpose, follow the instruc-
tions shown on page 23.
To adjust the output levels using program material, first
set the reference volume for the front left and front right
channels using the
Volume Control $r
î
.
To adjust the channel output levels using an external
source from the remote, press the
Channel Select
Button
m; the on-screen display and the Lower
Display Line
B will read FRONT L LEVEL,
indicating that the Front Left channel is ready for
adjustment. To trim the level, press the
Set Button
p and then use the
⁄
/
¤
Navigation Buttons
n to make the adjustment. When the correct level
has been reached, press the
Set Button p to enter
the setting and then press the
⁄
/
¤
Navigation
Buttons
n to select the next channel to be adjust-
ed. Repeat the procedure for any channels that need
adjustment, remembering that the goal is to have all
channels deliver sound at the same level.
To adjust the channel output levels using an external
source from the front panel, first press the
Set Button
!. Within five seconds press the
⁄
/
¤
Navigation
Buttons
)@ until CHANNEL MODE
appears in the on-screen display and the Lower
Display Line
B; an amber LED will also light next to
CHANNEL in the System Configuration Indicators
%. Within five seconds press the Set Button !
again and the on-screen display and the Lower
Display Line
B will change to FRONT L
LEVEL
, indicating that the Front Left channel is
ready for adjustment. To trim the level, press the
Set
Button
! and then use
⁄
/
¤
Navigation Buttons
)@
to make the adjustment. When the correct
level has been reached, press the
Set Button !
to enter the setting and then press the
⁄
/
¤
Navigation Buttons
)@
to select the next chan-
nel to be adjusted. Repeat the procedure for any chan-
nels that need adjustment, remembering that the goal
is to have all channels deliver sound at the same level.
The channel output for any input may also be adjusted
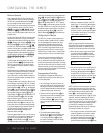
using the full-OSD on-screen menu system. Press the
OSD Button to bring up the MAIN menu
(Figure 1). Press the
¤
Navigation Button n until
the
CHANNEL ADJUST line is highlighted in
reverse video. Press the
Set Button p to activate
the
CHANNEL ADJUST menu (Figure 11).
Once the menu appears on your video screen, use the
⁄
/
¤
Navigation Buttons n to select the chan-
nels to be adjusted. At each channel position use the
‹/› Navigation Buttons n to change the output
level. Remember, the goal is to have the output level
at each channel sound equal when heard at the
listening position.
If you wish to reset all the levels to their original factory
default of 0dB offset, press the
⁄
/
¤
Navigation
Buttons
n so that the CHANNEL RESET
line is highlighted in reverse video and press the
‹/› Navigation Buttons n so that the word ON
appears. After the levels are reset, resume the proce-
dure outlined above to adjust the levels to the desired
settings. When all adjustments are done, press the
⁄
/
¤
Navigation Buttons n until RETURN
TO MAIN MENU
is highlighted in reverse video
and then press the
Set Button p if you wish to go
back to the main menu to make other adjustments.
If you have no other adjustments to make, press the
OSD Button to exit the menu system.
NOTE: The output levels may be separately trimmed for
each digital and analog surround mode. If you wish to
have different trim levels for a specific mode, select that
mode and then repeat the instructions in this section.
6-Channel/8-Channel Direct Input
The DPR 1001 is equipped for future expansion
through the use of optional, external adapters for for-
mats that the DPR 1001 may not be capable of pro-
cessing or to allow connection to the output of high-
resolution optical audio playback systems such as
DVD-Audio or SACD.When a device with six-channel
outputs (5.1 audio) is used, connect the source device
to the
6-Channel Direct Inputs . When a device
with eight-channel outputs (7.1) audio is used, connect
the additional Surround Back Left (SBL) and Surround
Back Right (SBR) outputs to the
8-Channel Direct
Inputs
on the DPR 1001.To select these inputs,
press the
6-Channel/8-Channel Input Select
Button
on the remote.
When the 6-Channel or 8-Channel Direct Input is in
use, you may not select a surround mode, as the
external decoder determines the processing in use. In
addition, there is no signal at the record outputs when
the 6-Channel or 8-Channel Direct Input is in use.
Memory Backup
This product is equipped with a memory backup system
that preserves the system configuration information
and tuner presets if the unit is accidentally unplugged
or subjected to a power outage. This memory will last
for approximately two weeks, after which time all
information must be reentered.
43
34
33
31
31
31
31