


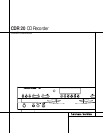
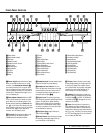
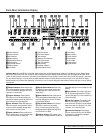
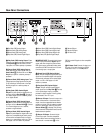

5 FRONT-PANEL CONTROLS
1 Power Switch: Press this switch to apply
power to the CDR 20.When the unit is first
turned on, the Status-Mode Indicator 2
surrounding the switch will turn green. Once
the unit has been turned on with this switch, it
may be operated from either the front panel or
remote control. Press the switch again to turn
the unit completely off.
2 Status-Mode Indicator: When the CDR
20 is in the ON mode, this indicator will glow
green.When the unit has been placed in the
Standby mode by pressing the Power-Off but-
ton on the remote, the indicator will glow
amber, indicating that the unit is still connected
to the AC main supply and is ready to be
turned on from the remote control.
3 Play Deck: This disc deck is used to play
back conventional CD discs and CD-R or
CD-RW discs that have been finalized.
4 Headphone Jack: Connect standard head-
phones to this jack for private listening.
5 Headphone Level Control: Turn this
control to adjust the volume level to the head-
phones. Note that the use of this control will
not change the analog output levels at the
rear-panel audio outputs ¡™.
6 Digital Input: This coaxial digital input
may be used to connect a portable digital audio
player to the CDR 20 for digital recording.
When an active digital signal is connected to
both the front- and rear-panel coaxial inputs,
the source connected to the front-panel input
will be selected for recording.
7 Play-Deck Open: Press this button to
open the Play Deck 3.
8 Record Button: Press this button to begin
the recording process. See pages 20-22 for
more information on CD recording.
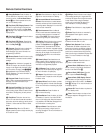
9 CD Sync: Press this button once to begin
an automated recording of a single track from
an external CD player when a digital connec-
tion is used. Press it twice to begin automated
recording of an entire disc. See page 21 for
more information on CD Sync recording.
) Dubbing: Press this button to begin the
process of making a complete copy of the disc
in the Play Deck 3 to a CD-R or CD-RW disc
in the Record Deck %. See page 20 for more
information on dubbing.
! Erase: Press this button to erase one or
more tracks or the entire contents of an unfi-
nalized CD-RW disc.When a CD-RW disc has
already been finalized you may erase the entire
disc or you may “unfinalize” the disc by erasing
the TOC data. See page 22 for more informa-
tion on erasing CD-RW discs.
32
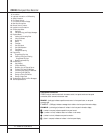
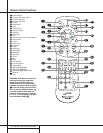
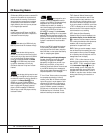
Front-Panel Controls
1 Power Switch
2 Status-Mode Indicator
3 Play Deck
4 Headphone Jack
5 Headphone Level Control
6 Digital Input
7 Play-Deck Open
8 Record Button
9 CD Sync
) Dubbing
! Erase
@ Finalize
# Speed
$ Record-Deck Open
% Record Deck
^ Analog-Record Level Control
& Record-Deck Stop
* Record-Deck Play/Select
( Record-Deck Pause
Ó Record-Deck Next
Ô Record-Deck Previous
Input Select
Ò Record-Deck Display Select
Ú Information Display
Û Remote Sensor
Ù Play-Deck Display Select
ı Dual-Play Selector
ˆ Play-Deck Next
˜ Play-Deck Previous
¯ Play-Deck Pause
˘ Play-Deck Play
¸ Play-Deck Stop
2
1
3
5
6
7
8
9
)
!
@
#
$
%
^
4
&
*
(
Ó
Ô
Ò
Ú
Û
Ù
ı
ˆ
˜
¯
˘
¸
0