


6 FRONT PANEL CONTROLS
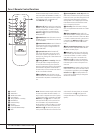
Front Panel Controls
8
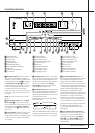
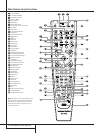
Tone Mode: Pressing this button enables or
disables the Bass and Treble tone controls.When
the button is pressed so that the words TONE
INappear in the Main Information Display
ˆ
the Bass and Treble controls will be enabled.
When the button is pressed so that the words
TONEOUTappear in the Main Information
Display
ˆ
, the output signal will be “flat,”
without any bass or treble alteration.
9
DSP Surround Mode Selector: Press this
button to select the following DSP Surround
Modes:VMAx Near/Far,Hall 1, Hall 2 or Theater.
(See page 30 for more information about sur-
round modes.)
)
Tuning Selector: Press the left side of the
button to tune lower frequency stations and the
right side of the button to tune higher frequency
stations.When a station with a strong signal is
reached, the TUNED indicator
I
will illuminate
in the Main Information Display
ˆ
(see
page 43 for more information on tuning
stations).
!
Tuner Band Selector: Pressing this button
will automatically switch the AVR to the Tuner
mode. Pressing it again will switch between the
AM and FM frequency bands. Holding it pressed
for 3 seconds will switch between stereo or mono
receiving and automatic or manual tuning mode.
When the button is pressed so that the AUTO
Indicator
J
lights, the tuner will search for the
next station with an acceptable signal when the
Tuning Selector
)
K
é
is pressed.When
the button is pressed so that the AUTO Indicator
J
is not lit, each press of the Tuning Selector
)
K
é
will increase the frequency. (See page
42 for more information on using the tuner.)
@
6CH/8CH Direct Button: Press this button
to select the 6 Channel Direct or 8 Channel
DIrect inputs as the AVR's source.
#
Preset Stations Selector: Press this button
to scroll up or down through the list of stations
that have been entered into the preset memory.
(See page 42 for more information on tuner pro-
gramming.)
$
Stereo Mode Selector /
›
Button: This
button has two functions: In normal use, pressing
this selector button cycles through the stereo
modes, and it is also used to turn off all surround
processing and place the unit in a traditional
two-channel Stereo mode.The first press selects
5-Channel Stereo or 7-Channel Stereo, depend-
ing on the selection (5.1 or 6.1/7.1) made in the
surround mode setting, see page 24, and the sec-
ond selects “SURROUND OFF,” which is true
Stereo.
%
Input Source Selector: Press this button to
change the input by scrolling through the list of
input sources.
^ RDS Select Button: Press this button to dis-
play the various messages that are part of the RDS
data system of the AVR’s tuner.(See page 43 for
more information on RDS).
& DTS Neo:6 Mode Selector: Pressing this
selector button cycles the AVR through the vari-
ous DTS Neo:6 modes, which extract a five- or
seven-channel surround field from two-channel
program material (from PCM source or analog
input signal).The first press selects the last DTS
Neo:6 surround mode that was in use, and each
subsequent press selects the next mode in the
following order:
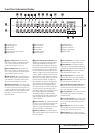
NOTE: The front panel digital audio, video and
analog audio input and output jacks are normally
concealed behind a drop-down door in the lower
right corner of the front panel.To access these
jacks, open the panel door by gently pulling
down the upper right corner of the door as
indicated by ”PULL/OPEN”.
*
Optical Digital 4 Input Jack:Connect the
optical digital audio output of an audio or video
product to this jack.
(
Optical Digital 4 Output Jack: Connect
this jack to the optical digital input of a digital
recorder to send a feed of the digitial output
when a PCM digital input source is in use by the
AVR.
Ó
Coaxial Digital 4 Input Jack: Connect the
output of a digital audio source to this jack.
Ô
Coaxial Digital 4 Output Jack: Connect
this jack to the coaxial digital input of a digital
recorder to send a feed of the digitial output
when a PCM digital input source is in use by the
AVR.
Input/Output Status Indicators:This LED
indicator will normally light green to show that
the front panel Video 5 A/V
Ò
jacks are
operating as an input.When these jacks are con-
figured for use as an output, the indicator will
turn red to show that the jack may be used for
recording. (See page 21 for more information on
configuring the front panel jacks as outputs,
rather than inputs.)
Ò
Video 5 Input/Output Jacks: These
audio/video jacks may be used for temporary
connection to video games or portable audio/
video products such as camcorders and portable
audio players.They may also be configured as
output jacks (also S-Video) to feed a signal to any
recording Audio or Video device (see page 37 for
more information).
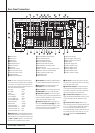
Ú
DTS Surround Mode Selector: When a
DTS source is in use the AVR will select the
appropriate mode automatically and no other
mode will be available, except THX or Logic 7
processing. In that case, pressing that button will
display the mode currently selected by the AVR´s
decoder.Depending on the surround material
played and the speaker setting, one of the
following modes will be selected by the unit:
• DTS-ES 6.1 DISCRETE
• DTS-ES 6.1 MATRIX
• DTS + NEO:6
• DTS 5.1
Both DTS ES 6.1 Modes and DTS+NEO:6 will be
selected only when surround back speakers have
been configured with your system: DISCRETE with
appropriate source material, MATRIX with 6.1
Matrix recordings and DTS+NEO:6 with normal
DTS 5.1 channel recordings.The DTS 5.1 mode
will be selected with any DTS source, when no
surround back speakers are configured (see also
pages 25 and 33-36).When the THX mode was
selected by pressing the HOME THX button
6
j
pressing this button will escape from the
THX processing mode.
Û
Digital Select Button:When playing a
source that has a digital output, press this button
to select between the Optical
* U
and
Coaxial
Ó V
Digital inputs (See page
35 for more information).
Ù
Volume Control:Turn this knob clockwise
to increase the volume, counterclockwise to
decrease the volume. If the AVR is muted, adjust-
ing volume control will automatically release the
unit from the silenced condition.
ı
Input indicators: A green LED will light in
front of the input that is currently being used as
the source for the AVR.
ˆ
Main Information Display:This display
delivers messages and status indications to help
you operate the receiver.(See pages 7–8 for a
complete explanation of the Information Display.)
˜
Remote Sensor Window:The sensor
behind this window receives infrared signals from
the remote control.Aim the remote at this area
and do not block or cover it unless an external
remote sensor is installed.
¯
Surround Mode Indicators: A green LED
will light in front of the surround mode or digital
bitstream format (HDCD, MP3 or PCM) that is
currently in use.
Note that depending of specific combination of
input sources and surround mode selected, more
than one indicator may light.
DTS Neo:6 MUSIC
DTS Neo:6
CINE