


22 SYSTEM CONFIGURATION
System Configuration
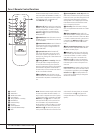
The tone controls may also be adjusted at any
time by pressing the Tone Mode Button
8
on the front panel or
i
on the remote control.
The first press will bring up the Tone Mode
setting in the Semi-OSD on-screen display and in
the Lower Display Line
B
. Press the
‹
/
›
Buttons
7$
on the front panel or
⁄
/
¤
D
on the remote to activate or disable the tone
controls as shown above.
To change the tone control settings,press the
Tone Mode Button
8
i
until the desired
setting (BASS or TREBLE) appears in the semi-
OSD on-screen display and in the Lower
Display Line
B
.When you see the correct
name press the
‹
/
›
Buttons
7$
on the front
panel or
⁄
/
¤
D
on the remote to make the
adjustments. If no buttons are pressed for five
seconds the displays will return to their normal
operation and any changes will be stored in the
AVR's memory.
NOTE:Although all other settings in the
IN/OUTSETUPMenu are specific to the
input being adjusted, the Tone settings are
global and will carry through to all input
sources.There is no need to adjust these settings
when configuring subsequent inputs.
Speaker Setup
This menu tells the AVR which type of speakers
are in use.This is important as it adjusts the
settings that determine which speakers receive
low-frequency (bass) information. For each of
these settings use the LARGEsetting if the
speakers for a particular position are traditional
full-range loudspeakers that are capable of
reproducing sounds below 80Hz. Use the
SMALLsetting for smaller, frequency-limited
satellite speakers that do not reproduce sounds
below 80Hz or 100Hz or mid-size speakers that
cannot reproduce frequencies below 40 or 60 Hz
(selectable). Note that when “small” front
speakers are used, a subwoofer is required to
reproduce low-frequency sounds. Remember
that the “large” and “small” descriptions do not
refer to the actual physical size of the speakers,
but to their ability to reproduce low-frequency
sounds. If you are in doubt as to which category
describes your speakers, consult the
specifications in the speakers’ owner’s manual,
or ask your dealer.
Notes:
• As the speaker settings need to be made for
each input individually, you can determine
which speaker should be used depending on
the input source selected. So it´s possible e.g.
to turn off the Center and/or the Sub with any
music source selected and to use them with
any movie input source.
• With the currently selected input all speaker
settings will be copied to all other surround
modes (as far as speakers are used with them)
and need not be repeated when another sur-
round mode is selected with that input.
• You can select four X-over frequencies: 40Hz,
60Hz, 80Hz and 100Hz.As the frequency
selected will affect all speakers which are set
to "SMALL", you should select that
frequency fitting the best with the "smallest"
speaker in your system as per the definitions
below.
• The default setting for all speakers is
"SMALL" and the Sub "ON".
To start with the speaker setting,first select any
of the DTS Neo:6 modes as with them all speak-
ers and all speaker modes are available.It is eas-
iest to select these modes directly, without the
on-screen display, so press the OSD button
L
to turn the on-screen display off if it is still visi-
ble.Then press the DTS Neo:6 button
&
on
the front panel or
T
on the remote.
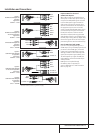
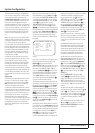
1. It is easiest to enter the proper settings for
the speaker setup through the SPEAKER
SETUPmenu (Figure 3).So press the OSD
Button
L
to bring up the MASTER
MENU(Figure 1), and then press the
¤
Button
D
once so that the cursor is on the
SPEAKERSETUPline.At this point,
press the Set Button
F
to bring
up the
SPEAKERSETUPmenu (Figure 3).
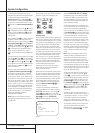
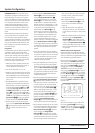
Figure 3
2.The first line on the SPEAKERSETUP
menu allows you to configure the AVR for either
standard 5.1 or advanced 6.1/7.1 operation.
With the on-screen
›
cursor at the CH
CONFIGline, press the Set Button
F
and
then press the
‹
or
›
Buttons
Ea
so that
5.1 is highlighted if you have no surround
back speakers installed, or 6.1/7.1 if you
have one or two speakers connected to the
Surround Back Preamp Outputs
C
through
optional, external power amplifiers.
Making this selection will set the surround mode
options for the AVR so that only the correct
modes for the number of speakers in your specif-
ic system will be available. Should you change
your system and add Surround Back speakers at
a later date, it is important to change this setting
so that advanced surround modes such as THX
Surround EX, 7 Channel Stereo, Logic 7/7.1,
DTS-ES 6.1 Discrete and Matrix, DTS+NEO:6,
and DTS NEO:6 will be available.
Important Note: Moreover this setting is
linked with the Surround Back Speaker selection
outlined below, both settings will turn on
(”6.1/7.1”) or off (”5.1”) these speakers in the
same manner.
When the desired selection is made, press the
¤
Button
D
to begin the speaker configura-
tion process.
3. Once the setting is made for 5.1 or 6.1/7.1
operation,the on-screen cursor
›
will be at the
top of the list of speaker positions,pointing
toward the LEFT/RIGHTline,which sets
the configuration for the front left and right
speakers.If you wish to make a change to the
front speakers’ configuration, press the
‹
/
›
Buttons
Ea
so that either LARGEor
SMALLappears,matching the appropriate
description from the definitions shown above.
When SMALLis selected,low-frequency front
channel sounds below the x-over frequency
selected (see above and item 9 below) will be
sent only to the subwoofer output.If you choose
this option and there is no subwoofer connected,
you will not hear any low-frequency sounds with
front channel signals.
When LARGEis selected,a full-range output
will be sent to the front left and front right
outputs. Depending on the choice made in
the SUBWOOFERline in this menu (see
below), the front left and right bass information
may also be directed to the subwoofer.
Important Note: When a speaker set with a
subwoofer and two front satellites connected to
the Sub´s speaker outputs is used, the Sub´s
inputs must be connected to the Front speaker
outputs
D
and LARGEmust be selected for
the front speakers.
4.When you have completed your selection for
the front channel, press the
¤
Button
D
on
the remote to move the cursor to CENTER.
* SPEAKER SETUP *
CH CONFIG : 5.1 6.1/7.1
LEFT/RIGHT: SMALL
CENTER : SMALL
SURROUND : SMALL
SURR BACK : SMALL
SUBWOOFER : SUB
X-OVER FREQ: 80 HZ
BACK TO MASTER MENU