


23 SYSTEM CONFIGURATION
System Configuration
If the front left/right speakers are set to
LARGE, three options are available:
• If no subwoofer is connected to the
AVR 520, press the
‹
/
›
Buttons o
on the remote so that NONE appears in
the on-screen menu. When this option is
selected, all bass information will be routed
to the front left/right “main” speakers.
• If a subwoofer is connected to the AVR 520,
you have the option to have the front
left/right “main” speakers reproduce bass
frequencies at all times, and have the sub-
woofer operate only when the AVR 520 is
being used with a digital source that con-
tains a dedicated Low Frequency Effects, or
LFE soundtrack. This allows you to use both
your main and subwoofer speakers to take
advantage of the special bass created for
certain movies. Press
‹
/
›
Buttons
o on the remote so that SUB
(LFE)
appears in the on-screen menu.
• If a subwoofer is connected and you wish to
use it for bass reproduction in conjunction
with the main front left/right speakers,
regardless of the type of program source or
Surround mode you are listening to, press
the
‹
/
›
Buttons o on the remote
so that
SUB LFE+L/R appears in
the on-screen menu. When this option is
selected, a full-range signal will be sent to
the front left/right “main” speakers, and the
subwoofer will receive the bass frequencies
under frequency selected in the next option
setting on this menu, as described below.
When you have completed your selection for the
subwoofer, press the
¤
button n on the
remote to change the cursor to
SUB X-
OVER FREQ
. The subwoofer crossover set-
ting may only be adjusted using the on-screen
display system.
At this line, you will select the frequency at
which bass information is directed to the
Subwoofer Output ∞.The choices available
will depend on the setting made previously for
the front left/right speakers.When making
these selections, choose the crossover frequency
that is closest to that of your front left/right
speakers, or the upper frequency limit of your
subwoofer.This figure is normally printed in the
owner’s manual or data sheet for the speakers;
or consult the speaker’s manufacturer.
• When the front speakers have been set to
LARGE, the crossover choices are
40 Hz or 60 Hz to match the typical
crossover points of full range speakers.
Choose the option that is closest to your
speakers’ design.
• When the front speakers have been set to
SMALL, the crossover choices are
80 Hz or 100 Hz to match the typical
crossover points of the smaller speakers
used in satellite speaker systems. Choose
the option that is closest to your speakers’
design.
When all speaker selections have been made,
press the
¤
Button n and then the Set
Button
p to return to the Master
menu.
Delay Settings
If Dolby Digital or Dolby Pro Logic is selected as
the surround mode for an input, you may need
to adjust the delay time setting. Note that the
delay time is not adjustable for any other modes.
Due to the different distances between the
listening position for the front-channel speakers
and the surround speakers, the amount of time
it takes for sound to reach your ears from the
front versus surround speakers differs.You may
compensate for this difference through the use
of the delay settings to adjust the timing for
the speaker placement and acoustic conditions
in your listening room or home theater.
The factory setting is appropriate for most
rooms, but some installations create an uncom-
mon distance between the front and surround
speakers that may cause the arrival of front-
channel sounds to become disconnected from
surround-channel sounds.
To resynchronize the front and surround chan-
nels, follow these steps:
1. Measure the distance from the listening
position to the front speakers.
2. Measure the distance from the listening
position to the surround speakers.
3. Subtract the distance to the surround speak-
ers from the distance to the front speakers.
a. When setting the delay time for the
Dolby Digital surround modes, the opti-
mal delay time is the result of that sub-
traction. For example, if the front speak-
ers are ten feet away and the surround
speakers are five feet away, the optimal
delay time is figured as 10–5=5. Thus,
in this example, the delay time for Dolby
Digital should be set at five milliseconds.
b. When setting the delay time for the Pro
Logic mode, take the result of the sub-
traction and add 15 to obtain the opti-
mal delay time. For example, if the front
speakers are ten feet away and the sur-
round speakers are five feet away, the
optimal delay time is figured as
10–5+15=20. Thus, in this example, the
Pro Logic delay should be set at twenty
milliseconds.
NOTE: The DTS, Logic 7 and DSP modes use a
fixed, nonadjustable delay time.
The Dolby Digital mode also includes a separate
setting for the Center Channel Delay mode,
since the discrete nature of these signals makes
the location of the center-channel speaker more
critical. To calculate the delay for the center
channel, measure the distance from the pre-
ferred listening position in the center of the
room to both the center-channel speaker and
either the left or right speaker.
If the distances are equal, no further adjustment
is required and the center delay should be set to
zero. If the distance to the front speakers is
greater than the distance to the center speaker,
you may wish to reposition the speakers by
moving the front left and front right speakers
closer to the listening position or the center
speaker further away from the listening position.
If repositioning of the speakers is not possible,
adjust the center delay time, adding one milli-
second of center-channel delay for every foot
closer to the listening position the center
speaker is than the front speakers. For example,
if the front left and front right speakers are
each 10 feet from the listening position and the
center-channel speaker is 8 feet away, the delay
is figured as 10–8=2, suggesting an optimal
center delay of 2 milliseconds.
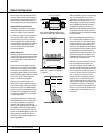
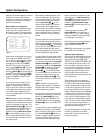
To set the delay time for a specific input,
the
DELAY ADJUST menu (Figure 6)
should be visible on your on-screen display. If
the system is not already at that point, press
the
OSD Button v to bring up the MAS-
TER MENU
, press the
›
Button n three
times or until the on-screen
›
cursor is pointing
at the
DELAY ADJUST line. Press the
Set Button p to call up the menu.
37
37
37