


24
AVR
Set Up the Remote Control
Set Up the Remote Control
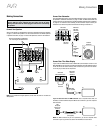
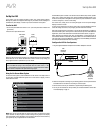
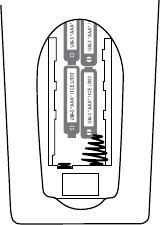
Install the Batteries in the Remote Control
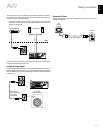
Remove the remote control’s battery cover, insert the four supplied AAA batteries as
shown in the illustration, and replace the battery cover.
NOTE: Remove the protective plastic from the AVR’s front panel so it doesn’t reduce the
remote control’s effectiveness.
Program the Remote to Control Your Source Devices and TV
You can program your AVR remote to control many brands and models of audio/video
source devices and TVs. The remote is also ready to operate your iPod or iPhone when it
is connected to the AVR’s front-panel USB port.
Each of the remote’s Source Selector buttons has been preprogrammed to control certain
types of source devices:
Cable/Sat: Controls cable TV and satellite TV tuner boxes
Disc: Controls Blu-ray Disc and DVD players
Radio:
Controls the AVR’s built-in FM/AM tuner
TV:
Controls TVs and video displays
USB:
Browses compatible media on an Apple iOS device that is connected to, or a USB
device that is inserted in the AVR’s USB port Note: Does not require programming.
DVR:
Controls TiVo
®
recorders
Game:
Controls video-game consoles
Media Server:
Controls media servers
Network:
Browses compatible media on DLNA-compatible devices connected to your
home network and on vTuner (Internet Radio). Note: Does not require programming.
AUX:
Controls HDTV tuner boxes, CD players, VCRs and PVDs.
Although the Source Selector buttons are preprogrammed for the device types listed
above, you can reassign a Source Selector button to a different device type. See
Reassigning a Source Selector Button for a Different Device Type, on page 24.
Once you have programmed the remote, you can switch the remote’s control mode to
access the functions for a particular device by pressing the remote’s Source Selector
button for that device.
Follow these steps to program the Source Selector buttons for your source devices:
1. Turn on the source device you want to program the remote to control.
2. Look up the code numbers for the device in Tables A14 – A24 in the Appendix. Write all
the applicable code numbers in a convenient place.
3. Press the Source Selector button for the device and hold it as it glows red, goes dark
and glows red again. Then release it. The remote is now in the Programming mode.
NOTE:
The remote will remain in the Programming mode for 20 seconds. If you do not
complete Step 4 within 20 seconds, the remote will exit the Programming mode, and you
will need to repeat Step 3.
4. Aim the remote at the source device and use the remote’s Number buttons to enter a
code number from Step 1, above.
a) If the device turns off, press the Source Selector button again to save the code. The
Source Selector button will flash, and the remote will exit the Programming mode.
b) If the device does not turn off, enter another code number.
c) If you run out of code numbers for a device, you can search through all of the codes
in the remote’s library for dervices of its type by pressing the remote’s Up button
repeatedly until the device turns off. When it does, press the Source Selector button
to save the code.
5. Check that other functions control the device correctly. Sometimes manufacturers use
the same Power code for several models, while other function codes vary. Repeat this
process until you’ve programmed a satisfactory code set that operates most of the
device’s functions.
6. If you searched through the remote’s code library to find the code, you can find out
which code number you have programmed by pressing and holding the Source Selector
button to re-enter the Programming Mode. Then press the remote’s OK Button, and the
Source Selector button will flash in the code sequence. One flash represents “1,” two
flashes for “2,” and so forth. A series of quick flashes represents “0.” Record the code
number programmed for each device in Table A9 in the Appendix.
Repeat Steps 3 – 6 for each source device you want to control with the AVR remote.
Reassigning a Source Selector Button for a Different Device Type
You can reassign a Source Button to control a different device type (for example, you can
program the Media Server button to control a DVD player).
1. Turn on the source device you want the remote to control.
2. Look up the code numbers for the device in Tables A14 – A24 in the Appendix. Write all
the applicable code numbers in a convenient place.
3. Press the Source Selector button you want to override and hold it for three seconds
as it glows red, goes dark and glows red again. Then release it. The remote is now in
the Programming mode.
4. Press the Source Selector button that corresponds to the source device’s type (i.e.,
for a DVD player, press the Blu-ray button). The Source Selector button you pressed in
Step 3 will flash once.
5. Aim the remote at the source device and use the remote’s Number buttons to enter a
code number from Step 2, above.
a) If the device turns off, press the Source Selector button from Step 3 again to
save the code. The Source Selector button will flash, and the remote will exit the
Programming mode.
b) If the device does not turn off, enter another code number.
c) If you run out of code numbers for a device, you can search through all of the codes
in the remote’s library for devices of its type by pressing the remote’s Up button
repeatedly until the device turns off. When it does, press the Source Selector button
from Step 3 to save the code.
Most of the button labels on the AVR remote describe each button’s function when the
remote is used to control the AVR. However, the button may perform a different function
when used to control another device. Refer to the Remote Control Function List, Table
A13 in the Appendix.
You can also program the remote to perform Macros (preprogrammed code sequences
that execute many code commands with a single button press), and for “punch-
through” programming (allowing the remote to operate a device’s channel or transport
controls when the remote is in another device’s mode). See Advanced Remote Control
Programming, on page 41, for instructions on these functions.