


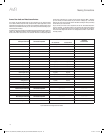


AVR
18
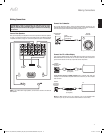
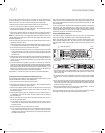
AVR Input Connector Connected Component
Default Source Button
Assigned
Source Button
AVR 3650/AVR 365 AVR 2650/AVR 265
HDMI 1 Blu-ray Blu-ray/TV
HDMI 2 Cable/Sat Cable/Sat
HDMI 3 Game Game
HDMI 4 Media Server Media Server
HDMI 5 TV DVR
(AVR 3650/AVR 365 only) HDMI Front Aux – –
Component Video 1 A (red) A (red)
Component Video 2 B (green) B (green)
Composite Video 1 C (yellow) C (yellow)
Composite Video 2 D (blue) D (blue)
Optical Digital Audio 1 A (red) A (red)
Optical Digital Audio 2 B (green) B (green)
Coaxial Digital Audio Input 1 C (yellow) C (yellow)
Coaxial Digital Audio Input 2
Analog Audio In 1 D (blue) D (blue)
Analog Audio In 2 Aux
Analog Audio In 3
Monitor Output Connector Connected Component
— — — — — — — —
HDMI Monitor Out — — — — — — — —
Composite Video Monitor Out — — — — — — — —
Record Output Connector Connected Component
— — — — — — — —
Composite Video Rec Out — — — — — — — —
Optical Digital Audio Out — — — — — — — —
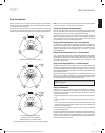
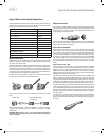
Input Connections and Assigned Source Buttons
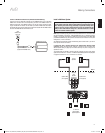
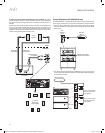
Making Connections
Connect Your Audio and Video Source Devices
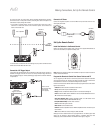
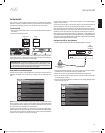
Your receiver has several different types of input connectors for your audio and video
source devices: HDMI, component video, composite video, optical digital audio, coaxial
digital audio and analog audio. The connectors are not labeled for specific types of source
devices; they are labeled numerically, so you can connect your devices according to your
individual system’s makeup.
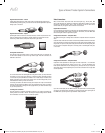
Your AVR’s various source buttons have default assignments to different input connectors
(listed in the “Default Source Button” column of the table below). For ease of setup, you
should connect each source device to the connector where the corresponding default
source button is assigned (e.g., connect your Blu-ray Disc player to HDMI 1). However,
you can connect your source devices as you wish and re-assign any of the source
buttons to any of the input connectors listed in the table according to where you actually
connect each of your source devices.
As you connect your various source components, fill out the “Connected Component”
column in the table – it will make it easier for you to assign the various source buttons
after you have completed making all of the connections. (You will make any changes to
the source-button assignments and fill in the “Assigned Source Button” column later in
the setup process.)
0295CSK - HK (x65Series) AVR3650_365_2650_265 CORE OM, WORK18 danny.indd 18 01/07/11 11:33:43