


42
AVR
System Settings
System Settings
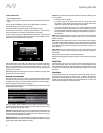
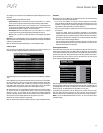
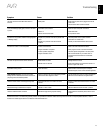
The AVR’s System Settings menu lets you customize in what way many of the AVR’s
features operate. Press the AVR button and navigate to the System line. Press the OK
button to display the System Settings menu.
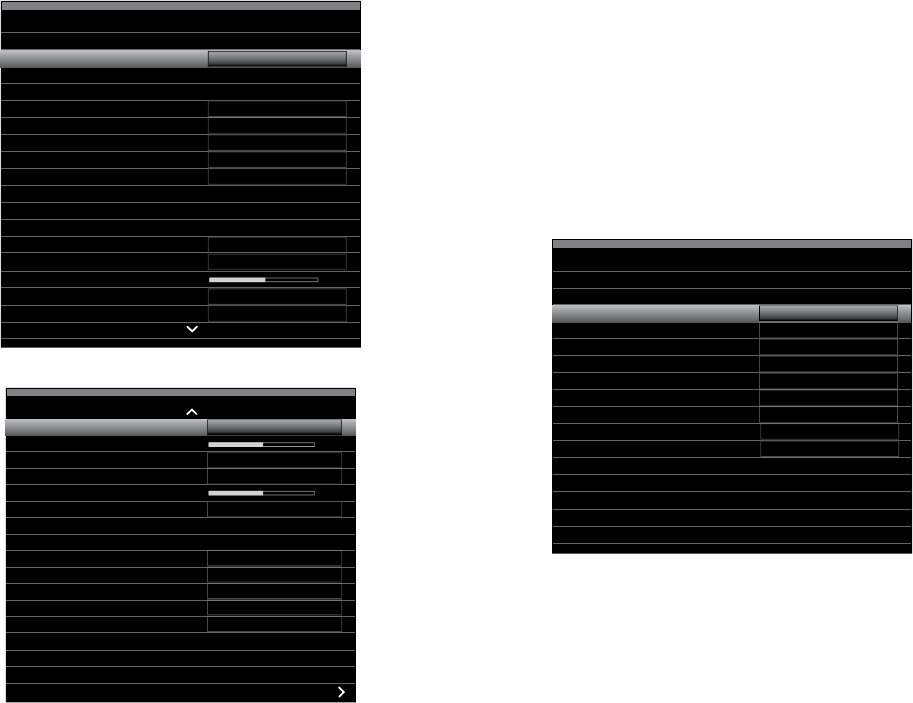
System Settings
Front Panel Settings
Panel Brightness:
100%
dB
Off
Feet (ft)
English
On
HDMI out 1
Auto
Off
Off
HDMI Settings
HDMI Audio to TV:
HDMI Control:
Audio Return Channel:
CEC Power Control:
TV Control:
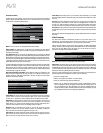
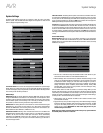
General AVR Settings
Network Settings
Volume Units:
Volume Default:
Volume Default Level
Unit of Measure:
Language:
System Settings
Volume Default:
Volume Default Level
Unit of Measure:
Language:
Dolby Vol. Calibration:
RS232 Control:
Off
Feet (ft)
English
Off
13-10-2012 01
Medium
3 seconds
30 seconds
5 minutes
10 minutes
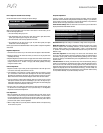
Menu Appearance
Menu Transparency:
Volume/Status Messages:
Menus:
Setup and Slide-In Menus:
Screen Saver:
System Info
Software Version:
Upgrade Software
Front-Panel Dimmer: This control sets the brightness of the AVR’s front-panel message
display. Select from 100%, 50%, 25% or Off. The light inside the Volume Control will go
out when the display is partly or fully dimmed, but the Power Indicator will always remain
lit to remind you that the AVR is powered on.
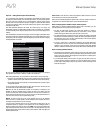
HDMI Settings
HDMI Audio to TV: This setting determines whether HDMI audio signals are passed
through the HDMI Monitor Out connector to the video display. In normal operation, leave
this setting at Off, as audio will be played through the AVR. To use the TV by itself, without
the home theater system, turn this setting to On. In this case you will need to mute the
TV’s speakers (or switch the setting to Off) when using the AVR for audio.
HDMI Control: This setting allows the communication of control information among the
HDMI devices in your system. Turn this setting to On to allow control communication
between the HDMI devices; turn the setting to Off to forbid control communication. (For
AVR 3700/AVR 370 select HDMI Out 1, HDMI Out 2 or Off.)
Audio Return Channel: Selecting “Auto” will send audio from the TV to the AVR via the
HDMI Audio Return Channel (ARC) connection (which is in the HDMI cable connecting
the AVR to the TV). The TV source’s “Audio Input from Source” will be automatically
reassigned to the HDMI ARC connector. This way, whenever you’re watching a source
that is connected directly to your TV (such as an Internet connection), you can listen to
the sound through the AVR.
CEC Power Control: This setting links the power on/off functions of the AVR to those of a
TV connected to its HDMI Monitor Out connector. When Power Control is set to On, turning
the TV’s power off will automatically put the AVR into the Standby mode; turning the TV’s
power on will automatically turn the AVR on. NOTE: The connected TV must support the
HDMI System Standby CEC (Consumer Electronics Control).
TV Control: This setting extends some audio-control functions between the AVR and a TV
connected to its HDMI Monitor Out connector. When TV Control is set to On, if the TV is set
to use external speakers, the TV’s internal speakers will mute, and you can use the TV’s
remote to control the AVR’s volume up/down and mute functions. If the TV is set to use
its internal speakers, the AVR’s output will automatically mute. NOTE: The connected TV
must support the HDMI Remote Control/System Audio Control CEC (Consumer Electronics
Control).
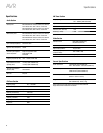
General AVR Settings
Network Settings: Select this to set up your AVR for connection to your wired home
network. Note: The AVR 3700 and AVR 370 will first present a Wired/Wireless/Network
Upgrade screen. For information about the Wired Network connection screen, see Set Up
the Network, on page 27.
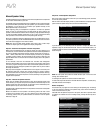
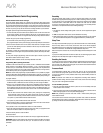
Network Settings
Mac
Network Settings:
IP Address:
Subnet Mask:
0x:00:0x:00:0x:0x
Automatic
000 . 000 . 000 . 000
000 . 000 . 000 . 000
000 . 000 . 000 . 000
000 . 000 . 000 . 000
000 . 000 . 000 . 000
Off
000.000.000.000
00000
Connected
Gateway:
Primary DNS:
Secondary DNS:
Proxy
IP Address:
Proxy Port:
Network Status:
Apply & Save
sMac: This line is informational only and identifies the AVR to other devices on your
home network and the Internet for www.radioharmankardon.com.
sNetwork Settings: Since most networks use automatic IP address settings, in most
cases you can set Network Settings to Automatic. If you are required to use a static
IP address and network settings, you must obtain these settings from your ISP or
network administrator. Use the OK button to set this line to “Manual.” The following
settings will become active: IP Address, Subnet Mask, Gateway, Primary DNS,
Secondary DNS. If your network is a proxy network, enter those settings for Proxy,
the second IP Address and Proxy Port.
Use the Number buttons to make the entries for all of these settings. When you have
finished, select Apply & Save, and press the OK button. The AVR will enter the Standby
mode. When you turn the AVR back on, it will attempt to connect to the network using the
settings you entered. If the AVR cannot connect to the network using the manual settings,
contact your ISP or network administrator for assistance.
sNetwork Status: This line indicates the AVR’s current network-connection status
(Connected/Not Connected).
sApply & Save: Any time you make a change in any of the Network settings, the Apply
& Save line will become available. Select this line and press the OK button. The AVR
will go into the Standby mode. After you turn the AVR back on, the new network
settings will be in effect. IMPORTANT: You must select Apply & Save for your
network settings to take effect.
NOTE: If you have trouble connecting to the network at any time, cycle the AVR into
the Standby mode, and then turn it back on.