Installation, Set Up & Configuration
12
ENGLISH
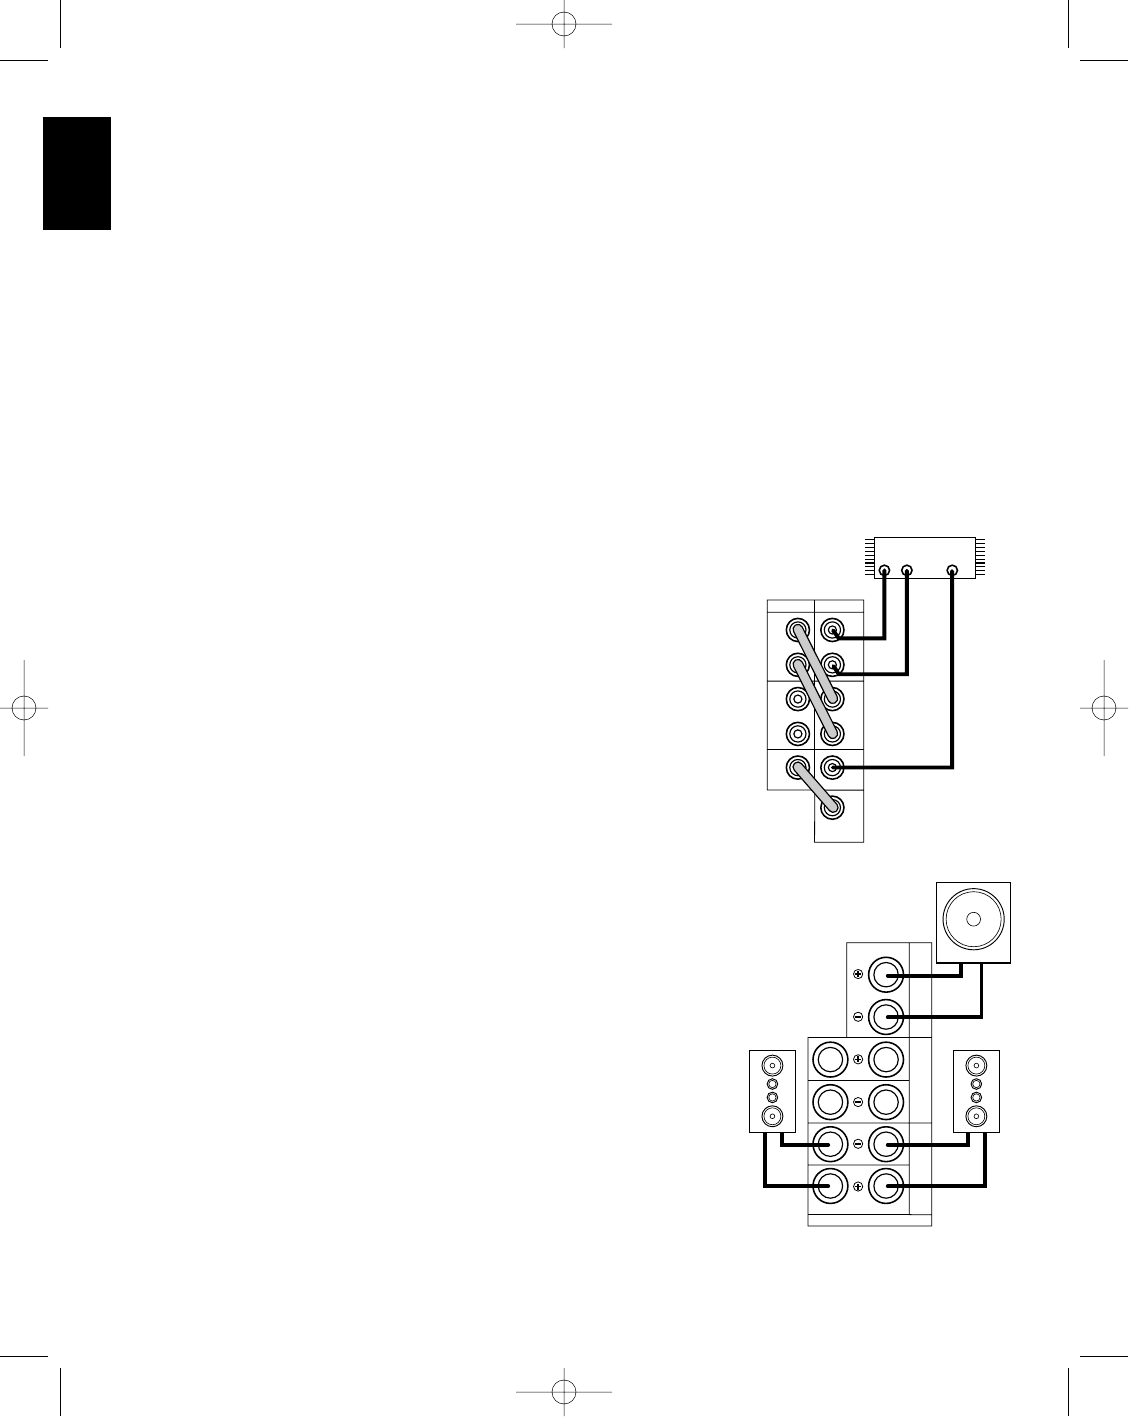
External Audio Power Amplifier
Connections
Using the PRE OUT jacks ñ,
connections may be made to external
power amplifiers. To make these
connections, remove the jumpers between
PRE-OUT and MAIN IN, and save
them for future use. Connect the PRE-
OUT of the channels to be connected to
external amplifiers to that amplifier’s
inputs. Volume will still be controlled by
this receiver.
When an external amplifier is used for
the front channels, this receiver’s rear
channel outputs and one passive (non-
powered) subwoofer may be connected to
this unit’s internal amplifier for higher
power output. To make these
connections, follow the diagrams on this
page. Using short RCA to RCA jumpers,
connect the left and right SURR PRE-
OUT jacks to the left and right FRONT
MAIN IN jacks. A subwoofer may be
connected by connecting the
SUBWOOFER PRE OUT to the
CENTER MAIN IN.
If these connections are used, changes
must be made to the speaker outputs.
Connect the left and right surround
speakers to the speaker terminals labeled
FRONT ˙î and the passive subwoofer
to the speaker terminals labeled
CENTER ∆.
NOTE: When external power amplifiers
are used, the center channel speakers
should receive at least as much amplifier
power as the front left and right speakers.
AC Power Connections
This unit is equipped with two accessory
AC outlets. They may be used to power
accessory devices, but they should not be
used with high current draw equipment
such as power amplifiers (not more than
50 Watts each).
The SWITCHED † outlet will receive
power only when the unit is on. This is
recommended for devices that have no
power switch, or a mechanical power
switch that may be left in the “ON”
position (as for example with the
harman/kardon CDPlayer HD730).
Devices with electronical power switch
may only switch on to standby mode, if
pluged in here.
The UNSWITCHED ü outlet will
receive power as long as the unit is
plugged into a powered AC outlet.
Finally, when all connections are
complete, plug the power cord into a
non-switched AC wall outlet. Note that
the ring surrounding the Power Switch
( will turn amber. You’re almost ready
to enjoy the AVR80!
CENTER
SURR.
8 OHMS
8 OHMS
FRONT
8 OHMS
RL
SPEAKERS
Subwoofer
Left Surround
Speaker
Right Surround
Speaker
+
–
–
MAIN IN PRE OUT
L
FRONT
R
L
SURR.
R
CENTER
SUB
WOOFER
LR
External
Power Amplifier
CENTER
+
+
–
Use these connections when the AVR80’s
internal amplifiers are re-configured from
their factory settings
AVR80 manual 11/01/98 13:01 Side 12


