


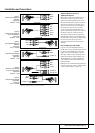

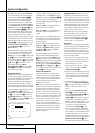

SYSTEM CONFIGURATION 23
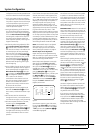
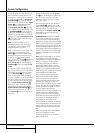
System Configuration
field presentations.The choices available are Hall
1, Hall 2,Theater,VMAx Near and VMAx Far.The
Hall and Theater modes are designed for multi-
channel installations, while the two VMAx modes
are optimized for use in delivering a full surround
field when only the front left and front right
speakers are installed. See pages 27 for a com-
plete explanation of the DSP surround modes.
Note that the Hall and Theater modes are not
available when a Dolby Digital or DTS soundtrack
is played.
On the
STEREO menu,the selection choices
made with the
‹
/
›
Buttons
Ea
on the
remote may either turn the surround processing
off for a traditional two-channel stereo presenta-
tion, or select
5 Stereo or 7 Stereo
depending on whether the 5.1 or 6.1/7.1 output
is in use.The latter modes feed the stereophonic
input signal to both front speakers, to the rear
speakers and to both surround back speakers (if
in use), while the monophonic signal parts are
spread over all speakers, also the Center.
See page 28 for a complete explanation of the
5 Stereo and 7 Stereo modes.
After the selections are made in the Dolby, DTS,
Logic 7, DSP (Surround) or Stereo menus, press
the
⁄
/
¤
buttons
D
so that the cursor moves
to the
BACK TO SURRSELECTline and
presss the Set Button
F
.
After one input has been adjusted for analog or
digital input, speaker type and surround mode,
return to the
INPUTSETUPline on the
MASTERmenu and enter the settings for each
input that you will use. In most cases, only the
digital input and surround mode may be different
from one input to the next, while the speaker type
will usually be the same (inputs set to
GLOBAL). But if prefered you can also select
different speaker types or turn speakers on or off
individually for each input in use.
Configuring the Surround Off
(Stereo) Modes
For superior reproduction of two-channel program
materials, the AVR offers two Stereo modes: an
analog Stereo-Direct mode that bypasses the digi-
tal signal processing circuitry for a completely
analog signal path that preserves the purity of the
original signal, and a digital mode that is capable
of providing bass management for optimal distri-
bution of the low frequencies between smaller
speakers and a subwoofer.
Stereo-Direct (Bypass) Mode
When the analog Stereo-Direct mode is selected
by pressing the Stereo Mode Selector
S
until SURROUNDOFFappears in the Main
Information Display
˜
and the Surround
Mode Indicator
(
for Surround Off is lit, the
AVR will pass the analog source material directly
through to the front left and right speakers,
bypassing the digital processing circuitry.
In this mode, the front left and right speakers will
automatically be configured as
LARGE; it is not
possible to configure these speakers as
SMALL.
When the AVR is in the Stereo Bypass mode you
may still configure the subwoofer output so that
it is either turned off, with a full-range signal
going to the front left/right speakers, or you may
configure it so that the subwoofer feed is activat-
ed.The factory default setting is to have the sub-
woofer turned off for this mode, but you may
change that setting by following these steps:
1. Press the Speaker Button
6
b
.
2. Press the Set Button
F
@
to activate the
configuration menu.
3. Press the
⁄
/
¤
Buttons
D
on the remote or
the
‹
/
›
Buttons
7
on the front panel to select
the desired option.
SUBNONEturns off the
feed to the subwoofer, while
SUB<L+R>
turns it on.
4.When the desired setting has been entered,
press the Set Button
F
@
to return to normal
operation.
Stereo-Digital Mode
When the Stereo-Direct (Bypass) mode is in use a
full range signal is always sent to the front
left/right speakers. By its nature, that option does
not pass the signal through the AVR’s digital sig-
nal processing, creating the requirement for full-
range speakers. If your front speakers are band-
width limited,“satellite”speakers, we recommend
that you do NOT use the Bypass mode, but rather
use the
DSPSURROUNDOFFmode for
stereo listening.
To listen to programs in the two-channel stereo
mode while taking advantage of the bass man-
agement system, press the Stereo Mode
Selector
S
until SURROUNDOFF
appears in the Main Information Display
˜
and the DSP and SURR.OFFSurround
Mode Indicators
(
both light up.When only
the
SURR.OFFSurround Mode
Indicators
(
is lit you are in the Stereo-Direct
(Bypass) mode.
When this mode is in use, the front left/right
speakers and subwoofer may be configured to
meet the requirements of your specific speakers
using the steps shown in the Speaker Setup sec-
tion on page 19.
Delay Settings
Due the different distances between the listening
position for the front channel speakers and the
surround speakers, the amount of time it takes for
sound to reach your ears from the front or sur-
round speakers is different.You may compensate
for this difference through the use of the delay
settings to adjust the timing for the specific
speaker placement and acoustic conditions in
your listening room or home theater.
To re-synchronize the front, center and surround
channels at first measure and note the distance
from the listening/viewing position to the front,
center, surround and surround back (if any)
speakers in meters.
The Delay setting for all speakers configured for
your system will be available only (with 5.1 or
with 6.1/7.1 configuration) when any Dolby sur-
round mode is selected (except Dolby-3-Stereo).
In addition they are selectable with these modes
only, with all other modes the delay times are
fixed.
Note that the Delay settings are "Global" for all
inputs, using those Dolby modes, and need not to
be repeated with any input.
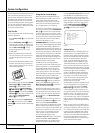
To start with the delay settings at first select any
input associated with such a Dolby mode. Next,
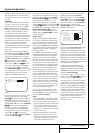
continue within the MASTERMENU
(Figure 1). If the system is not already at that
point, press the OSD button
L
to bring up the
master menu. Press the
¤
Button
D
three
times or until the on-screen
›
cursor is pointing
at the
DELAYADJUSTline. Press the Set
Button
F
to call up the menu.
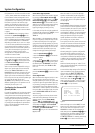
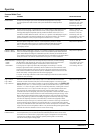
Figure 7
Next move the
›
cursor to the UNITline and
select the unit for distances you prefer to enter,
feet or meter. Then move the
›
cursor to the
CENTERline where the first adjustment is
made. Now press the
‹
/
›
Buttons
Ea
until
the distance from the center speaker to the pre-
ferred listening position is entered.When the
CENTERDELAYis entered, press the
¤
Button
D
once to move to the next line.
** DELAY ADJUST **
CENTER :10FT
SURROUND :10FT
SURR BACK :10FT
UNIT: FEET METER
BACK TO MASTER MENU