


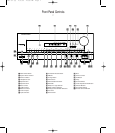
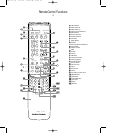

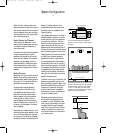
Front Panel Controls
& FM Mode: Press this button to
select the stereo or mono mode for
FM tuning. In the STEREO mode a
Stereo indicator will illuminate in the
Information Display ¯, and stereo
reception will be provided when sta-
tions are transmitting stereo signals.
In the MONO mode the left and right
signals from stereo broadcasts will
be mixed together and reproduced
through all channels. Select MONO
for better reception of weak signals.
* Dolby Pro Logic Selector: Press
this button to select the Dolby Pro
Logic surround mode when listening
to an analog program that is encoded
with surround-sound information. (See
page19 for more information on
surround modes.)
( Dolby 3 Stereo Selector: Press
this button to select the Dolby 3
Stereo listening mode. This mode
is used primarily when a program
has surround information when a
center channel speaker, but no
surround speakers, is installed.
(See page 19 for more information
on surround modes.)
Ó Analog Surround Mode
Selectors: Press one of these
buttons to select the analog sur-
round modes. These modes may
be used with any analog program
source to create a pleasing surround
effect. (See page 19 for more
information on surround modes.)
Ô Test Tone: Press this button to
begin the sequence of steps used to
set the AVR5’s output levels. When this
button is pressed, a test tone will
replace the currently selected listening
source and the Information Display
¯ will show the channel where the
test tone appears. The test tone will
automatically switch to the next chan-
nel after three seconds. (See page 16
for more information on using the test
tone to set the output levels.)
Surround Off: Press this button
to turn off all surround processing,
and to listen to a program in tradi-
tional stereo from the left front and
right front speakers only.
Ò Mute: Press this button to
momentarily silence the speaker
output of the AVR5.
Ú Volume Control: Turn the knob
clockwise to increase volume,
counterclockwise to decrease the
volume.
Û Set Button: This button has
two functions. If this button is
pressed while in normal operation,
the Information Display ¯ will
show the Surround mode for three
seconds. This button is also used to
enter an output level setting when
using the Test Tone and Selector
Buttons Ô˜. (See pages 15–17
for more information on setting
output levels.)
Ù Delay: Press this button to enter
delay time settings. (See page 17 for
more information on delay times.)
ı Channel Select: Press this
button during normal operation, or
during the Test Tone operation, to
begin the process that adjusts the
output levels.
NOTE: Be sure to select the Dolby
Pro Logic surround mode before cal-
ibration so that all five channels will
be adjusted. (See page 16 for more
information on setting output levels.)
ˆ Center Speaker Select Button:
Press this button to select the center
channel speaker. When it is first
pressed, the Information Display
¯ will show the currently selected
speaker type. Press it again to show
another speaker type or no speaker
option (this option is available with the
Dolby Pro Logic surround mode only).
Release this button when a desired
selection is shown in the Information
Display ¯. (See page 15 for more
information on setting the center
channel type.)
˜ Selector Buttons: Press these
buttons to adjust the AVR5’s output
levels. You may use these buttons
while you are checking the output
levels by pressing either the Test
Tone Button Ô or the Channel
Select Button ı.
NOTE: Be sure to press the Set Button
Û to enter a new output level each
time you adjust the channel. (See
pages 15–17 for information on set-
ting output levels using the test tone,
or page 22 for information on output
level trim using a normal program
source.)
¯ Information Display: This
display delivers messages and
status indications to help you
operate the receiver.
˘ Remote Sensor Window: The
sensor behind this window receives
infrared signals from the remote con-
trol. Aim the remote at this area and
do not block or cover it unless an
external remote sensor is installed.
9
AVR5 om (e) 2/5/99 10:38 AM Page 9