


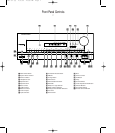

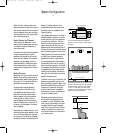
Front Panel Controls
8
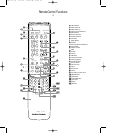
1 Main Power Switch: Press this
button to apply power to the AVR5.
When the switch is pressed in the
unit is placed in a Standby mode,
as indicated by the amber LED 3
surrounding the System Power
Control 2. This button MUST be
pressed in to operate the unit. To turn
the unit off and prevent the use of the
remote control, this switch should be
pressed until it pops out from the
front panel so that the word “OFF”
may be read at the top of the switch.
NOTE: In normal operation this
switch is left in the “ON” position.
2 System Power Control: When
the Main Power Switch
1
is “ON,”
press this button to turn on the
AVR5; press it again to turn the unit
off. Note that the Power Indicator
surrounding the switch
3
will turn
green when the unit is on.
3 Power Indicator: This LED will
illuminate in amber when the unit is
in the Standby mode to signal that
the unit is ready to be turned on.
When the unit is in operation, the
indicator will turn green. A red indi-
cator means that the unit is in the
Protect mode, and should be turned
off and then checked for a possible
speaker wire short circuit.
4 Headphone Jack: This jack may
be used to listen to the AVR5’s out-
put through a pair of headphones.
Be certain that the headphones
have a standard
1
⁄4" stereo phone
plug.
7 Bass Control: Turn this control to
modify the low-frequency output of
the left/right channels by as much as
±10dB. Set this control to a suitable
position for your taste and room
acoustics.
5 Speakers ON Button: This
button turns the speakers on for
normal listening.
6 Speakers OFF Button: This but-
ton turns the speakers off for private
listening when the headphones are
in use.
8 Treble Control: Turn this control
to modify the high-frequency output
of the left/right channels by as much
as ±10dB. Set this control to a
suitable position for your taste and
room acoustics.
9 Balance Control: Turn this
control to change the relative volume
for the front left/right channels.
NOTE: For proper operation of the
surround modes this control should
be at the midpoint, or “12 o’clock”
position.
) Video 3 Inputs: These
audio/video inputs may be used
for temporary connection of video
games, camcorders, digital still
cameras or portable audio products.
To select a source connected to
these jacks, press the Vid 3 Input
Selector !.
! Input Selectors: Press one of
these buttons to select or change
the input source. If the unit is in the
Standby mode, pressing one of these
buttons will also turn the AVR5 on.
@ 6-Channel Direct Selector:
Press this button to select the output
of an optional, external 6-channel
decoder connected to the 6 Ch
Direct inputs ° as the listening
source.
# AM/FM: Press this button to
select the tuner as the AVR5’s input
source. When it is first pressed the
last station tuned will be heard.
Press it again to change between
AM and FM bands.
$ Tuning Button: Press the left
side of the button to tune lower
frequency stations and the right side
of the button to tune higher frequency
stations. When a station with a strong
signal is tuned, the TUNED indicator
will illuminate in the Information
Display ¯. A brief (1/2 second)
press of the button will manually
tune to the next frequency incre-
ment, while pressing and holding
the button for a longer period will
automatically tune to the next station
with a signal strong enough for
acceptable reception.
% Preset Scan: Press this button
to automatically scan through the
stations that have been programmed
in the AVR5’s memory. The tuner will
play five seconds of each station
before moving to the next preset
station. To stop the scan when the
desired station is heard, press the
button again. (See page 21 for more
information on the tuner memory
system.)
^ Preset Stations Selector: Press
this button to select stations that
have been entered into the preset
memory. (See page 21 for more
information on tuner programming.)
AVR5 om (e) 2/5/99 10:38 AM Page 8