


System Configuration
19
IMPORTANT NOTE: Many listeners
are often confused aboutthe operation
of the surroundchannels. While some
assume that soundshould always be
coming from eachspeaker, most of the
time there willbe little or no sound in
the surround channels.This is because
they are onlyused when a movie director
or sound mixerspecifically places sound
there to create ambiance,an effect or to
continue action from the front of the
room to the rear. When the output levels
are properly set itis normal for rear/
surround speakers to operate only
occasionally. Artificially increasing the
volume to therear speakers may destroy
the illusion ofan enveloping sound field
that duplicates theway you hear sound
in a movietheater or concert hall.
Before beginning the adjustment process
make certain that all speaker connections
have been properly made. The system
volume should be set to the level that
you will use during a typical listening
session. Finally, make certain that the
Balance Control 9 is set to the center
“12 o’clock” position.
To adjust and calibrate the output levels,
follow these steps. For accurate calibration,
it is a good idea to make these adjustments
from the location in your room that is
your favorite listening position:
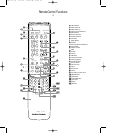
1. Put the AVR5 in the Dolby Pro Logic
mode by pressing the Dolby Pro
Logic Selector * on the front
panel or by pressing the Surround
Mode Selector on the remote
until PRO LOGIC appears in the
Information Display ¯ and the
PRO LOGIC indicatorlights.
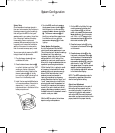
2. Press the Test Tone button "
Ô on the remote or front panel.
The word TEST will appear in the
Information Display ¯, and the
letters FL will flash once each second.
3. At this point, the test noise will begin
to circulate among all the speakers in
a clockwise rotation.
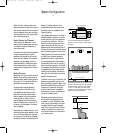
NOTE: This is a good time to verify
that the speakers have been properly
connected. As the test noise circulates,
listen to make certain that the sound
comes from the speaker position
shown in the Main Information
Display. If the sound from a speaker
location does NOT match the position
indicated in the display, turn the
AVR5 off and check the speaker
wiring to make certain that each
speaker is connected to the correct
output terminal.
4. After checking for proper speaker
placement and connection, continue
to let the test noise circulate so that
you may judge the output level of
each speaker position to the others. As
you listen to the relative output levels,
use the front left speaker as a refer-
ence, and make a note of which of
the other speakers are louder or softer
than the front left.
NOTE: The subwoofer output level is not
adjustable using the test tone. To change
the subwoofer level, follow the steps for
Output Level Trim Adjustment on page 22.
5. To change the output level, let the test
noise circulate until the channel
requiring adjustment appears in the
Information Display, and then press
the
‹
/
›
buttons { to stop the
circulation and raise or lower the
output. For example, using the front
right speaker as a reference, to adjust
the center speaker level, press the
‹
/
›
buttons ˜{when TEST
CTR appears in the display.
6. During level adjustment, the flashing
speaker position indication will be
replaced with a positive or negative
number to indicate the output offset
from the reference level. Use the
‹
/
›
buttons ˜{until the level
is equal to the reference, then press
the Set button Û}to enter the
setting into the AVR5’s memory. Note
that output level adjustments must be
made within three seconds or the test
noise will begin to circulate.
AVR5 om (e) 2/5/99 10:38 AM Page 19