


System Configuration
18
System Setup
Once the speakers have been placed in
the room and connected, the final step in
the setup process is to enter the settings
that configure the AVR5 for the type of
speakers used in your system, the calibra-
tion of the output levels and the delay
times used by the surround sound
processor. Before proceeding further, this
is a good time to review the installation
section of the manual to make certain
that all connections are properly made.
You are now ready to power up the AVR5
to begin these final adjustments.
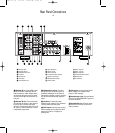
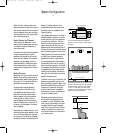
1. Plug the Power Cable › to an
unswitched AC outlet.
2. Press the Main Power Switch 1
in so that it latches in with the “OFF”
wording on the top of the switch
inside the front panel. Note that the
Power Indicator 3 will briefly
turn red, then amber, indicating that
the unit is in the Standby mode.
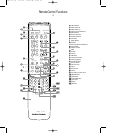
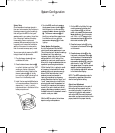
3. Install the two supplied AAA batteries
in the remote as shown. Be certain to
observe the (+) and (
–
) polarity
indicators shown in the bottom of the
battery compartment.
4. Turn the AVR5 on either by pressing
the System Power Control 2 on
the front panel, or via the remote by
pressing the Main Power On button
ç. The Power Indicator 3 will
briefly turn red and then green to con-
firm that the unit is on, and the
Information Display ¯ will also
light up.
Center Speaker Configuration
An initial adjustment tells the AVR5
which type of center speakers are in use.
This is important as it adjusts the settings
that determine if they receive low-
frequency (bass) information. For these
settings use the LARGE setting if the
speakers for a particular position are tra-
ditional full-range loudspeakers that are
capable of reproducing sounds below
100Hz. Use the SMALL setting for small-
er, frequency-limited satellite or center
speakers that do not reproduce sounds
below 100Hz. Note that when “small”
speakers are used, a subwoofer is
required to reproduce low-frequency
sounds. Remember that the “large” and
“small” descriptions do not refer to the
actual physical size of the speakers, but
their ability to reproduce low-frequency
sounds. If you are in doubt as to which
category describes your speakers, consult
the specifications in the speakers’ owner’s
manual, or ask your dealer.
With the AVR5 turned on, follow these
steps to configure the speakers:
1. Put the AVR5 in the Dolby Pro Logic
mode by pressing the Dolby Pro
Logic Selector * on the front
panel or by pressing the Surround
Mode Selector on the remote,
until PRO LOGIC appears in the
Information Display ¯ and the
PRO LOGIC indicatorlights.
2. Press the Center buttonˆ on the
front panel or the Center button¥
on the remote.
3. Press the Center buttonˆ on the
front panel or the Center button¥
on the remote until the desired center
channel speaker type appears in the
Information Display ¯ , using the
definitions for “Large” and “Small”
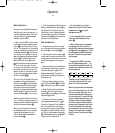
that appear above. If no center channel
speaker is installed, press the button
until the display reads NONE as shown
in the Information Display.
NOTE: The AVR5’s subwoofer output is
always active, regardless of the center
channel configuration setting.
Output Level Adjustment
Output level adjustment is a key part of
the configuration process for any sur-
round sound product. It is particularly
important for a digital-ready receiver
such as the AVR5, as correct outputs will
ensure that you hear sound tracks in their
proper place with the proper intensity.
AVR5 om (e) 2/5/99 10:38 AM Page 18