


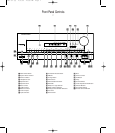


Remote Control Functions
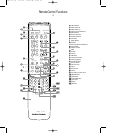
π Volume: When the remote has
been properly programmed for a
compatible device, these buttons
may be used to raise or lower the
volume of a TV. Note that they DO
NOT change the volume of the AVR5.
That is done with the Master Volume
button µ.
œ FM Mode: Press this button when
the tuner is in use in the FM band to
switch to monaural reception if the
station is weak and noisy. When the
MONO indicator is on, FM reception
will be monaural regardless of the
strength of the tuned FM station.
(See page 21 for more information.)
® Transport Controls: These but-
tons are used to control Play, Play
Forward, Play Reverse, Stop, Pause
and Record functions on compatible
Harman Kardon compact disc players/
changers and cassette tape decks.
When the remote has been pro-
grammed to control an external
device, such as a VCR, DVD or LD,
these buttons may be used to con-
trol the standard Forward, Reverse,
Stop and Pause functions, as well.
(See page 23 for information on
programming the remote.)
ß Tuning Up/Down: When the tuner
is in use, these buttons will tune up or
down through the selected frequency
band. A brief (
1
⁄2 second) press of
the button will manually tune to the
next frequency increment, while
pressing and holding the button for
a longer period will automatically
tune to the next station with a signal
strong enough for acceptable recep-
tion. These buttons will also control
Fast Forward and Fast Reverse (or
Rewind) for compatible Harman
Kardon compact disc players/
changers and cassette tape decks,
as well as controlling these functions
on a DVD or VCR, if the remote has
been properly programmed.
† Preset Up/Down: When the
tuner is in use, these buttons scroll
through the stations that have been
programmed into the AVR5’s memory.
These buttons also control the track
Skip Up and Down on compatible
Harman Kardon compact disc players/
changers as well as controlling the
similar functions on a DVD if the remote
has been properly programmed.
Source Power: When the remote
has been properly programmed to
control another product, and the
Device Control Selector ∂ for that
device has been pressed, press this
button to turn the product on or off.
V Numeric Keys: These buttons
serve as a ten-button numeric key-
pad to enter tuner preset positions.
They are also to be used to select
channel numbers when TV or VCR
has been selected on the remote, or
to select track numbers on a DVD
player, depending on how the
remote has been programmed.
W Direct: Press this button to select
a radio station by entering its fre-
quency using the Numeric Keys V.
(See page 21 for more information.)
X Auto Preset: When the tuner and
FM band have been selected, this
button may be used to automatically
program the tuner presets for all
active stations. To start the auto pre-
set scan, press and hold the button.
Note that the MEMO and PRESET indi-
cators will flash. After a few seconds,
the tuner will start to “look” for active
stations, as shown by increasing fre-
quency numbers in the Information
Display. Release the button and note
that the tuner will briefly stop at each
active station and add a preset num-
ber to the memory. If the FM tuner
found less the 30 FM stations with
acceptable signal strength, the Auto
Preset tuning will scan two more
cycles or until the remaining vacant
preset memory spaces have been
filled with those found in the first
scan. The scan will stop when all 30
preset memory spaces have been
filled or when three scans through
the band have been completed.
Y Center: Use this button to config-
ure the AVR5 for the type of center
channel speaker being used. (See
page 15 for more information.)
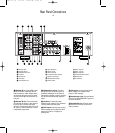
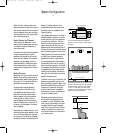
Z Secondary Control Cover: This
sliding cover normally is in the “up”
position so that it hides the sec-
ondary controls. To access these
controls, place your thumb on the
small recessed area at the top cen-
ter of the control, and gently press
the cover down and towards you.
{
‹
/
›
Buttons: These buttons
are used to change settings during
the level output adjustments with
either the test tone or an external
audio source. (See page 16 for
information on output level adjust-
ment with the test tone, or page 22
for level trim adjustment with an
external source.)
} Set Button: This button has
two functions. If this button is
pressed while in normal operation,
the Information Display ¯ will
show the Surround mode for three
seconds. This button is also used to
enter an output level setting when
using the Test Tone and Selector
buttons Ô˜. (See pages 15–17
for more information on setting
output levels.)
: Channel Button: Use this
button to adjust the AVR5’s output
levels using an external audio
source, rather than the internal test
signal generator. Each press of the
button will select a channel for
adjustment. To trim the output level,
use the
‹
/
›
buttons {. (See
page 22 for more information.)
" Test Tone: Press this button to
start the procedure for adjusting the
AVR5’s output levels. (See page 16
for more information.)
< Delay: Press this button to
change the AVR5’s delay settings.
To change the settings, first make
certain that the Pro Logic mode has
been selected. Then, each press
of the button will change the delay
setting in the following order:
(See page 17 for more information
on delay settings.)
> Memory: Press this button to
open a memory position that stores a
preset location for the AVR5’s tuner.
(See page 21 for more information on
tuner presets.)
15 ms 30 ms20 ms
14
AVR5 om (e) 2/5/99 10:38 AM Page 14