


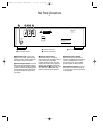
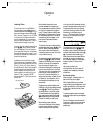

Front Panel Controls
5
1 Power Switch: Press this
switch to apply power to the FL8350.
When the FL8350 is first connected
to AC power, the Status Mode
Indicator 2 will turn green, and
the Information Display Ó will
illuminate. Press the switch again
to turn the unit off, and the Status
Mode Indicator will turn amber,
indicating that the unit is in a
Standby mode. When the FL8350 is
connected to a switched AC outlet,
such as those found on the back of
many audio products, it will return to
the ON mode when power is applied
to the switched outlet without any
further press of the switch.
2 Status Mode Indicator: When
the FL8350 is in the ON mode, this
indicator will glow green. When the
unit is off, the indicator will glow
amber, indicating that the unit is still
connected to the AC mains supply.
3 Headphones Jack: Connect a
set of standard headphones to this
jack for private listening.
4 Headphones Level: Turn this
knob to increase or decrease the
volume level for headphones con-
nected to the FL8350’s Headphones
Jack 3. Note that changing this
level will not change the sound level
for the unit’s main output, as that
remains constant.
5 CD Drawer: This drawer holds
the discs that will be played. Press
the Open/Close button !ato
open the drawer so that discs may
be inserted.
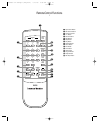
6Time Button: In normal opera-
tion, this display will show the run-
ning time of the track being played.
Press the button once to check the
time remaining for the track in play.
Press this button again to view the
total play time remaining for the disc
in play.
7 Repeat Button: Press this button
once to constantly repeat the track
currently being played. Press it a
second time to repeat the entire disc.
(See page 14 for more information.)
8 Intro Button: Press this button to
put the FL8350 in the Intro Scan
mode. When you press the button,
the unit will play the first 10 seconds
of each track on the disc, and then
move to the next track. Press the but-
ton again to defeat the function and
continue full play of the current track.
(See page 12 for more information.)
9 Clear Button: Press this button to
remove tracks from a programmed
sequence. Each press of the button
will remove one track, starting with
the last track programmed to play.
(See page 13 for complete informa-
tion on programming the FL8350.)
) Program Button: This button
is used to program the playback
of a disc in a particular order. (See
page 13 for complete instructions
on programming the FL8350.)
! Open/Close: Press this button
to open or close the disc drawer. DO
NOT push the drawer to close it, or
damage to the transport mechanism
may result.
@ Random Button: Press this
button to put a disc into play, and
to have all of the tracks played in
a random order. (See page 11 for
more information.)
# Pause Button: Press this button
once to momentarily pause a disc.
When the button is pressed again,
the disc will resume play at the point
it was paused.
$ Play Button: Press this button to
start the playback of a CD. If the CD
drawer is open, pressing this button
will automatically close the drawer.
% Stop Button: Press this button to
stop the disc currently being played.
(See page 11.)
^ Skip Button: Press either side of
this button to move to the next track
fl·
, or to move back to the previous
track
‡fi
on the disc being played.
& Search Button: Press either side
of this button to search forward
—
or backwards
‚
through a disc to
locate a particular portion of the
selection of the disc being played.
* Disc Skip Button: Press this
button to change to the next disc. If
a disc position is empty, the FL8350
will automatically search for the next
position that contains a disc.
( Disc Select Buttons: Press one
of these buttons to select the disc in
a specific position in the CD drawer.
Ó Information Display: This
display provides details about the
operation of the FL8350.
Ô Remote Sensor: The sensor
behind this window receives com-
mands from the remote control. Keep
this area clear if you wish to use the
FL8350 with a remote control.
FL8350 CD Changer (English) 7/11/00 9:30 AM Page 8