


SYSTEM CONFIGURATION 23
ENGLISH
System Configuration
Subwoofers produce largely nondirectional
sound, so they may be placed almost anywhere
in a room.Actual placement should be based on
room size and shape and the type of subwoofer
used. One method of finding the optimal
location for a subwoofer is to begin by placing it
in the front of the room, about 15cm from a
wall, or near the front corner of the room.
Another method is to temporarily place the
subwoofer in the spot where you will normally
sit, and then walk around the room until you
find a spot where the subwoofer sounds best.
Place the subwoofer in that spot.You should
also follow the instructions of the subwoofer’s
manufacturer, or you may wish to experiment
with the best location for a subwoofer in your
listening room.
Once the speakers have been placed in the room
and connected, the remaining steps are to pro-
gram the system configuration memories.
Although it is necessary to assign input/output
settings and surround mode choices manually,
we recommend that you take advantage of the
power and precision of EzSet/EQ to automatical-
ly select and enter the settings for all other
audio parameters.This will not only save you
time; it will ensure that your room is calibrated
and equalized with an accuracy not possible
when these settings are made manually. You are
now ready to power up the AVR 347 to begin
these final adjustments.
First Turn On
You are now ready to power up the AVR to
begin these final adjustments.
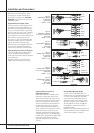
1. Plug the Power Cable
I
into an un-
switched AC outlet.
2. Press the Main Power Switch
1
in until it
latches and the word “OFF” on the top of the
switch disappears inside the front panel. Note
that the Power Indicator
3
will turn
orange, indicating that the unit is in the
Standby mode.
3. Remove the protective plastic film from the
main front-panel lens. If left in place, the film
may affect the performance of your remote
control.
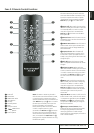
4. Install the three supplied AAA batteries in the
remote as shown. Be certain to follow the (+)
and (–) polarity indicators that are on the top
of the battery compartment.
5.Turn the AVR on either by pressing the
System Power Control
2
or the Input
Source Selector
%
on the front panel, or
via the remote by pressing the Power On
Button
3
, AVR Selector
5
or any of the
Input Selectors
46
on the remote. The
Power Indicator
3
will turn blue to confirm
that the unit is on, and the Main
Information Display
Ò
will also light up.
NOTE: After pressing one of the Input Selector
buttons
4
to turn the unit on, press the AVR
Selector
5
to have the remote control the AVR
functions.
Using the On-Screen Display
When making the following adjustments, you
may find them easier to make via the unit’s on-
screen display system.These easy-to-read
displays give you a clear picture of the current
status of the unit and facilitate speaker, delay,
input or digital selection you are making.
To view the on-screen displays, make certain you
have made a connection from either the HDMI
Output
X
or the Video Monitor Out jack
B
on the rear panel to the HDMI, component, com-
posite or S-Video input of your TV or projector. In
order to view the AVR’s displays, the correct
video input must be selected on your video dis-
play.
IMPORTANT NOTE:When viewing the on-screen
menus using a CRT-based projector, plasma display
or any direct-view CRT monitor or television, it is
important that they not be left on the screen for
an extended period of time. As with any video dis-
play, but particularly with projectors, constant dis-
play of a static image such as these menus or
video game images may cause the image to be
permanently “burned into” the CRT.This type of
damage is not covered by the AVR warranty and
may not be covered by the projector TV set’s war-
ranty.
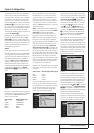
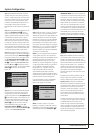
The AVR has two on-screen display modes,
“Semi-OSD” and “Full-OSD.” When making con-
figuration adjustments, it is recommended that
the Full-OSD mode be used.This will place a
complete status report or option listing on the
screen, making it easier to view the available
options and make the settings on the screen. The
Semi-OSD mode uses one-line displays only.
Note that when the full OSD system is in use,
the menu selections are not shown in the Infor-
mation Display
Ò
.When the full OSD menu
system is used,
OSDONwill appear in the
Main Information Display
Ò
to remind you
that a video display must be used.
When the semi-OSD system is used in conjunc-
tion with the discrete configuration buttons, the
on screen display will show a single line of text
with the current menu selection.That selection
will also be shown in the Main Information
Display
Ò
.
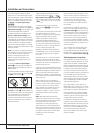
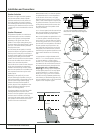
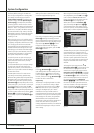
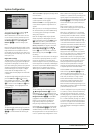
The full OSD system can always be turned on or
off by pressing the OSD button
L
.When this
button is pressed the
MASTERMENU
(Figure 1) will appear, and adjustments are
made from the individual menus. Note that the
menus will remain on the screen for 20 seconds
after the latest action was made on the screen
menu, then they will “time-out” and disappear
from the screen.The time-out may be increased
to as much as 50 seconds by going to the
SYSTEMSETUP menu, and changing the
item titled
FULLOSDTIMEOUT.
The semi-OSD system is also available as a sys-
tem default, although it may be turned off by
using the
SYSTEMSETUP menu. (See page
49).With the semi-OSD system, you may make
adjustments directly, by pressing the buttons on
the front panel or remote control for the specific
parameter to be adjusted. For example, to
change the digital input for any of the sources,
press the Digital Select Button
Û
G
and
then any of the Selector buttons
‹
/
›
7
or
⁄
/
¤
D
on the front panel or remote.
System Setup
The AVR 347 features an advanced memory
system that enables you to establish different
configurations for, digital input, surround mode,
for each input source. This flexibility enables you
to custom tailor the way in which you listen to
each source and have the AVR memorize them.
This means, for example, that you may associate
different surround modes and analog or digital
inputs with different sources. Once these
settings are made, they will automatically be
recalled whenever you select that input.
However, we recommend that the first time you
use the AVR, you take advantage of the simplici-
ty of configuring the system using the EzSet/EQ
process, which takes the guesswork out of
speaker size and delay settings, and balances
the speaker output levels to tailor the AVR’s
sound presentation to your specific system and
room. Before beginning the EzSet/EQ procedure,
there are a few adjustments that need to be
made to ensure accurate results.