


(5)(5)
(5)(5)
(5)
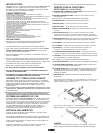
To mount a receiver in a 19" standard rack by using 2 long L type metal
racks (L1).
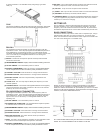
CHARGING CONNECTING DIAGRAM:
Connect the supplied DC cable to the receiver and the microphone, and it takes
around 10 hours to charge and the LED of transmitter is flashing all the time.
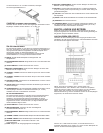
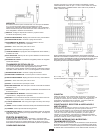
ZM-128 HANDHELD MICROPHONE:
The handheld microphone operates in UHF band frequency with PLL
synthesized control. UHF 700 preprogrammed selectable frequencies to
avoid interference. Uni-directional dynamic or uni-directional electret
condenser cartridges feature different characters for various choices. Use
1.5V x 2 AA size dry or rechargeable batteries for cost saving and
environmental protection.
(1)GRILLE: Protects the microphone capsule and helps reduce breath
sounds and wind noise.
(2) PROGRAMMABLE DISPLAY: Displays channel number and battery power level
(3) ON/OFF SWITCH: Turns transmitter power on and off.
(4) BATTERY COMPARTMENT: Insert 2 x1.5V AA dry or rechargeable batteries
into the compartment and make sure that the polarity of batteries is correct.
(5) CHANNEL + BUTTON: Press this button to change channel forward.
(6) CHANNEL BUTTON: Press this button to change channel backward.
(7) BATTERY COVER: Unscrew to expose battery compartment and
channel buttons.
(8) COLOR CLIP: This color clip helps to identify the frequency for multi-
channel operation.
(9) CHARGING INPUT: The inserted rechargeable batteries are charged by
using the supplied DC-plug cable connection to DC Out on the receiver.
It takes up to 10 hours for charging.
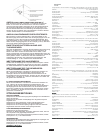
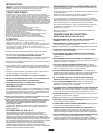
ZB-128 BODYPACK TRANSMITTER:
The bodypack transmitter operates in UHF band frequency with PLL
synthesized control. UHF 700 preprogrammed selectable frequencies to
avoid interference. Various uni-directional electret condenser cartridge
options. Use 1.5V x 2 AA size dry or rechargeable batteries for low
operating cost.
(1)ON/OFF SWITCH: Turns transmitter power on and off.
(2)3-PIN MINI XLR CONNECTOR: The included electret lapel microphone
is inserted into the connector on transmitter.
(3)PROGRAMMABLE DISPLAY: Displays channel number and battery power level
(4)CHANNEL + BUTTON: Press this button to change channel forward.
(5)CHANNEL BUTTON: Press this button to change channel backward.
(6)MIC/LINE SELECTOR: The switch sets the audio input either to
microphone level or line level.
(7)GAIN: The rotary control adjusts the sensitivity of the transmitter’s audio
to the level of the connected lapel microphone or instrument.
(8) BATTERY COMPARTMENT: Insert 2 X 1.5V AA dry or rechargeable batteries
into the compartment and make sure that the polarity of batteries is correct.
(9)MIC UNIT: The uni-directional electret condenser unit features the wide
frequency response for warm, rich bass and clear sound.
(10) TIE CLIP: To clip on the tie or lapel for free-movement.
(11) CABLE: With 3-pin mini XLR connector cable to connect the transmitter.
(12) ANTENNA: Permanently connected, helical antenna.
(13) CHARGING INPUT: The inserted rechargeable batteries are charged by
using the supplied DC-plug cable connection to DC Out on the receiver.
It takes up to 10 hours for charging.
SETTING UP:
Prior to setting up, check that the transmitter and receiver are tuned to
the same frequency. Two or above transmitters operating in the same
frequency can not be used at the same time and area, so please select
the different frequencies which can be used simultaneously at local area.
BASIC CONNECTIONS:
Connect the receiver output to the audio mixer or amplifier input, using a
standard audio cable with 3-pin XLR connectors or 1/4” phone plugs.
Never use the balanced and unbalanced audio outputs at the same time!
This may cause signal loss or increased noise.
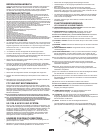
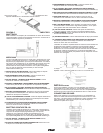
AB-8A, the antenna booster is highly recommended for long-distance
purpose, such as in stadium or in auditorium. By means of antenna
holder, the antenna and booster can put wherever you want. It is an ideal
design for multi-channel application. Antenna boosters are applied to the
receivers, which have detachable antennas.
AH-1 Antenna holder makes it easy to fix wherever for connection antenna and
booster. AH-1 can be assembled on the mic stand or on the wall.