


39
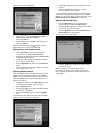
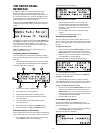
Importing Files to your Audio Server
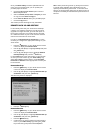
Double click on the folder entitled Import. An
empty folder window will be displayed.
To Import Music Files
Navigate to the location of the music les on your
computer.
Use your mouse to select the les you wish to
import and drag them into the Import window.
The les will appear briey in the Import window but
after a few seconds will disappear. These les should
now be accessible in the Audio Library of your Audio
Server.
Note: The currently supported audio le types for import
are WMA and MP3 (WMA Lossless and DRM protected
les are not supported). Any les of an unsupported
type that are dropped into the Import folder will not be
imported.
To Import Cover Art Files
Navigate to the location of the cover art les on
your computer.
Use your mouse to select the les you wish to
import and drag them into the Import window.
The les will appear briey in the Import window but
after a few seconds will disappear. These les should
now be available when selecting cover art for an album
in the Audio Library.
Note: The currently supported image le types are BMP
and JPEG. Files will be resized automatically. Any les of
an unsupported type that are dropped into the Import
folder will not be imported.
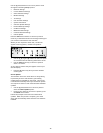
Exporting Files from your Audio Server
Double click on the folder entitled MusicShare. A
folder window will be displayed containing a folder
for each artist present in the Audio Library of your
Audio Server.
Double click on the folder for an artist. A folder
window will be displayed containing a folder for
each album by the chosen artist present in the
Audio Library.
Double click on the folder for an album. A folder
window will be displayed containing all the tracks
within the album and JPEG le containing the cover
art for the album.
You now have read only access to these les and can
drag and drop them to a location on your PC. You are
now also able to copy music from your Audio Server
directly to your portable player.
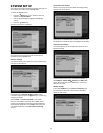
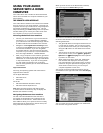
Transferring Music to your Portable Player
using iTunes
The iTunes Media Player application is specically
designed to simplify the process of synchronizing your
music collection with an iPod portable player. Support
for other devices is limited; you should check that
your portable player is compatible before using this
application. iTunes version 4.6 or later is required.
The Library source in iTunes shows all media les stored
on the local hard disk as well as media which has been
added from other network drives. You can add the
music collection from your Audio Server to the Library as
follows:
Select the Preferences option. This can be found
under the Edit menu on the Windows edition of
iTunes and under the iTunes menu on the Macintosh
version.
•
•
•
•
•
•
•
•
•
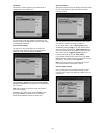
Select the Advanced tab.
Ensure that the option labelled Copy les to iTunes
Music folder when adding to library is unchecked.
Click the OK button to conrm any changes.
Making sure you have Library displayed in iTunes,
navigate to your Audio Server on the network.
Select the music you wish to transfer; you can
transfer entire albums, or all the music by a
particular artist, by dragging the relevant folder
into the iTunes Library and releasing the mouse
button. To transfer the entire contents of your
Audio Library, drag the folder entitled Albums By
Artist into the iTunes Library.
Note: the import process may take some time depending
on the number of albums and the speed of your
computer.
Once the iTunes Library source has been updated with
the music from your Audio Server you can you can
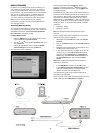
update your iPod as follows:
Connect your iPod in the normal way.
Click the Browse button in the top right-hand
corner of the iTunes window.
Drag any item from the Genre, Artist, Album lists
onto the iPod icon in the Source area.
The transfer process will begin shortly afterwards.
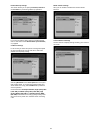
Updating the iTunes Library
If you have removed music from your Audio Server or
edited the names of any items in the library you will
need to update the iTunes Library to remove any broken
links. To do this, you should rst delete all the Audio
Server albums from the iTunes Library as follows:
Select the View Options item from the Edit menu.
Check the Grouping option, then click the OK
button to conrm your changes.
In the iTunes Library click the new Grouping column
heading. The tracks located on your Audio Server
hard disk will be grouped together using the label
<-AUDIOSERVER_NAME (e.g. <-Crestron-1234).
Click on the rst track in the list with this grouping
label then, holding down the Shift key, click the last
track.
Press the Delete key to remove these tracks from
the iTunes Library.
Click Yes to conrm your choice.
Repeat the import process described above to add back
the Audio Server information.
Transferring Music to your Portable Player
using Windows Media Player
It is also possible to use Windows Media Player to
transfer music from your Audio Server to your portable
device.
Firstly, make sure you can navigate to your Audio
Server and view the music in your MusicShare
folder.
Display the File drop down menu and select Add
to Library, followed by Add Folder. In the Explorer
window that appears navigate to your Audio Server
on the network and select the music you wish to
transfer; you can transfer entire albums, or all the
music by a particular artist by selecting the relevant
folder and clicking OK. To transfer the entire
contents of your Audio Library, select the folder
entitled MusicShare.
Note: the import process may take some time depending
on the number of albums and the speed of your
computer.
•
•
•
•
•
•
•
•
•
•
•
•
•
•
•
•