


5
XMA2
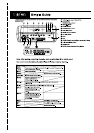
1) Press the POWER button 2.
∗ To turn the power off, press the POWER button for at least 1 second.
2) Press the FUNC button 2 to select another operation mode. The
mode switches as follows each time the FUNC button is pressed:
Radio ➜ Tape ➜ Radio
∗ “CASS” appears when no tape is loaded in the unit.
3) Use the Up and Down buttons 1 to adjust the volume.
w: Increases the volume.
z: Decreases the volume.
Audio Mode Adjustments
1) Press the A-M button @ to select the adjustment mode. The mode
switches as follows each time the A-M button is pressed:
BASS/TREB ➜ BAL/FAD ➜ Previous mode
2) Use the Left and Right and the Up and Down buttons !, 1 to
adjust the bass and treble.
<Adjusting the bass>
d: Bass gets stronger.
a: Bass gets weaker.
<Adjusting the treble>
w: Treble gets stronger.
z: Treble gets weaker.
3) Use the Left and Right and the Up and Down buttons !, 1 to
adjust the balance and fader.
<Adjusting the balance>
d: Sound from right speakers gets stronger.
a: Sound from left speakers gets stronger.
<Adjusting the fader>
w: Sound from front speakers gets stronger.
z: Sound from rear speakers gets stronger.
Switching the Display
While pressing the BAND button #, press the DISPLAY button 4 to
enter the clock display mode.
Main display ➜ Clock display ➜ Main display
7. OPERATION
Note:
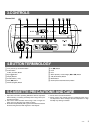
• Be sure to read this chapter referring to the front diagrams of chapter 2. CONTROLS on page 3.
When this unit is turned on, starting and stopping the engine
of a boat with its volume raised to the maximum level may
harm your hearing.
Be careful about adjusting the volume.
CAUTION
Basic Operations
Setting the Clock
1) While pressing the BAND button #, press the DISP button 4 to
enter the clock display mode.
2) While pressing the BAND button #, press and hold the DISP
button 4 for 2 seconds or more. This enables the clock editing
mode.
∗ The editable fields will be indicated when the display flashes.
3) To move between the hour and minute fields, use the left (hour)
and right (minute) buttons !.
4) To store the clock setting, press the BAND button #.
Notes:
• If you select another operation mode before completing the above
procedure, the clock setting operation will be canceled.
• Removing the vehicle’s battery for a check or repair will cause the
clock to reset to 1:00. Set the clock again if this happens.
Tape Operation
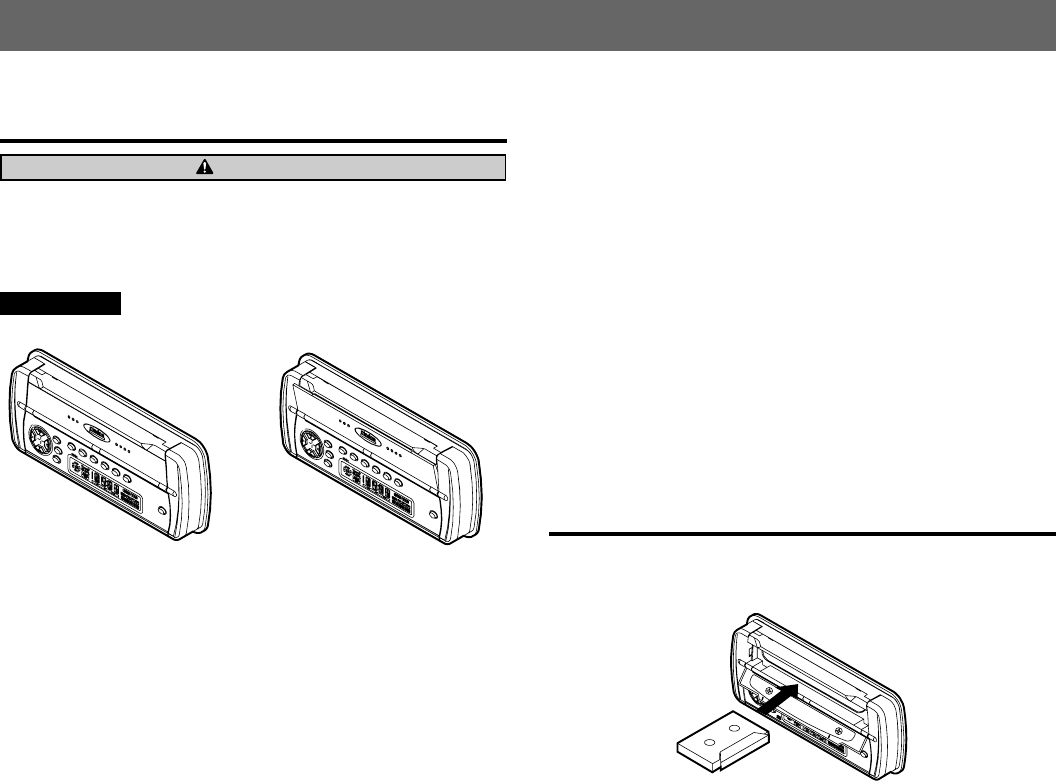
Loading Tapes
Open the door by push the hook.
OK NG
IMPORTANT
Door must be totally closed to prevent water go into the set!
Insert the cassette tape into the Cassette insertion slot with the side
on which the tape is exposed facing the right. Playback starts auto-
matically.
∗ When the end of the cassette tape is reached, the auto reverse mechanism
is activated and the other side of the tape begins playing automatically.
Note:
• Fully insert the cassette tape into the cassette insertion slot.
Listening to a tape which is already loaded
Press the FUNC button 2 to select the tape mode. Playback begins
automatically.
Ejecting Cassette Tapes
Open the door by push up the hook.
Press the Eject button 3. The cassette tape is ejected.
∗ The radio mode is selected automatically 4 seconds after ejecting the tape.
Fast-Forwarding and Rewinding
Use the FF button 8 and REW buttons 6.
D: Press this to fast-forward the tape.
A: Press this to rewind the tape.
∗ It is possible to listen to the radio during fast-forward, rewind or search
operations.