


Printed in Malaysia / Imprimé à Malaisie / Gedruckt in Malaysia / Stampato in Malaysia / Impreso en Malasia 2007/12 SE-305A
Installation/Wire Connection Guide
Guide d’installatio/câblage
Installation-/Anschluß-Anleitung
Installazione/Guida al Collegamento dei fili
Guia de instalación/Conexión
1 Power supply lead (5 m) ............................................... 1
2 Speaker input lead (0.3 m)............................................ 1
3 Remote control unit ....................................................... 1
4 Mounting bracket........................................................... 2
5 Tapping screw (dia.5 ✕ 16) ........................................... 8
6 Speed nut...................................................................... 4
7 Hook-and-Loop fastener (male) .................................... 1
8 Hook-and-Loop fastener (female) ................................. 1
9 Installation Manual ........................................................ 1
0 Warranty Card............................................................... 1
! User Registration Card ................................................. 1
ACCESSORIES / ACCESSOIRES / ZUBEHÖR / ACCESSORI / ACCESORIOS
1.
NAMES AND FUNCTIONS OF PARTS / NOMENCLATURE ET FONCTION DES PIècES / BEZEICHNUNGEN UND FUNKTIONEN DER TEILE / NOME E FUNZIONE DELLE PARTI / NOMBRES Y FUNCIONES DE LAS PARTES
2.
SRV314
17 cm COUNTER DRIVE POWERED SUB WOOFER
SUBWOOFER ALIMENTÉ DE 17 cm À ENTRAÎNEMENT INVERSÉ
17 cm ANGETRIEBENER COUNTER-DRIVE-SUBWOOFER
SUBWOOFER A CONTROPILOTAGGIO ALIMENTATO DA 17 cm
ALTAVOZ DE SUBGRAVES ALIMENTADO CON EXCITACIÓN INVERSA DE 17 cm
EspañolItalianoDeutschFrançaisEnglish
1 Cordon d’alimentation (5 m).......................................... 1
2 Cordon d’entrée d’enceinte (0.3 m) .............................. 1
3 Télécommande ............................................................. 1
4 Support de montage ..................................................... 2
5 Vis autotaraudeuse (dia. 5 ✕ 16) .................................. 8
6 Écrou à ressort ............................................................. 4
7 Fermeture velcro (mâle)................................................ 1
8 Fermeture velcro (femelle) ............................................ 1
9 Manuel d’installation ..................................................... 1
0 Carte de garantie ......................................................... 1
! Carte d’finscription utilisateur ...................................... 1
1 Netzversorgungskabel (5 m) ......................................... 1
2 Lautsprechereingangskabel ( 0.3 m ) ........................... 1
3 Fernbedienung .............................................................. 1
4 Montagebügel ............................................................... 2
5 Schneidschrauben (Durchmesser 5 ✕ 16).................... 8
6 Klemmmutter................................................................. 4
7 Klettbandstreifen (Haken) ............................................. 1
8 Klettbandstreifen (Ösen) ............................................... 1
9 Montageanleitung ......................................................... 1
0 Garantieschein ............................................................. 1
! Benutzerregistrierungskarte......................................... 1
1 Cavo di alimentazione (5 m) ......................................... 1
2 Cavo di ingresso diffusore (0.3 m) ................................ 1
3 Telecomando................................................................. 1
4 Staffa di installazione .................................................... 2
5 Viti autofilettanti (dia. 5 ✕ 16) ........................................ 8
6 Piastrina per viti autofilettanti ........................................ 4
7 Elemento di fissaggio (maschio) ................................... 1
8 Elemento di fissaggio (femmina)................................... 1
9 Manuale di installazione................................................ 1
0 Scheda di garanzia....................................................... 1
! Scheda di registrazione dell’futente............................. 1
1 Conductor de alimentación (5 m) .................................. 1
2 Conductor de entrada de altavoz (0.3 m)...................... 1
3 Unidad de control remoto.............................................. 1
4 Ménsula de montaje...................................................... 2
5 Tornillos autorroscantes (diá. 5 x 16) ............................ 8
6 Tuerca rápida ................................................................ 4
7 Fijador de gancho y bucle (macho)............................... 1
8 Fijador de gancho y bucle (hembra) ............................. 1
9 Manual de instalación ................................................... 1
0 Tarjeta de Garantía....................................................... 1
! Tarjeta de registro del usuario ..................................... 1
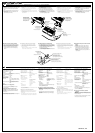
●Input-A (speaker input) wiring method / ●Méthode de câblage d’entrée-A (entrée de haut-parleur) / ●Kabelverbindung für Eingang A (Lautsprechereingang) / ●Metodo di collegamento Input-A (ingresso diffusore) / ●Método para conectar la entrada A (entrada de altavoz)
WIRE CONNECTIONS / CARACTÉRISTIQUES / KABELVERBINGUNGEN / COLLEGAMENTO DEI FILI / CONEXIONES
4.
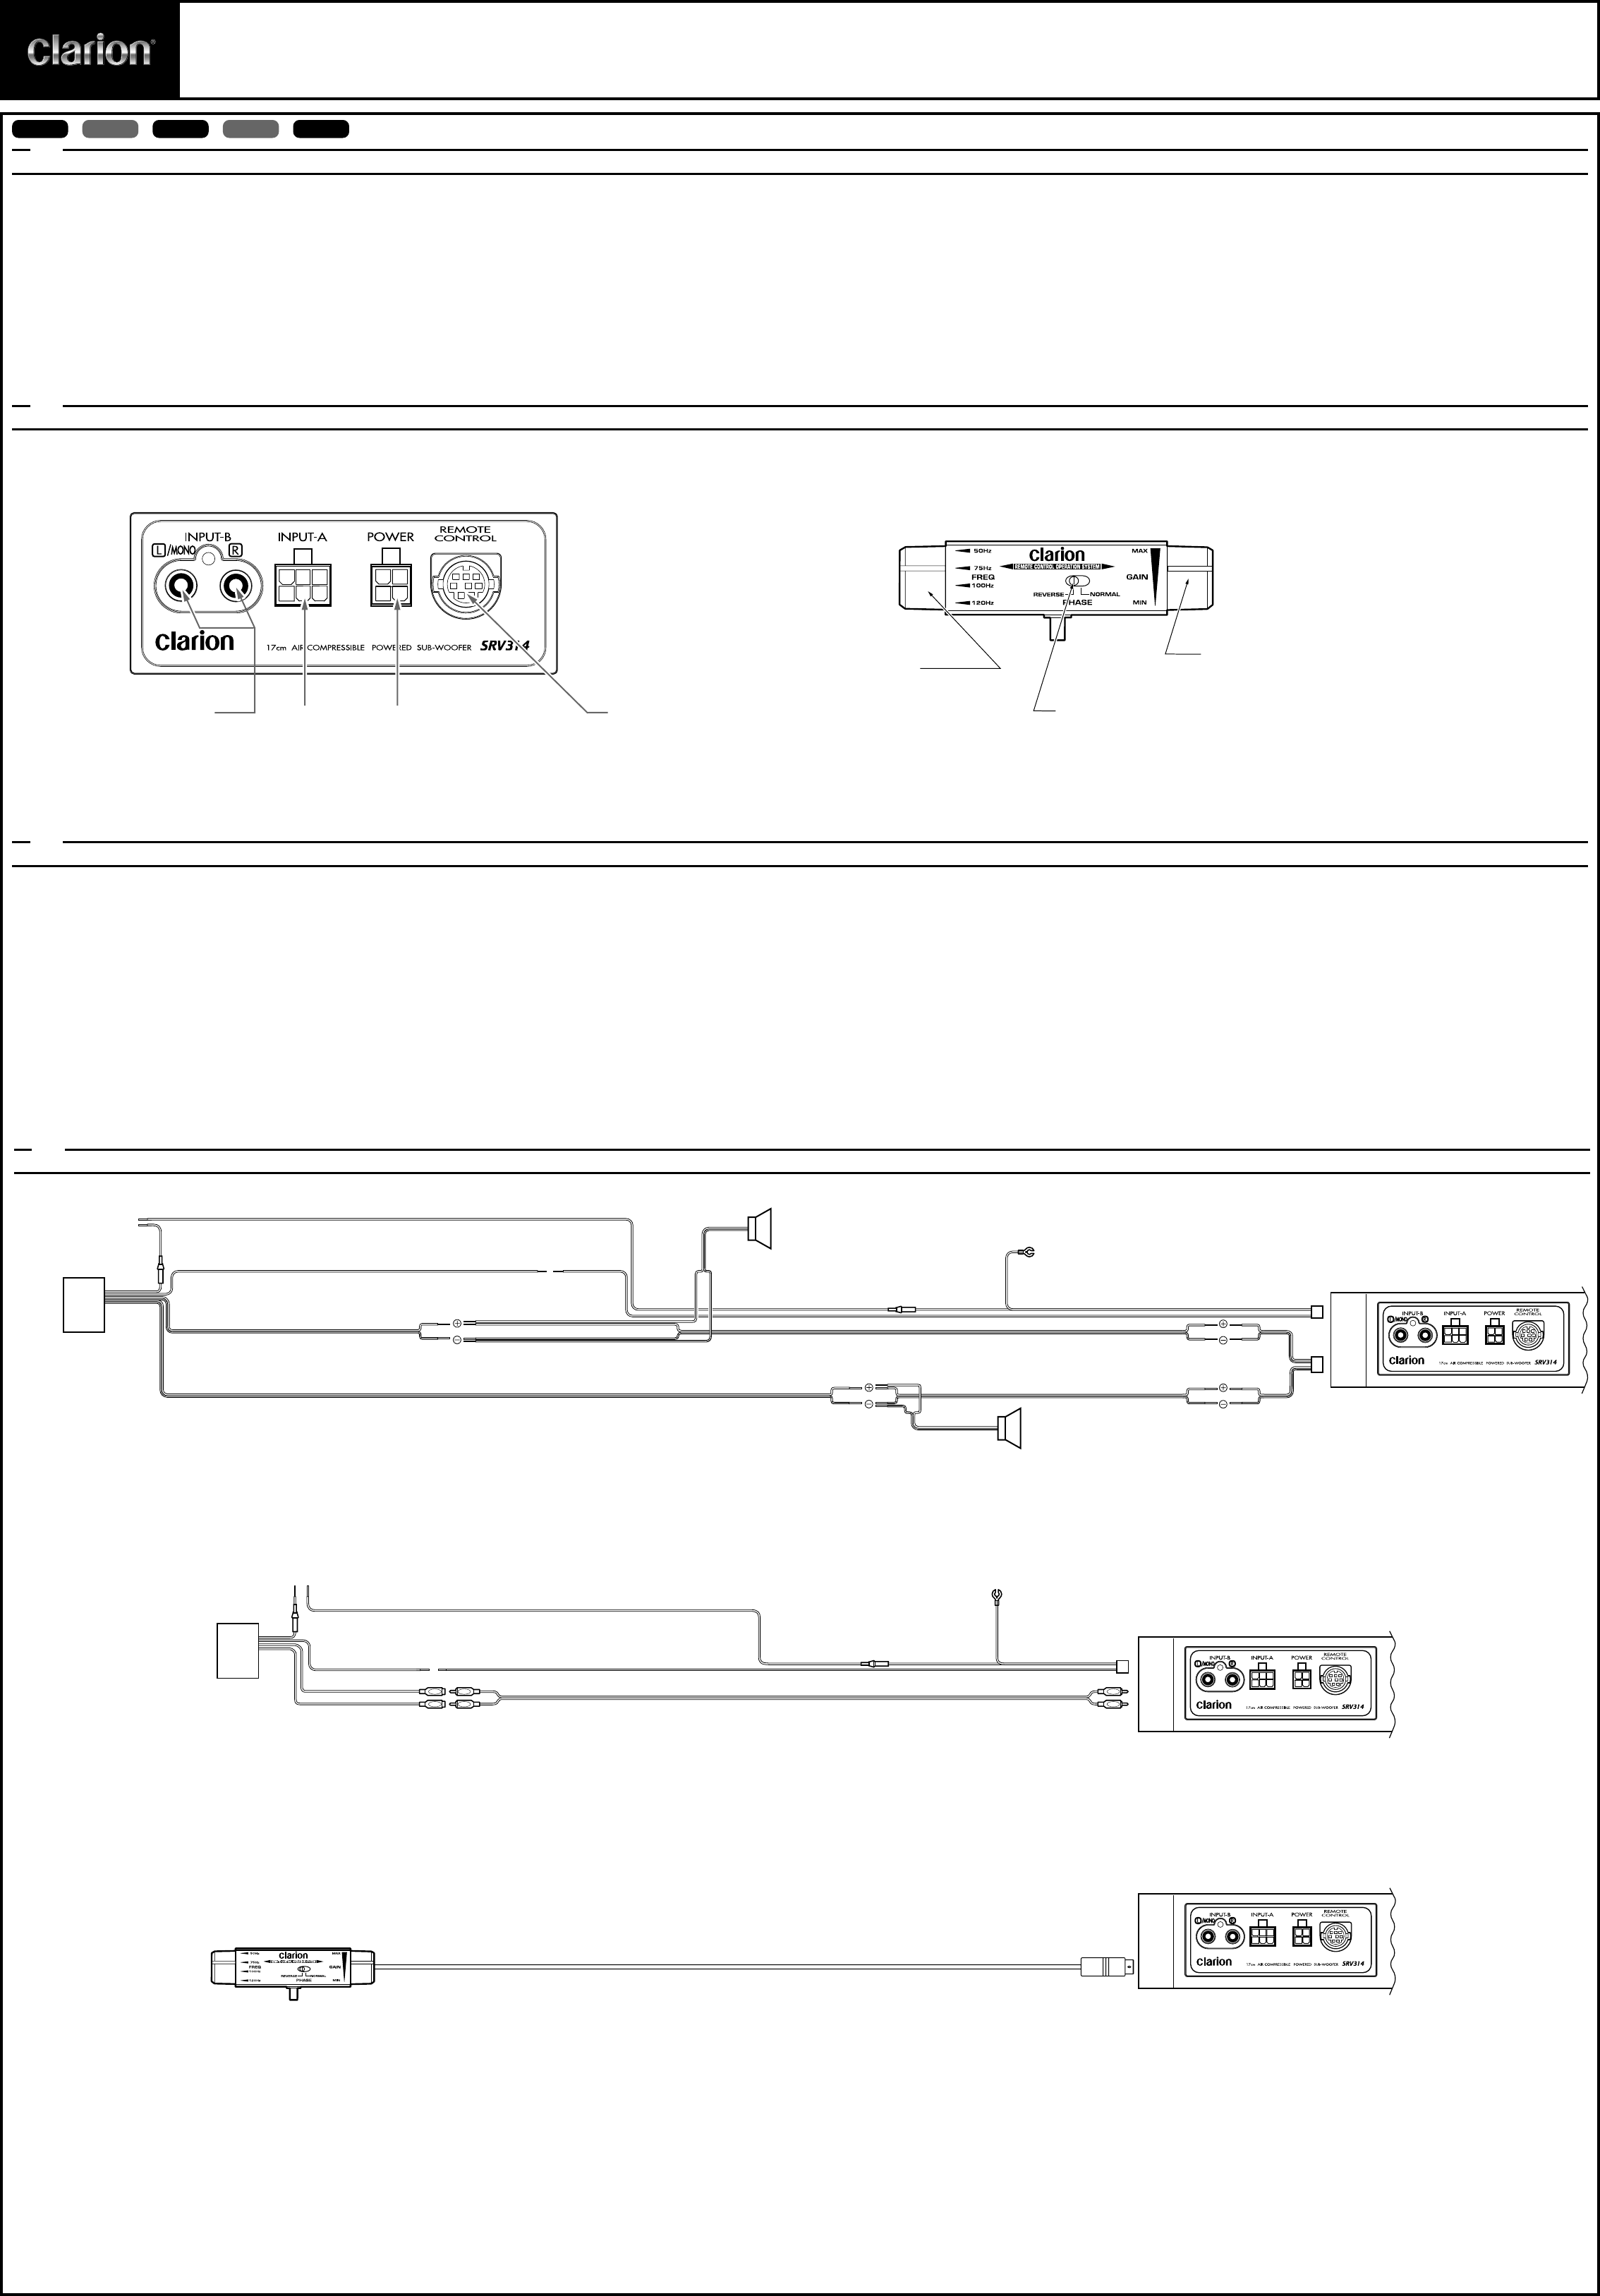
●Input-B (RCA input) wiring method / ●Méthode de câblage d’entrée-B (entrée RCA) / ●Kabelverbindung für Eingang B (RCA-eingang) / ●Metodo di collegamento Input-B (ingresso RCA) / ●Método para conectar la entrada B (entrada de RCA)
Main power supply (yellow)
Alimentation principale (jaune)
Hauptstromversorgung (gelb)
Alimentazione principale (giallo)
Alimentación principal (amarillo)
Center unit
Unité centrale
Zentrale Einheit
Unità centrale
Unidad central
Amplifier control (blue/white)
Commande d’amplificateur (bleu/blanc)
Verstärkersteuerung (blau/weiß)
Controllo amplificatore (blu/bianco)
Control del amplificador (azul/blanco)
White
Blanc
Weiß
Bianco
Blanco
White/black
Blanco/negro
Weiß/schwarz
Bianco/nero
Blanco/negro
Gray
Gris
Grau
Grigio
Gris
Gray/black
Gris/noir
Grau/schwarz
Grigio/nero
Gris/negro
Left speaker
Haut-parleur gauche
Linker Lautsprecher
Diffusore sinistro
Altavoz izquierdo
Fuse (10 A)
Fusible (10 A)
Sicherung (10 A)
Fusibile (10 A)
Fusible (10 A)
Right speaker
Haut-parleur droit
Rechter Lautsprecher
Diffusore destro
Altavoz derecho
Ground (black) Connect to metal portion of vehicle chassis.
Masse (noir) Connectez ce fil à une partie métallique du châssis du véhicule.
Erdung (schwarz) An ein Metallteil des Fahrzeugchassis anschließen.
Massa (nero) Collegare alla parte metallica del telaio del veicolo.
Masa (negro) Conéctelo a la parte metálica del chasis del vehículo.
RCA pin cord (sold separately)
Cordon à fiches RCA (vendu séparément)
RCA nadel schnur (getrennt erhältlich)
La corda di spillo di RCA (in vendita a parte)
Cable de clavija RCA (vendido por separado)
Main power supply (yellow)
Alimentation principale (jaune)
Hauptstromversorgung (gelb)
Alimentazione principale (giallo)
Alimentación principal (amarillo)
Center unit
Unité centrale
Zentrale Einheit
Unità centrale
Unidad central
Amplifier control (blue/white)
Commande d’amplificateur (bleu/blanc)
Verstärkersteuerung (blau/weiß)
Controllo amplificatore (blu/bianco)
Control del amplificador (azul/blanco)
Fuse (10 A)
Fusible (10 A)
Sicherung (10 A)
Fusibile (10 A)
Fusible (10 A)
Ground (black) Connect to metal portion of vehicle chassis.
Masse (noir) Connectez ce fil à une partie métallique du châssis du véhicule.
Erdung (schwarz) An ein Metallteil des Fahrzeugchassis anschließen.
Massa (nero) Collegare alla parte metallica del telaio del veicolo.
Masa (negro) Conéctelo a la parte metálica del chasis del vehículo.
1. Before mounting or making connections, do not fail to
disconnect the cable from the - side of the battery. Do
not reconnect the cable until all steps have been
completed.
2. Avoid the vicinity of objects that produce heat (especially
heating ducts) and select a location that is well ventilated
and where the unit is not likely to be splashed with water.
3. When making connections, avoid running the harness
near parts that can become hot. Also, keep cables with
connectors away from the vehicle's wiring and secure
them well in order to avoid the introduction of noise from
the vehicle.
NOTES ON MOUNTING AND MAKING CONNECTIONS / REMARQUES SUR L’INSTALLATION ET LES RACCORDEMENTS / HINWEISE Für ANBRINGUNG UND ANSCHLüsSE / NOTE SUL MONTAGGIO E I COLLEGAMENTI / NOTAS SOBRE EL MONTAJE Y LAS CONEXIONES
3.
1. Avant de commencer l’installation ou les raccordements,
débranchez impérativement le câble du côté - de la
batterie. Ne le rebranchez pas avant d’avoir terminé
toutes les opérations.
2. Évitez la proximité des sources de chaleur (et en
particulier celle des conduits de chaleur). Choisissez un
emplacement bien aéré et où le haut-parleur ne risque
pas d’être éclaboussé par l’eau.
3. Lors des raccordements, veillez à ce que le faisceau de
fils ne passe pas près de pièces qui peuvent devenir
chaudes. Gardez les câbles munis de connecteurs à
l’écart du câblage du véhicule et fixez-les bien afin
d’éviter les parasites depuis le véhicule.
1. Vor Anbringung oder Anschließungen unbedingt zuerst
das Kabel von der --Seite der Batterie abtrennen. Das
Kabel erst wieder anschließen,wenn alle Arbeitsschritte
ausgeführt worden sind.
2. Anbringung in Nähe von Teilen (besonders Heizkanäle)
vermeiden, die Wärme erzeugen, sowie einen gut
belüfteten Ort wählen, an dem das Gerät ebenfalls nicht
Wasser ausgesetzt ist.
3. Beim Ausführen von Anschlüssen, den Kabelsatz nicht
in Nähe von Teilen verlegen, die sich erwärmen können.
Ebenfalls Kabel und Stecker nicht in der Nähe der
Fahrzeugverdrahtung anbringen und diese gut sichern,
um Störungsrauschen vom Fahrzeug zu vermeiden.
1. Prima di montare o collegare, non dimenticare di
scollegare il cavo dal lato - della batteria. Non
ricollegare il cavo finché non si sono completate tutte le
operazioni.
2. Evitare la vicinanza di oggetti che producono calore
(particolarmente condotti di riscaldamento) e seleziona-
re un punto ben ventilato e dove l’unità non possa subire
schizzi d’acqua.
3. Quando si collega, evitare di far passare il cablaggio
vicino a parti che possono diventare calde. Inoltre tenere
i cavi con connettori lontani dai cavi del veicolo e fissarli
bene per evitare l’introduzione di disturbi dal veicolo.
1. Antes de montar el aparato o hacer ningún tipo de
conexiones, no se olvide de desconectar el cable
negativo - de la batería. No conecte de nuevo el cable
hasta haber completado todos los pasos.
2. Evite la proximidad de aparatos que produzcan calor
(especialmente las salidas de aire caliente de las
calefacciones) y seleccione un lugar que esté bien
ventilado, y en el que no haya peligro de que el aparato
pueda ser salpicado con agua.
3. Cuando haga las conexiones, evite tender el mazo de
cables cerca de partes que puedan calentarse. Además,
mantenga alejados del cableado del vehículo los cables
con conectores y sujételos bien para evitar la captación
de ruido eléctrico procedente del vehículo.
● Remote control unit lead wiring method
∗ Connect the lead (5 m) between the main unit and remote
control unit.
● Méthode de câblage du cordon de télécommande
∗ Raccordez le cordon (5m) entre l’appareil principal et la
télécommande.
● Verdrahtung für Fernbedienungskabel
∗ Das Kabel (5 m) zwischen dem Hauptgerät und der
Fernmbedienung verbinden.
● Metodo di collegamento via filo del telecomando
∗ Collegare il cavo (5 m) tra l’unità principale e l’unità
telecomando.
● Método de conexión del conductor de la unidad de
control remoto
∗ Conecte el conductor (5 m) entre la unidad principal y la
unidad de control remoto.
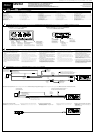
INPUT-A
Speaker input
Entrée de haut-parleur
Lautsprechereingang
Ingresso diffusore
Entrada de altavoz
INPUT-B
RCA input
Entrée RCA
RCA-Eingang
Ingresso RCA
Entrada de RCA
PHASE
Phase switch
Commutateur de phase
Phasenschalter
Interruttore di fase
Interruptor de fase
GAIN
Gain control
Commande de gain
Verstärkungsregler
Comando di guadagno
Control de ganancia
FREQ
Variable low-pass filter
Filtre passe-bas variable
Variabler Tiefpaßfilter
Filtro passabasso variabile
Filtro pasabajos variable
POWER
Power supply coupler input
Entrée de coupleur d'alimentation
Netzkopplungeingang
Ingresso accoppiatore alimentazione
Entrada del acoplador de alimentación
REMOTE CONTROL
Remote control input
Entrée de la télécommande
Fernbedienungseingang
Ingresso del telecomando
Entrada de control remoto
■
SIDE PANEL / PANNEAU LATÉRAL / SEITENWAND /
PANNELLO LATERALE / PANEL LATERAL
■
REMOTE CONTROL UNIT / TÉLÉCOMMANDE / FERNBEDIENUNG /
TELECOMANDO / UNIDAD DE CONTROL REMOTO