SRS1684
SRS1384
2-Way Component System
Systeme de haut-parleurs a 2 voies
Sistema de componentes de 2 vias
Installation Manual
Manuel d'installation
Manual de instalación
English Français
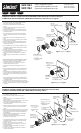
EXAMPLE OF THE TWEETER INSTALLATION (Surface Mount & Angle Mount)
EXEMPLE D'INSTALLATION D'UN HAUT-PARLEUR D'AIGU (Montage à Surface ou à Angle)
1. Remove the door trim, then using the tweeter template
drill holes for the screws and speaker leads.
2. Press and turn the speaker into the mounting ring to
fasten it.
3. Install the bracket on the door trim using the supplied
mounting screws. (Figure 1)
4. Attach the surface mount cup onto the tweeter assembly.
5. Press and turn the surface mount tweeter assembly onto
the bracket to fasten it.
1. Elever la garniture de porte et à l'aide du schéma/parton
de l'aigu, percez des trous pour les vis et les fils de haut-
parleur.
2. Placez l'aigu dans le cercle de Montage et tourner pour
serrer.
3. Placez la monture dans la garniture de la porte en utilisant
les vis de tôle. (Voir Schéma 1)
4. Placez la rondelle de support sur l'assemblage de l'aigu.
5. Placez la rondelle de montage à surface pour tweeter sur
la rondelle pour la serrer.
1. Quite el panel de adorno de la puerta, y después utilice la
plantilla del tweeter para taladrar orificios para los tornillos
y el cable del tweeter.
2. Presione y gire el tweeter en el aro de montaje.
3. Para instalar el soporte en el panel de adorno de la puerta,
utilice los tornillos para montaje. (Figura 1)
4. Fije la copa para montaje a superficie en el montaje del
tweeter.
5. Presione y gire el montaje del tweeter en el soporte para
fijarlo.
Español
EJEMPLO DE INSTALACIÓN DEL TWEETER (Para Montaje a Superficie y en Ángulo)
2–Speed clips
2–Ecrous fendus
2–Tuercas de presión
Door trim
Garniture de porte
Panel de adorno de la puerta
Bracket
Support
Soporte
2–Mounting screws
2–Vis à tôle
2–Tornillos de montaje
Tweeter
Haut-parleur
Tweeter
Figure 1 / Figure 1 / Figura 1
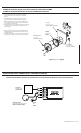
EXAMPLE OF THE TWEETER INSTALLATION (Flush Mount)
EXEMPLE D'INSTALLATION D'UN HAUT-PARLEUR D'AIGU (Montage Encastré/a Ras)
EJEMPLO DE INSTALACIÓN DEL TWEETER (Para Montaje a Ras)
1. Remove the door trim, then using the tweeter template
drill a hole for the flush mount cup.
2. Press and turn the speaker into the mounting ring to
fasten it.
3. Snap the flush mount cup onto the bracket, and turn to
fasten it. (Figure 3)
4. Attach the flush mount cup bracket assembly to the retaining
clamp using the supplied mounting screws.
5. Press and turn the tweeter assembly into the flush mount
cup bracket to fasten it.
1. Enlevez la garniture de porte et, à l'aide du schéma/parton
de l'aigu, percez des trous pour les vis et les fils de haut-
parleur.
2. Placez l'aigu dans le cercle de Montage et tourner pour serrer.
3. Placez la monture d'installation à ras dans la garniture de la
porte et appuyer pour la serrer l'annaux de montage à ras.
(Voir Schéma 3)
4. Attachez la rondelle de support à l'annaux de blocage à
l'aide des vis de montage disponibles.
5. Placez l'aigu dans l'annaux de montage et appuyer en
tournant pour fixer l'haut parleur.
1. Quite el panel de adorno de la puerta, y después utilice la
plantilla del tweeter para taladrar un orificio para la copa
para montaje a ras.
2. Presione y gire el tweeter en el aro de montaje.
3. Presione y gire la copa para montaje a ras en el soprote
para fijarlo. (Figura 3)
4. Para asegurar el soporte de montaje a ras utilice los
tornillos para montaje.
5. Presione y gire el conjunto del tweeter en el soporte de
montaje a ras para fijarlo.
Flush-mount cup ass’y
Monture encastrable avec
support
Conjunto de copa para
montaje a ras
Figure 3 / Figure 3 / Figura 3
Tweeter
Haut-parleur
Tweeter
Door trim
Garniture de porte
Panel de adorno
de la puerta
3
4
2
5
4
2
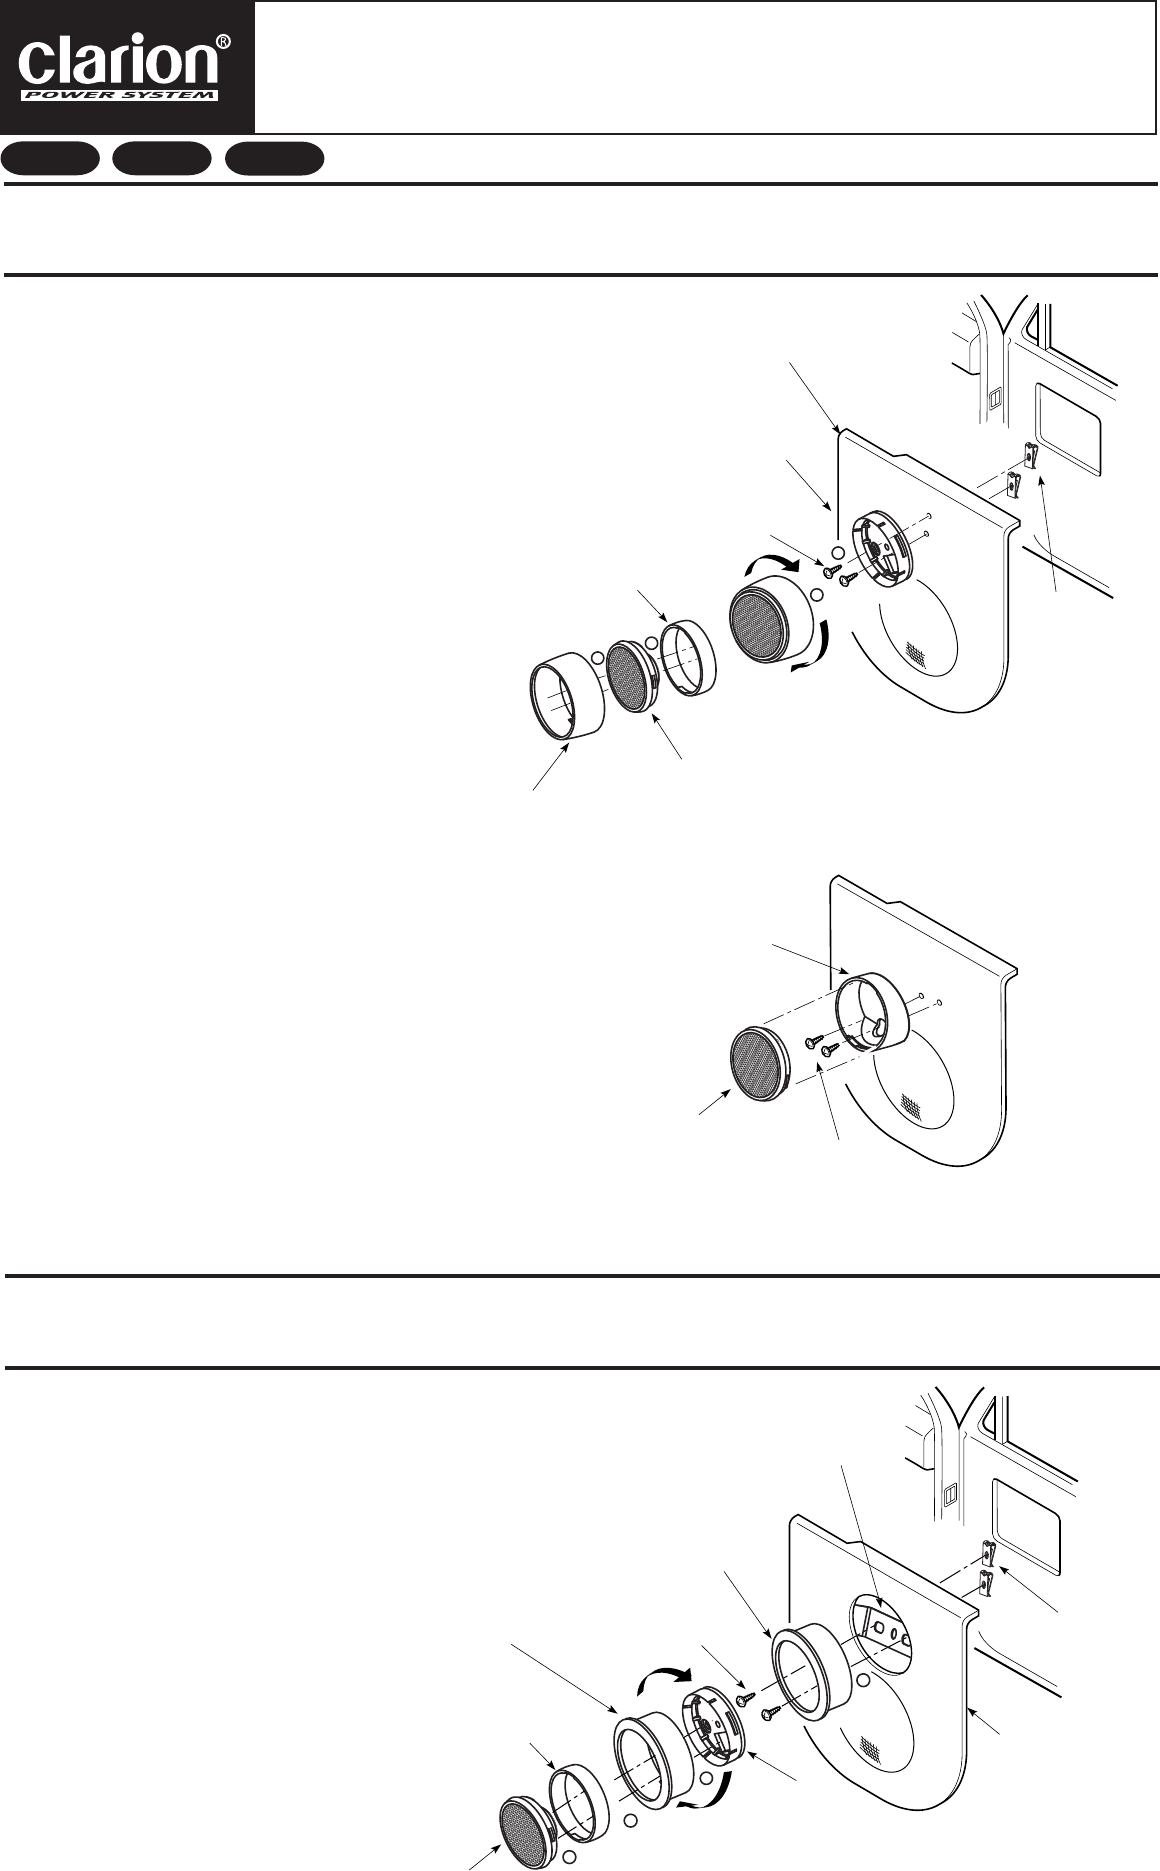
ANGLE MOUNT/MONTAGE À ANGLE/MONTAJE A ÁNGULO
Mounting Ring
Annaux de montage
pour haut-parleur
Aro de montaje
Figure 2
/ Figu
re
2 / Figura 2
SURFACE MOUNT/MONTAGE À SURFACE/MONTAJE A SUPERFICIE
1. Remove the door trim, then using the tweeter template
drill holes for the screws and speaker leads.
2. Install the angle mount cup on the door trim using the
supplied mounting screws. (Figure 2)
3. Press and turn the tweeter into the angle mount cup to
fasten it.
1. Enlevez la garniture de porte et, à l'aide du schéma/parton
de l'aigu, percez des trous pour les vis et les fils de haut-
parleur.
2. Installez l'annaux de montage à angle sur la garniture de
la porte à l'aide des vis à tôle disponibles. (Voir Schéma 2)
3. Placez l'aigu dans l'annaux de montage à angle et tourner
pour le fixer.
1. Quite el panel de adorno de la puerta, y después utilice la
plantilla del tweeter para taladrar orificios para los tornillos
y el cable del tweeter.
2. Para instalar la copa para montaje a ángulo en el panel de
adorno de la puerta, utilice los tornillos para montaje. (Figura 2)
3. Presione y gire el tweeter en la copa para montaje a ángulo
para fijarlo.
3
5
Mounting Ring
Annaux de montage
pour haut-parleur
Aro de montaje
Tweeter
Haut-parleur
Tweeter
Angle-mount cup
Annaux de monture
a angle
Copa para montaje
a ángulo
2–Mounting screws
2–Vis à tôle
2–Tornillos de montaje
Bracket
Support
Soporte
2–Mounting screws
2–Vis à tôle
2–Tornillos de montaje
Flush-mount cup
Monture encastrable
avec support
Copa para montaje
a ras
Retaining clamp
Annaux de blocage
Soporte
2–Speed clips
2–Ecrous fendus
2–Tuercas de presión
Surface-mount cup
Rondelle de montage
a surface
La copa para montaje
a superficie