


ARX8570z 15
Tape Operations
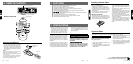
Notes:
• If the FILP DOWN PANEL does not open fully, gen-
tly open with your hand.
• The radio mode is selected automatically 4 seconds
after Eject button
&
is pressed.
If the auto antenna terminal for this unit is connected,
the antenna is extended automatically. If you are in
a location where the antenna may strike something,
press FNC button
3
to switch the mode.
Switching to the other side of the tape
Press PROG button @ to change tape direction
and playback.
∗ The tape mechanism automatically reverses di-
rection and engage playback at the end of the tape
(auto reverse).
Fast-forwarding/rewinding
● FF(fast-forward):
Press the right side of SEARCH button $.
● REW(rewind):
Press the left side of SEARCH button $.
● Canceling FF/REW:
Press Play/pause button 2.
∗ When the end of the tape is reached with FF/REW,
the mechanism automatically reverses tape direc-
tion and resumes playback.
∗ If you select another mode during FF/REW, it is
selected with FF/REW continued.
The mechanism automatically makes FF/REW
stop when the end of the tape is reached.
This function is called “monitor mode”.
APC (Auto Program Control) function
The APC function allows the tape to skip forward
to the beginning of the next track or rewind to
the start of the current track.
● Skipping forward to the next track (“APC-
FF”)
During tape playback, press the right side of
SEARCH button $ twice to fast-forward to the
next track. The next track starts playing.
● Skipping backwards to the start of the cur-
rent track (“APC-REW”)
During tape playback, press the left side of
SEARCH button $ twice to rewind to the start
of the current track. The current track plays from
the beginning.
● Canceling FF/REW APC to resume playback
Press Play/pause button 2.
∗ If you select another mode during APC mode, it is
selected with APC mode continued.
The mechanism automatically makes APC mode
stop when it finds the next track (in APC-FF) or
the start of the current track (in APC-REW). This
function is called “monitor mode”.
Dolby noise reduction system
The Dolby noise reduction system increases the
volume level of high frequency sounds during
recording and sets it back to their original level
during play. This system reduces hissing noise
which is typical of cassette tapes.
∗ Dolby noise reduction manufactured under license
from Dolby Laboratories Licensing Corporation.
Dolby and the double-D symbol are trademarks of
Dolby Laboratories Licensing Corporation.
1. Press DOLBY NR button 7 to select Dolby
noise reduction. Each time you press DOLBY
NR button 7, the Dolby type changes in the
following order:
DOLBY B NR ON➜DOLBY C NR ON➜DOLBY
NR OFF➜DOLBY B NR ON....
2. When DOLBY B NR ON is selected, “DOLBY
B NR” appears in the display. On the contrary,
when DOLBY C NR ON is selected, “DOLBY
C NR” appears in the display.
Intro tape scan
The intro tape scan allows the first 10 seconds
of all the tracks on the tape to be played.
This function continues automatically until it is
canceled.
1. Press SCN button 5 to start the intro tape
scan. “SCN” lights in the display.
2. To cancel the intro tape scan, press SCN but-
ton 5 again. “SCN” goes off from the display
and the current track continues to play.
∗ When the end of the tape is reached during the
intro tape scan, the tape mechanism automatically
reverses direction and continues the intro tape
scan.
∗ If you select another mode during the intro tape
scan, the mechanism automatically makes the intro
tape scan stop when it finds the next track (APC
function).