


280-7624-00
5 AXZ610 6 AXZ610 AXZ610 7
12
3
467890!@$%¥&*
(
#5
4. NOMENCLATURE
Note:
• Be sure to read this chapter referring to the front diagrams of chapter “3. CONTROLS” on page 5 (unfold).
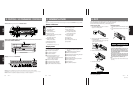
Names of Buttons
3.
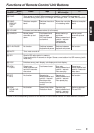
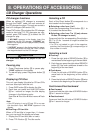
CONTROLS / LES COMMANDES / CONTROLES
Source unit / Appareil pilote / Unidad fuente
Note: Be sure to unfold this page and refer to the front diagrams as you read each chapter.
Remarque: Veuillez déplier cette page et vous référer aux schémas quand vous lisez chaque chapitre.
Nota: Cuando lea los capítulos, despliegue esta página y consulte los diagramas.
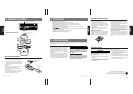
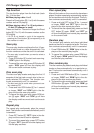
5. DCP
The control panel can be detached to prevent theft. When detaching the control panel, store it in the
DCP (DETACHABLE CONTROL PANEL) case to prevent scratches.
We recommend taking the DCP with you when leaving the car.
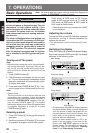
Removing the DCP
1. Hold down POWER button 3 for 1 second or
longer to turn off the power.
2. Deeply push in OPEN button 1 to unlock the
FLIP DOWN PANEL.
∗ If the FLIP DOWN PANEL does not open fully,
gently open it with your hand.
Flip down panel
OPEN button
3. Pull the DCP toward you and remove it.
DCP
4. Close the HOLD FLAP.
HOLD FLAP
CAUTION
Be sure to close the HOLD FLAP for safety
when removing the DCP.
With the FLIP DOWN PANEL opened / Ouverture du PANNEAU RABATTABLE /
Apertura del PANEL ABATIBLE
Display / Afficheur / Visualizador
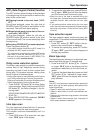
1 OPEN button
2 TITLE button
ADJ (adjust) button
3 POWER button
FNC (function) button
4 SCN (scan) button
PS/AS (preset scan/auto store) button
5 RPT (repeat) button
BLS (blank skip) button
6 DOLBY NR button
RDM (random) button
7 BEQ (Beat EQ) button
8 Preset buttons (1 to 6)
Direct buttons (1 to 6) (7 to 12)
9 ISR (instant station recall) button
0 DISP (display) button
! BND (band) button
PROG (program) button
@ A-M (audio mode) button
LOUD (loudness) button
# ENT (enter) button
Play/pause button
$ Rotary knob
% SEARCH button
¥ Cassette tape insertion slot
& Eject button
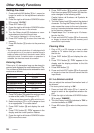
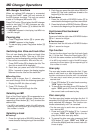
Display Items
1 Operation status indication
∗ Clock, Volume, etc. are displayed.
2 A-M (audio mode) indication
3 LD (loudness) indication
4 ST (stereo) indication
5 Preset channel indication (1 to 6)
Disc number indication (1 to 12)
∗ The disc numbers corresponding to the discs
in the CD or MD changer light.
6 INFO (information) indication
7 PTY (programme type) indication
8 TP (traffic programme) indication
9 TA (traffic announcement) indication
English Français Español
English
English
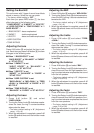
Attaching the DCP
1. Insert the right side of the DCP into the source
unit.
2. Insert the left side of the DCP into the source
unit.
2.
1.
DCP
CAUTION
• The DCP can easily be damaged by shocks.
After removing it, be careful not to drop it
or subject it to strong shocks.
• If the FLIP DOWN PANEL is kept open, the
DCP may drop due to vibration of the car.
This results in damage to the DCP. So close
the FLIP DOWN PANEL or remove the DCP
to store into the case.
• The connector connecting the source unit
and the DCP is an extremely important part.
Be careful not to damage it by pressing on
it with fingernails, screwdrivers, etc.
Note:
• If the DCP is dirty, wipe off the dirt with a soft, dry
cloth only.
0 Function mode indication
∗ The names of modes being selected, etc. are
displayed.
! AF (alternative frequency) indication
@ MANU (manual) indication
# DAB (Digital audio broadcasting) indication
$ RDM (random) indication
% RPT (repeat) indication
¥ DSP (Digital sound processor) indication
& SCN (scan) indication
* DISC indication
( BEQ (Beat EQ) indication