


8
Windows 8, Windows 7 and Windows Vista
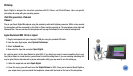
1. Plug the microphone into the USB port on your computer using the provided USB cable.
2. From the Start menu, select the Control Panel.
3. From the Control Panel, select the Sound icon.
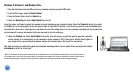
4. Select the Recording tab. Select Spark Digital from the list.
From this screen, you’ll want to adjust the computer’s internal microphone gain (volume) settings. Select the Properties button, then select
the Levels tab. As a starting point, set the microphone fader at about 80% of full level. If you decide you want to record something that is
very loud, like a drum set or a band practice, you will want to turn this setting down. If you are recording something that may be quiet, like
an interview with a person who speaks softly, you may want to turn this setting up.
5. Select the Playback tab. Select Spark Digital from the list. From this screen, you will also want to adjust the computer’s
master volume. As a starting point, set the computer’s master volume to 100%. Once you’ve selected Spark Digital as
your output device, you can control headphone volume with volume knob on the front of the microphone.
Also, from this screen, you will want to adjust the microphone monitoring volume. You can adjust this by moving the fader labeled
microphone to the left or to the right.*
*NOTE: The microphone monitoring volume is different than the microphone gain control. The microphone monitoring volume is the amount of sound from
the microphone that is sent to your main computer output. The microphone input volume is the control that determines the amount of sound from the
microphone that goes into your computer. If the microphone input is distorting, the microphone input volume should be adjusted accordingly.