


4
DIGITAL MONITOR SPEAKERS MS20/MS40
2. CONTROL ELEMENTS AND CONNECTIONS
Attention: High volume levels may damage your
hearing and/or your headphones. Please turn the
VOLUME controls all the way to the left before
powering up the unit. Be sure to always select an
appropriate volume level.
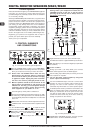
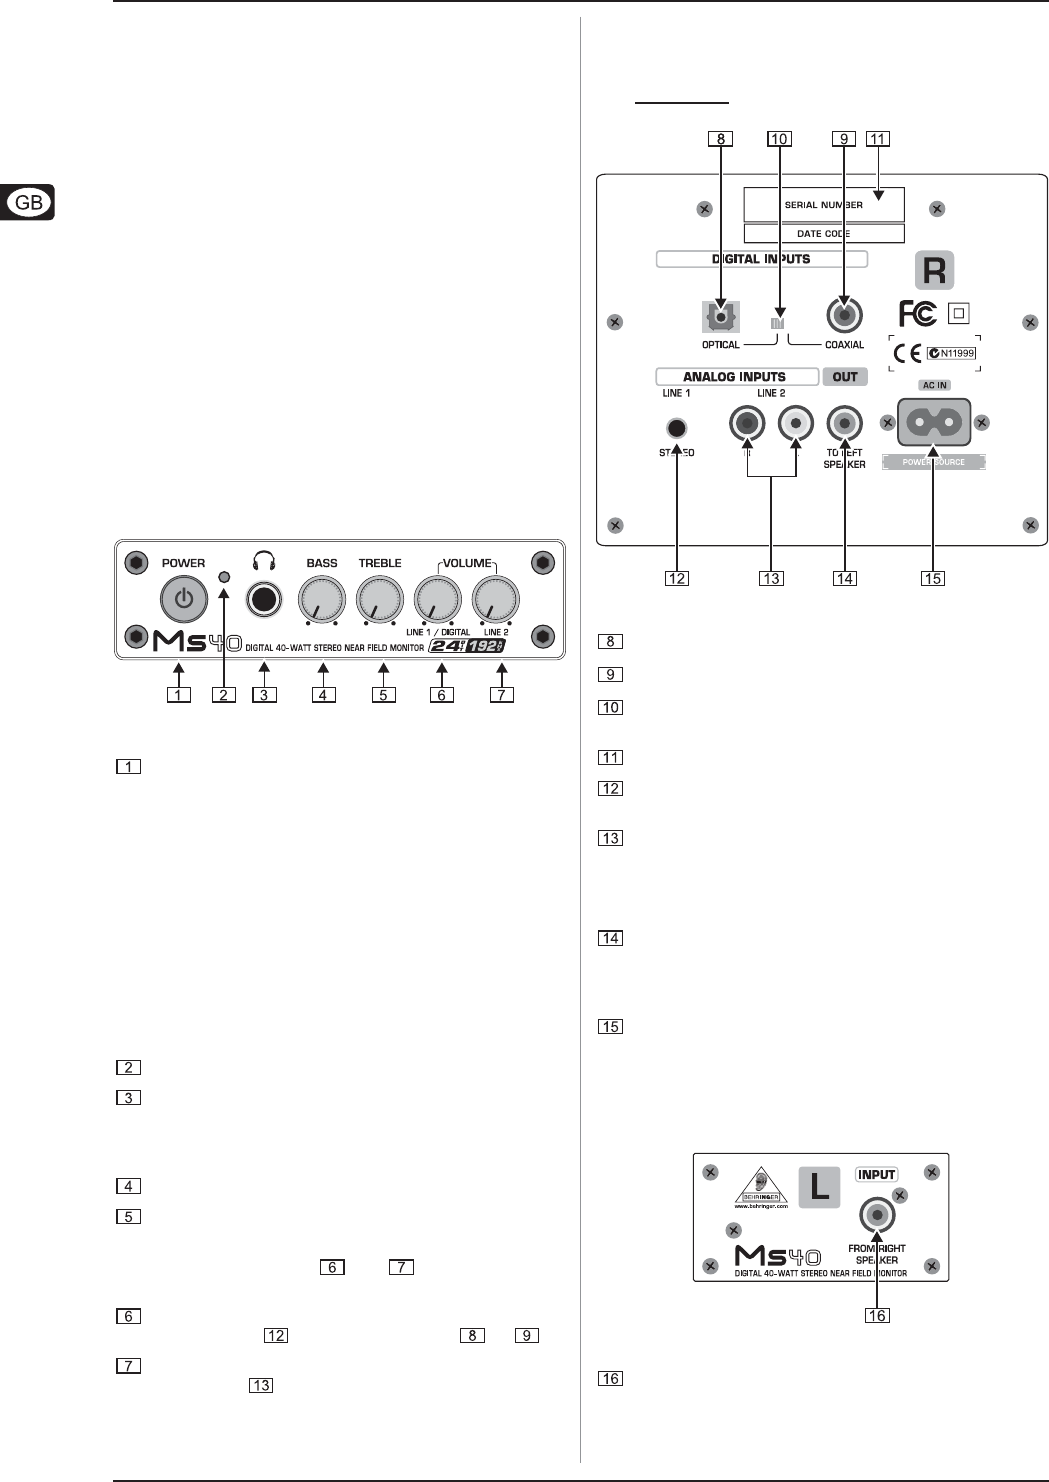
Fig. 2.2: Rear panel (right monitor)
Digital audio data can be fed in at the OPTICAL input.
The MS40 also features a digital COAXIAL input connector.
With this switch you can select the digital input (OPTICAL
or COAXIAL).
SERIAL NUMBER.
Analog input LINE 1 (1/8" TRS) allows you to connect
stereo audio equipment such as CD/MD players.
Use the analog input LINE 2 (RCA) to connect your sound
card, keyboard or expander.
You can play back various signals by using both
stereo inputs simultaneously.
TO LEFT SPEAKER output connector. Connect both
speakers by using the speaker cable included in this
package. As soon as both speakers are properly
connected, they will function as a stereo speaker system.
A standard power socket is provided for connection to the
mains. A matching power cable is included with the unit.
Before you connect the unit to the power source make
sure that the power switch is turned off and the volume
controls are turned all the way to the left to avoid any
damage to speakers or other devices.
Fig. 2.3: Rear panel (left monitor)
FROM RIGHT SPEAKER connector. Insert the speaker
cable from the TO LEFT SPEAKER connector.
1.1.3 Online registration
Please, do remember to register your new BEHRINGER equipment
right after your purchase by visiting www.behringer.com
(or www.behringer.de) and kindly read the terms and conditions
of our warranty carefully.
Should your BEHRINGER product malfunction, our goal is to have
it repaired as quickly as possible. To arrange for warranty service,
please contact the retailer from whom the equipment was
purchased. Should your BEHRINGER dealer not be located in
your vicinity, you may directly contact one of our subsidiaries.
Corresponding contact information is included in the original
equipment packaging (Global Contact Information/European
Contact Information). Should your country not be listed, please
contact the distributor nearest you. A list of distributors can be
found in the support area of our website (www.behringer.com).
Registering your purchase and equipment with us helps us
process your repair claims quicker and more efficiently.
Thank you for your cooperation!
2. CONTROL ELEMENTS
AND CONNECTIONS
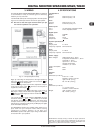
Fig. 2.1: Front panel elements (right loudspeaker)
Use the POWER switch to power up your MS20/MS40.
The POWER switch should always be in the “Off” position
when you are about to connect your unit to the mains.
Please note: The POWER switch does not fully
disconnect the unit from the mains. To disconnect
the unit from the mains, pull out the main cord plug
or appliance coupler. Unplug the power cord when
the unit is not used for prolonged periods of time.
Monitor speakers should be the last device in the
signal chain to be switched on and the first to be
switched off. This way, you avoid speaker damage
caused by loud crackling noises during turning
other equipment in your studio on or off.
This LED lights up when power is switched on.
Connect your headphones via the phones output (1/4" TRS)
to monitor any of the input devices. The internal speakers
are automatically muted when headphones are connected
to the unit.
BASS control. Turn the bass control to adjust the bass level.
TREBLE control. Turn the treble control to adjust the treble
level.
Turn the VOLUME controls and to adjust the overall
volume levels of the devices connected to your MS20/MS40:
The LINE 1 / DIGITAL knob controls the volume level of the
analog LINE 1 or the DIGITAL inputs or .
Turn LINE 2 control to adjust the volume level of
LINE 2 input .