


2
Existing construction Method 2
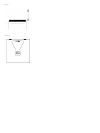
Using the pre-mount frame in retrofit situations
requires that the aperture is cut fairly accurately.
Use the template provided to mark out the
correct size aperture, having regard to how the
wall frame is to be lined up with any features
such as door frames, and cut out the aperture
neatly. Feed the pre-mount frame through the
aperture and pull it forward so that it sits flat on
the rear of the drywall and the inner part of the
frame protrudes through the aperture. Screw, but
do not tighten, 4 of the screws provided through
the slots in the wall frame into the pilot holes in
the pre-mount frame.
All Methods
Align the frame squarely and tighten down the
screws. A certain amount of flexing of the wall
frame is allowed to take up unevenness in the
wall surface, but do not over tighten the screws
as excessive distortion of the frame may impede
the fitting of the baffle.
CUSTOMISING
The wall frame has a white semi-matte paintable
finish, ready if necessary to be re-finished to
match your own decor. Decorate before the
baffle is fitted.
Do not paint the baffle. Remove it before
re-decoration. Avoid touching the drive units, as
damage may result.
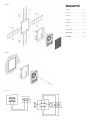
FITTING THE BAFFLE AND
CONNECTIONS
(figure 5)
All connections should be made with the
equipment switched off.
The baffle is secured to the wall frame by
4 machine screws in the corners. A pre-fitted
gasket seals the joint.
There are two pairs of gold plated terminals at
the back of each speaker, one pair to the
bass/mid units and one pair to the tweeter
which permit bi-wiring or bi-amplification if
desired. On delivery, both pairs are connected
together by high-quality gold plated copper links
for use with a single twin cable.
The terminals accept bare wires. For single cable
connection, connect either of the positive
terminals on the speaker (marked + and coloured
red) to the positive terminal on the power
amplifier and negative (-, black) to negative
(figure 5).
When bi-wiring the speakers, loosen the terminal
caps and remove the links. Use a separate twin
cable from the amplifier terminals to each pair of
speaker terminals (figure 5). Correct polarity
connection is even more critical in this case to
maintain the frequency response of each speaker
as well as the correct balance between left and
right speakers. The use of separate cables can
improve the reproduction of low-level detail by
reducing interaction in the crossover and
allowing optimum choice of cable for each
frequency range.
Always make sure all the terminal caps are
screwed down tight, as otherwise they may
rattle. Failure to observe correct polarity will
result in a loss of bass and vague imaging in a
multi-speaker installation.
When choosing cable, keep the total electrical
impedance (out and back) below the maximum
recommended in the specification. Ask your
dealer for advice, as the optimum cable will
depend on the length required. Cut off excess
length and tie down loose cable to prevent
rattles.
HF Control
The switch on the front baffle provides a boost or
cut in the speaker’s high-frequency output. Use it
to adjust the high-frequency level to compensate
for severely off axis positioned speakers or
heavy wall coverings (Boost) or speakers
positioned in highly sound reflective rooms (Cut).
FRANÇAIS
INTRODUCTION
Nous vous remercions d’avoir choisi les
enceintes encastrables Bowers & Wilkins de la
série Custom In Wall Mount.
Depuis sa fondation en 1966, la philosophie de
B&W a toujours été la quête de la reproduction
sonore la plus parfaite qui soit. Inspirée par son
fondateur, le regretté John Bowers, cette
recherche a entraîné de très lourds
investissements en équipements et en innovations
mais elle nous a surtout conduits à acquérir une
connaissance très approfondie de la musique
afin que la technologie soit toujours utilisée de
façon optimale.
Notre politique est d’introduire dans le maximum
de nos réalisations et aussi souvent que cela est
possible, les technologies avancées qui ont été
développées sur l’une de nos productions. La
série « Custom Installation » adopte le haut-
parleur de grave-médium à membrane en Kevlar
®
tressé qui réduit les colorations et apporte un
maximum de définition.
Au delà des qualités propres aux enceintes elles-
mêmes, vous ne devez pas oublier qu’elles
doivent fournir les meilleurs résultats en
association avec la salle d’écoute. Afin de tirer
le meilleur parti de la qualité de vos enceintes,
vous devez savoir que l’étude de leur installation
joue un grand rôle dans le résultat d’écoute
général. Le soin que vous consacrerez à leur
mise en œuvre sera récompensé par de très
nombreuses heures d’écoute et de plaisir
musical. Nous vous invitons à lire intégralement
ce manuel. Il vous aidera à optimiser les
performances du système.
B&W qui est distribué dans plus de 65 pays,
maintient un réseau de distributeurs officiels
capables de vous aider si vous rencontriez un
problème que votre revendeur ne saurait
résoudre ; n’hésitez pas à les contacter en cas
de besoin.
DEBALLAGE
(figure1)
Vérifiez le contenu :
• 2 x baffle comportant les haut-parleurs, le filtre
et de la mousse
• 2 x cadre de fixation murale avec oreilles
rétractables de maintien
• 2 x grille de protection des haut-parleurs
• 1 x gabarit d’alignement
• 1 x sachet d’accessoires contenant :
8 x vis auto perforantes pour fixation du PMK
à l’ossature
8 x vis mécaniques pour la fixation du baffle
sur le cadre mural
Nous vous suggérons de conserver l’emballage
pour un usage ultérieur. Veuillez retirer les grilles
et les baffles du cadre mural et conservez-les à
l’abri dans leur sac en plastique voire même
dans leur carton, loin de la zone de travail pour
qu’ils ne courent aucun risque
d’endommagement.