


w w w. a u d i o s o u r c e . n e t
13970 SW 72nd Ave Portlan
d
OR 97223
Tel: 503.914.4688
LINE
IN
LINE
OUT
IN OUT
DVD / VC
R
CABLE BO
X
DIGITAL ANTENNA
DIGI
TAL-
CONVERTE
R
AUDIO
VIDEO
L
R
AUDIO
OUTPUT
CD
SATELLITE RADIO
PC
L
R
L
R
Note: In this setup all inputs-
Audio In, Video In, Tape 1 In,
or Tape 2 In can be used as
inputs for the EQ 200.
-
IN
L
L
R
L
R
R
Speaker IN
OUT
Line 1 Line 2
Line 1 Line 2
+ +
- -
V
V
Serial Number:
IN
OUT
Delay
Time
3 Sec 15 Sec
Master Level
Min Max
Min Max
Mode
Stereo Bridged
12V Trigger
+
Trigger Normal
Auto On
LR
Use Class 2 Wiring
Minimum Impedance:
8 ohm Bridged
4 ohm Stereo
Speaker A
R L
R
L
-
-
-
+ +
+
-
-
+ +
Bridge
Speaker B
115V~ 60Hz 700W
FUSE:T6.3AL 250V
FUSE:T3.15AL 250V
230V~ 50Hz 700W
MODEL AMP210
Custom Manufactured in China
CAUTION: See User Manual Before
Replacing Fuse
On Off
Light Bar Display
3076079
CONFORMS TO
UL STD 60065
CERTIFIED TO
CSA STD C22.2
NO.60065
AVIS: RISQUE DE CHOC ELECTRIQE
NE PAS OUVRIR CE CARTER
RESERVE AU PERSONNEL AUTORISE
RISK OF ELECTRIC SHOCK
DO NOT OPEN
CAUTION: TO REDUCE THE RISK OF ELECTRIC SHOCK
WARNING
CAUTION AVIS
DO NOT REMOVE COVER. NO USER SERVICEABLE PARTS INSIDE.
REFER SERVICING TO QUALIFIED SERVICE PERSONNEL.
: TO REDUCE THE RISK OF FIRE OR ELECTRIC SHOCK
DO NOT EXPOSE THIS EQUIPMENT TO RAIN OR MOISTURE.
IN
TAPE DECK (play)
AMPLIFIER
AMP 100
AMP 102
AMP 110
AMP 210
AMP 310
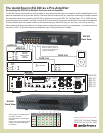
The AudioSource EQ 200 as a Pre-Amplifier:
Connecting the EQ 200 to Multiple Sources and an Amplifier
The EQ 200 can be used in place of a pre-amplifier to connect several devices to an amplifier, with the added benefit of full
spectrum equalization for all your audio sources. This setup does not make use of any “tape loops” and does not include a receiver.
The schematic below is for connecting the EQ 200 to several music sources: MP3, PC, Satellite Radio, CD, or TAPE with the
output being sent to an amplifier. Any input on the EQ 200 can be used for any source device listed in any order of arrangement.
The chart shows which front panel controls to activate according to which EQ input you are using. Your set up may vary.
When making or changing connections, it is always wise to unplug the power cords of your components – or at least make sure
the power is “Off”, so you won’t hear any unexpected “pops” during connection of cables.
.
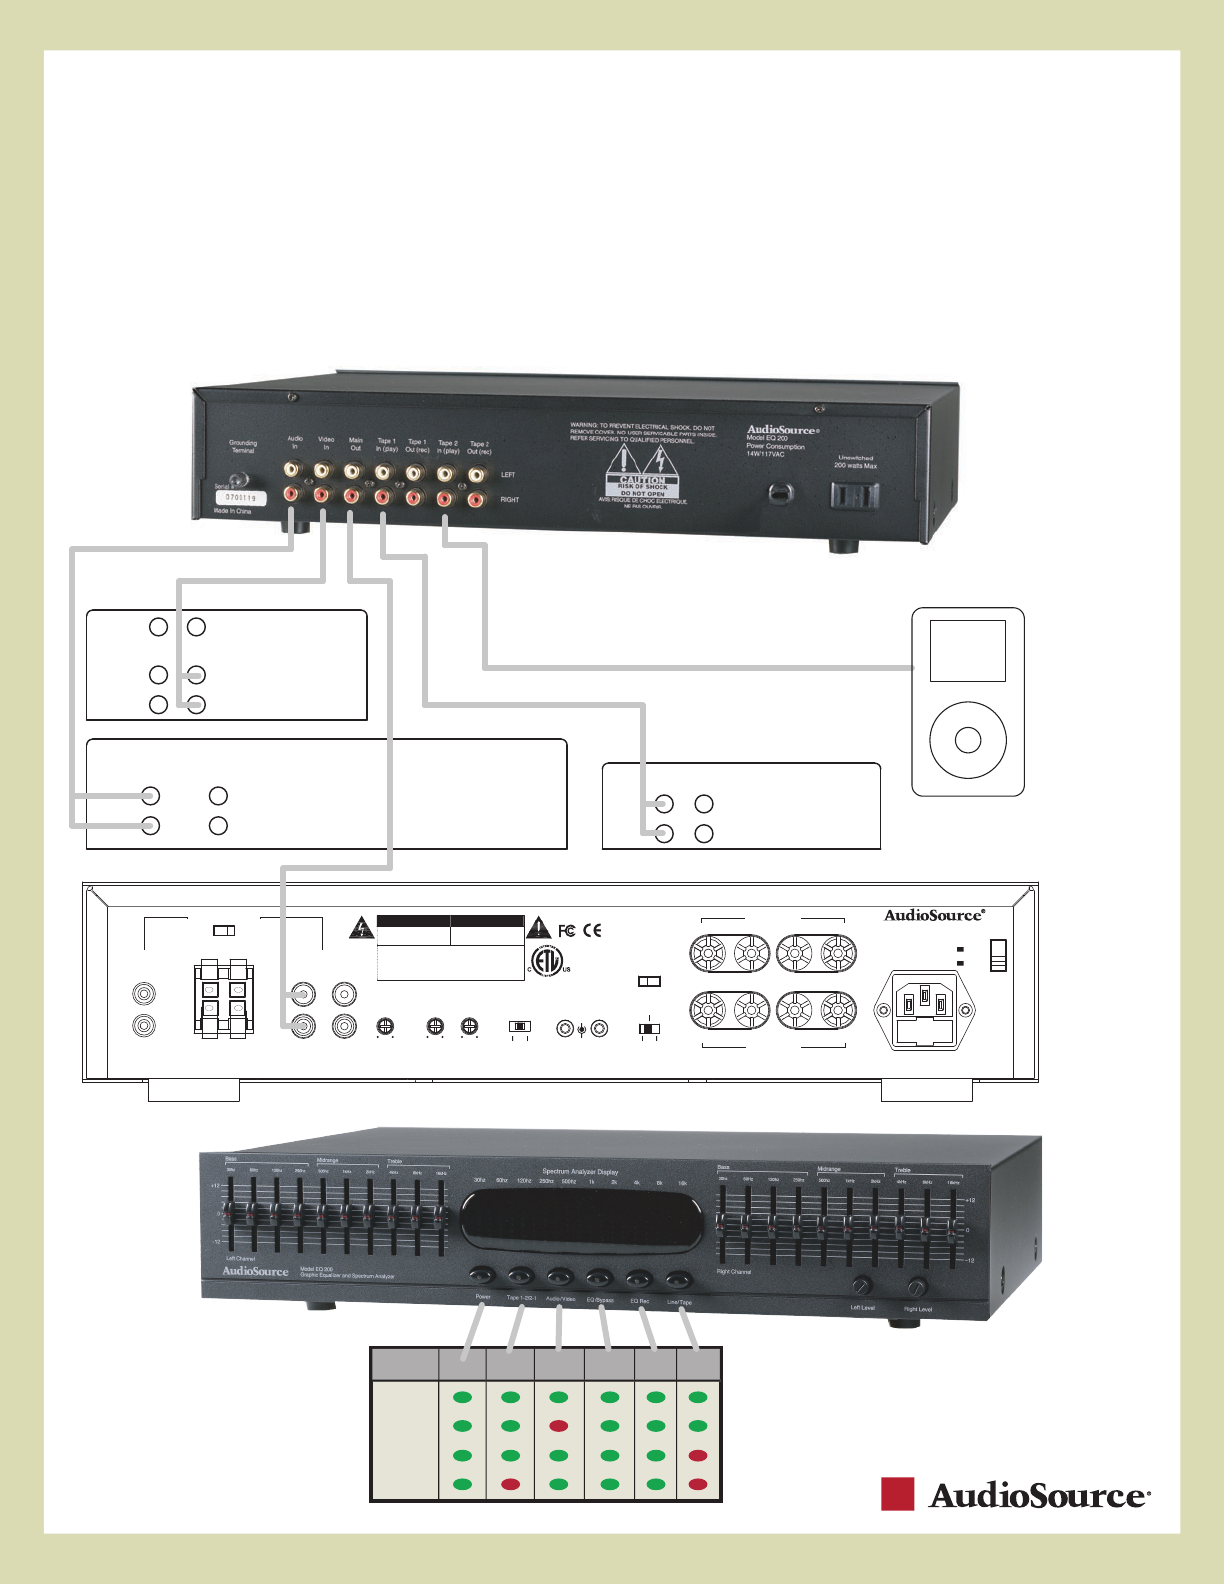
AUDIO IN
VIDEO IN
TAPE 1 IN
TAPE 2 IN
Main Out
Input
in Use
Power
Tape
1-2/2-1
Audio/
Video
EQ/
Bypass
EQ
Rec
Line/
Tape
AUDIO IN
VIDEO IN
TAPE 1 IN
TAPE 2 IN
Note: A green oval indicates a green
LED light in the button.
Red ovals indicate a red LED light in
the button.
Buttons show a green LED light when
pushed in, and red LED light when
not pushed in.
EQ 200
Rear View
EQ 200
Front View