


9
UNIT INSTALLATION
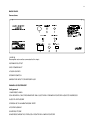
Apart from the amplifier and this manual, the package should contain the following items:
1 Power cord
1 Warranty card
Please check the package content. If any of the items listed above is missing, please contact your local dealer. After
opening the package, carefully extract the unit and remove the plastic protection. Check the unit to be sure that it hasn’t
been damage during transportation. Please keep the package: you may need it to return the unit to the technical service.
INSTALLAZIONE
Oltre all’amplificatore ed a questo manuale d'uso, l'imballo deve contenere i seguente articoli:
1 Cordone di alimentazione
1 Certificato di garanzia
Si prega di controllare, nel caso di eventuali mancanze, contattate il rivenditore. Dopo aver aperto l'imballo, estraete
l’amplificatore con cura e rimuovete la sua busta protettiva; controllate l’amplificatore per eventuali danni causati da un
trasporto poco accurato. Si prega di conservare l'imballo intatto nel caso in cui occorra inviare l'apparecchio al centro di
assistenza tecnica.
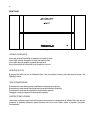
UNIT PLACING
The unit normally warms up while functioning. To assure proper ventilation to the unit, leave at least 5-8cm above,
behind and on both sides of the unit and avoid blocking ventilation openings. The best placement is on a hard and flat
surface.
POSIZIONE DI FUNZIONAMENTO
Durante il funzionamento, è normale che l’amplificatore riscaldi. Per questo motivo, almeno 5-8 cm di pazio sopra
devono essere lasciati per assicurare una adeguata ventilazione e, soprattutto, i fori di aerazione non devono essere
ostruiti. Solitamente si hanno i migliori risultati sistemando l’amplificatore su una superficie dura e piana non coperta da
tappeti o moquette.
POWER PLUGGING
Before plugging the unit to a wall outlet, please check that the voltage indicated on the back panel plate near the power
inlet matches the local voltage. DO NOT PLUG THE UNIT TO A VOLTAGE DIFFERENT TO THE ONE INDICATED ON
THE UNIT! After correctly placing the unit, please plug the IEC power cord into the unit inlet then plug the power cord to
the wall outlet.
After plugging the unit, please wait 10-15 seconds and check if the power led indicator is on before pressing the stand-
by switch to turn on Maestro Mono. There is only one fuse in the unit and it is placed in the back panel. Power
interruption value of the fuse is 3.15A retarded for220-240V systems and 6.3A retarded for 110-120V systems. Always
replace the fuse with one of the same type!
COLLEGAMENTO ALLA RETE
Prima di alimentare l’amplificatore, controllare che la tensione di alimentazione, indicata sul pannello posteriore in
prossimità della presa IEC, corrisponda a quella locale di rete. NON COLLEGARE MAI
L'AMPLIFICATORE AD UNA TENSIONE DI RETE DIVERSA DA QUELLA INDICATA! Dopo aver collocato
l’amplificatore correttamente, prima inserire la spina IEC del cordone di rete nella presa sul pannello posteriore poi
inserire la spina nella presa a muro.
Una volta inserita la spina nella presa a muro attendere almeno 10 15 secondi, verificare l’accensione del LED di colore
rosso tenue e poi agire sull’interruttore di stand-by per rendere Maestro Mono alimentato ed operativo. E’ presente un
solo fusibile, accessibile esternamente dal pannello posteriore. Il valore della corrente di interruzione del fusibile é di
3,15A ritardato per sistemi a 220-240V, mentre é di 6,3A ritardato per sistemi a 110-120V. Sostituire sempre con altri
dello stesso tipo!