


12
Standby mode
You can put Maestro Settanta in standby mode pressing the “STBY” button on the remote. When the amplifier is in standby mode,
only the microcontroller section is powered while the rest of the circuit is off. In this case, the display on the front panel is off and the
power led lights blue. To exit the standby mode, just press the “STBY” button on the remote controller or turn one of the knobs on the
front panel.
Stand-by
Il Maestro Settanta può essere posto in stand-by premendo il tasto “STBY” sul telecomando. Quando l’amplificatore è in stand-by
soltanto la sezione relativa al microcontrollore viene alimentata, mentre il resto del circuito viene spento. In questo caso il pannello
frontale presenterà il display spento e il led blu acceso. Per uscire dallo stand-by è sufficiente agire di nuovo sul tasto “STBY” del
telecomando oppure ruotare una delle due manopole.
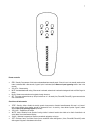
How to use the serial port
Maestro Settanta is equipped with a standard RS-232 serial port. You may remotely control the amplifier connecting to a PC or a
home-automation unit through this port. This feature allows you to integrate Maestro Settanta into a multi-room or house-automation
system and enjoy its sound everywhere in your house. For technical details, please contact your local Audio Analogue retailer or go
to www.audioanalogue.com.
Note sull’utilizzo della porta seriale
Il Maestro Settanta è dotato di una porta seriale in standard RS-232. Tramite questa porta è possibile controllare l’apparecchio
tramite un PC o una centralina per l’home automation. Questa caratteristica permette di inserire il Maestro Settanta in impianti mutli-
room o di home automation e usufruire delle sue prestazioni sonore in tutta la casa. Per maggiori dettagli, contattare il vostro
rivenditore Audio Analogue di fiducia o visitare il sito web www.audioanalogue.com.
Configuration through set-up activation
Maestro Settanta is an extremely versatile unit. The controls on the front panel and on the remote controller allow to access to the
most used functions but not to the configuration parameters. To customize the unit configuration, you have to enter the set-up just
pressing the “SET” button on the remote controller. Set-up options will then be shown on the display.
Configurazione attraverso l’attivazione del set-up
Il Maestro Settanta è un apparecchio estremamente versatile. Ovviamente, i controlli disponibili sul pannello frontale o sul
telecomando permettono di accedere alle funzionalità operative di più frequente utilizzo ma non ai parametri di configurazione. Per
personalizzare la configurazione dell’apparecchio è disponibile un completo setup accessibile dal telecomando e visualizzato sul
display del pannello frontale. Il set-up viene richiamato premendo il pulsante “SET” sul telecomando.
Set-up navigation
Due to the reduced size of the display, only one option at a time is shown. Use the remote controller to navigate through the different
options and choose the desired one and also to modify the parameters value. To select an option, press the “SET” button when the
desired option is shown on the display. It is possible to modify the parameters of the selected option pressing the “IN+/IN-“ buttons
on the remote controller. To fix a parameter value, press the “SET” button. To jump back to the upper set-up level or to exit set-up,
choose the “EXIT” option and press the “SET” button.
Navigazione del set-up
A causa dello spazio limitato, sul display del pannello frontale compare una sola voce di menu per volta. Per questo motivo, e anche
per scorrere le varie voci e selezionare quella desiderata, nonché per modificare i valori dei parametri visualizzati, è possibile
navigare il setup dal telecomando. Per selezionare la voce desiderata bisogna premere il tasto “SET” del telecomando quando la
voce desiderata è visualizzata sul display. E’ possibile modificare i parametri relativi alla voce selezionata premendo i tasti “IN+/IN-“
del telecomando. Per memorizzare il valore di un parametro è sufficiente premere il tasto “SET”. Per salire di livello o uscire dal set-
up è sufficiente selezionare la voce EXIT del livello in cui ci si trova e premere il tasto “SET”.
Set-up options
Input 1 Mode: this option allows selecting in 1 use mode (Line, Phono MM, Phono MC)
By-Pass: this option allows choosing which in to use for the “by-pass” mode and to deactivate the “by-pass” mode.
Balance: this option allows modifying the channels relative levels.
Opzioni di set-up
Input 1 Mode: questa opzione consente di scegliere la modalità di utilizzo dell’ingresso 1 (linea, phono MM, phono MC).
By-Pass: questa opzione permette di scegliere quale ingresso utilizzare per la modalità “by-pass” oppure permette di disattivare la
modalità stessa.
Balance: questa opzione consente di modificare i livelli relativi dei due canali rispetto al livello generale di ascolto.