


The shipping box should contain the following items apart from the amplifier and this
owner's manual:
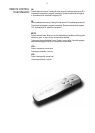
Remote control
Two AAA size batteries
AC power cord
Warranty certificate
Please check if all has been included: if not, contact your dealer. After opening the box,
carefully extract the amplifier and remove its protective plastic bag; check for any
damage that may have been caused by poor transport. With a Philips screwdriver,
unscrew the bottom cover of the remote control and insert the two AAA batteries in the
battery holder inside the remote control. Then, tighteen back the bottom cover in place.
Please retain all packing materials in case the unit needs to be transported for servicing.
Oltre all'amplificatore ed a questo manuale d'uso, l'imballo deve contenere i seguente
articoli:
Telecomando
Due pile mini-stilo (AAA)
Cordone di alimentazione
Certificato di garanzia
Si prega di controllare; nel caso di eventuali mancanze, contattate il rivenditore. Dopo
aver aperto l'imballo, estraete l'amplificatore con cura e rimuovete la sua busta protettiva;
controllate l'amplificatore per eventuali danni causati da un trasporto poco accurato.
Con un cacciavite a croce, aprite il coperchio inferiore del telecomando ed inserite le
due pile nel portapile. Poi richiudete il coperchio del telecomando. Si prega di conservare
l'imballo intatto nel caso in cui occorra inviare l'apparecchio al centro di assistenza
tecnica.
While operating, it's quite normal that the amplifier warms up. Please allow at least 2"
clearance all around the cabinet in order to ensure adequate ventilation. Best results
can be obtained by resting the unit on a hard, flat surface.
Durante il funzionamento, é normale che l'amplificatore riscaldi. Si prega di lasciare
uno spazio di almeno 5cm intorno in modo da assicurare un'adeguata ventilazione. Per
raggiungere le migliori prestazioni sonore, consigliamo di sistemare l'amplificatore su
una superficie dura e piana.
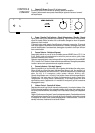
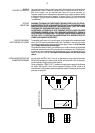
Before connecting the amplifier to the mains socket, please check that the voltage
setting, indicated on the rear panel near the IEC inlet, corresponds to your local AC
voltage. NEVER CONNECT THE UNIT TO A HIGHER VOLTAGE THAN THAT
INDICATED! After positioning the integrated amplifier correctly, first insert the IEC plug
of the mains cable in the inlet on the amplifier's rear panel then insert the mains plug
in the household wall outlet. The mains fuse is located in a receptacle next to the IEC
inlet together with a spare. Its value is 1.6A Slow Blow for 220-240V systems, whereas
for 110-120V systems, the correct value is 3.15A Slow Blow. Always replace with
the same type! For the UK only, please follow the instructions on fitting a mains plug
on the "Safety Instructions and Maintenance" page.
Prima di accendere l'amplificatore, controllare che la tensione di alimentazione, indicata
sul pannello posteriore in prossimità della presa IEC, corrisponda a quella locale di
rete. NON COLLEGARE MAI L'AMPLIFICATORE AD UNA TENSIONE DI RETE
SUPERIORE A QUELLA INDICATA! Dopo aver collocato l'amplificatore integrato
correttamente, prima inserire la spina IEC del cordone di rete nella presa sul pannello
posteriore poi inserire la spina nella presa a muro. Il fusibile di rete insieme a quello
di scorta si trova nel portafusibile incorporato nella presa IEC. Il valore corretto é di
1,6A ritardato per sistemi a 220-240V, mentre é di 3,15A ritardato per sistemi a 110-
120V. Sostituire sempre con altri dello stesso tipo!
INSTALLATION
INSTALLAZIONE
UNPACKING
APERTURA DELL’IMBALLO
OPERATING POSITION
POSIZIONE DI FUNZIONAMENTO
AC MAINS CONNECTION
COLLEGAMENTO ALLA RETE
5