


10
Powering up Class A
When you set the rear switch of Class A in the position “1”, the unit turns on in the STANDBY mode. When the front button is kept
pressed for at least three seconds or when the “STBY” button on the remote control is pressed, the amplifier turns on. The amplifier
will powers up about in ten seconds. During power up the protection circuit check the status of the power lines and the absence of a
DC voltage on the speaker outputs; the central display indicate “POWERING UP”. You’ll hear some “click” inside the amplifier, this is
absolutely normal! If nothing happens or if an error message is displayed, please refer to the troubleshooting section of the present
manual. Even if it is safe to turn the unit off unplugging it from the outlet when unused for long periods of time or during lightning
storms, it is possible to leave it plugged when using it daily. To this purpose, please put the unit in the Stand-by mode (don’t use the
rear switch). The amplifier is internally disconnected from the mains.
Accensione del Class A
Porre nella posizione “1” il pulsante posteriore determina la condizione Stand-by dell’amplificatore. Per accendere l’apparecchio
occorre tenere premuto per almeno tre secondi il pulsante situato sotto il pannello frontale oppure premere il tasto “STBY” del
telecomando. L’unità impiega circa dieci secondi per accendersi. Durante la fase di accensione il circuito di protezione verifica lo stato
di tutte le alimentazioni e l’assenza di tensione continua sulle casse. Il display centrale indica “POWERING UP”. Si sentono degli
scatti provenire dall’interno dell’amplificatore, ciò è assolutamente normale! Se invece non succede niente oppure viene scritto un
messaggio di errore fare riferimento alla sezione di risoluzione dei problemi di questo manuale. Durante i temporali con fulmini o i
lunghi periodi di inattività è consigliabile spegnere l’apparecchio e staccarlo dalla presa a muro. Durante i periodi di uso normale è
consigliabile spegnere l’apparecchio tenendolo in stand-by (senza usare l’interruttore posteriore). L’amplificatore è comunque
sconnesso internamente dalla rete elettrica.
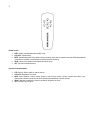
Volume settings and silencing (mute)
The volume control on the front panel and the Vol+/Vol- buttons on the remote control change the general sound level. It means that
the volume of the two channels is changed identically. It is possible to modify the relative level of each channel changing the balance
option in the setup. The mute buttons on the remote control allows lowering the sound level to 0. This function is useful any time you
have to suddenly lower the volume, for example when you answer to a phone call or when talking with people or when changing CD
in the player. When the unit is muted, the status is displayed in the central display. Mute deactivating will restore slowly the previous
volume setting.
Regolazione del volume e silenziamento (mute)
La manopola del volume sul pannello frontale e i pulsanti Vol+/Vol- sul telecomando agiscono sul livello generale di ascolto. Ciò
significa che il volume di entrambi i canali viene modificato dello stesso valore.
Il pulsante di mute sul telecomando permette di attenuare istantaneamente il livello di ascolto al valore 0. Questa funzione è utile
qualora sia improvvisamente necessario abbassare il volume di ascolto, per esempio per rispondere al telefono o per parlare con
qualcuno o ancora quando si desidera cambiare il CD nel lettore. Lo stato di muting dell’apparecchio viene indicato sul display
centrale. La disattivazione del mute ripristinerà lentamente il precedente livello di ascolto.
Inputs selection
You may select your desired audio input by turning the “SELECT” knob on the front panel or the “IN+/IN-“ buttons on the remote
control. The volume will be reset before changing the channel and slowly restored after the change to avoid the bump on the
loudspeakers.
Selezione dell’ingresso per l’ascolto
La selezione dell’ingresso audio desiderato per l’ascolto avviene tramite la rotazione della manopola SELECT sul pannello frontale
oppure tramite la pressione dei pulsanti IN+ o IN- del telecomando. Per evitare il colpo sulle casse, prima di cambiare canale il
volume viene automaticamente portato a zero e, dopo il cambiamento, ristabilito al valore corrente.
Standby mode
You can put the unit in standby mode pressing either the “STBY” button on the remote control or pushing the button under the front
panel. When Class A is in standby mode, only the microcontroller and protection section is powered while signal and power circuits
are turned off, reducing power consumption and minimizing damage risks.
Stand-by
L’apparecchio può essere messo in stand-by sia premendo il pulsante “STBY” sul telecomando che il pulsante posto sotto al pannello
frontale. Quando il Class A è in stand-by, solo i circuiti di controllo e protezione rimangono accesi, mentre quelli di segnale e di
potenza sono spenti. Ciò riduce i consumi ed i rischi di danni.