


MADE IN USA
SIX YEAR WARRANTY
Explorer Pro Sound System Owners Manual
For System Setup & Operation Videos Visit Our Website: www.anchoraudio.com
9
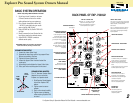
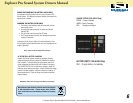
MUSIC
SPEECH
VOICE
OVER
LINE IN
VOLUME
MIC 2
VOLUME
MIC 1
VOLUME
TREBLE
ON
WIRELESS 1
WARNING: TO REDUCE THE RISK OF FIRE
OR ELECTRIC SHOCK, DO NOT EXPOSE
THIS EQUIPMENT TO RAIN OR MOISTURE.
POWER INLET
100-240 VAC, 47-63 Hz
(250 WATTS MAX)
LINE OUT
LINE IN
RL
MIC 1
MIC 2
VOLUME
9
WIRELESS 2
SPEAKER OUT
VOLUME
BASS
OFF
POWER
CHARGE STATUS
BATTERY EMPTY
2
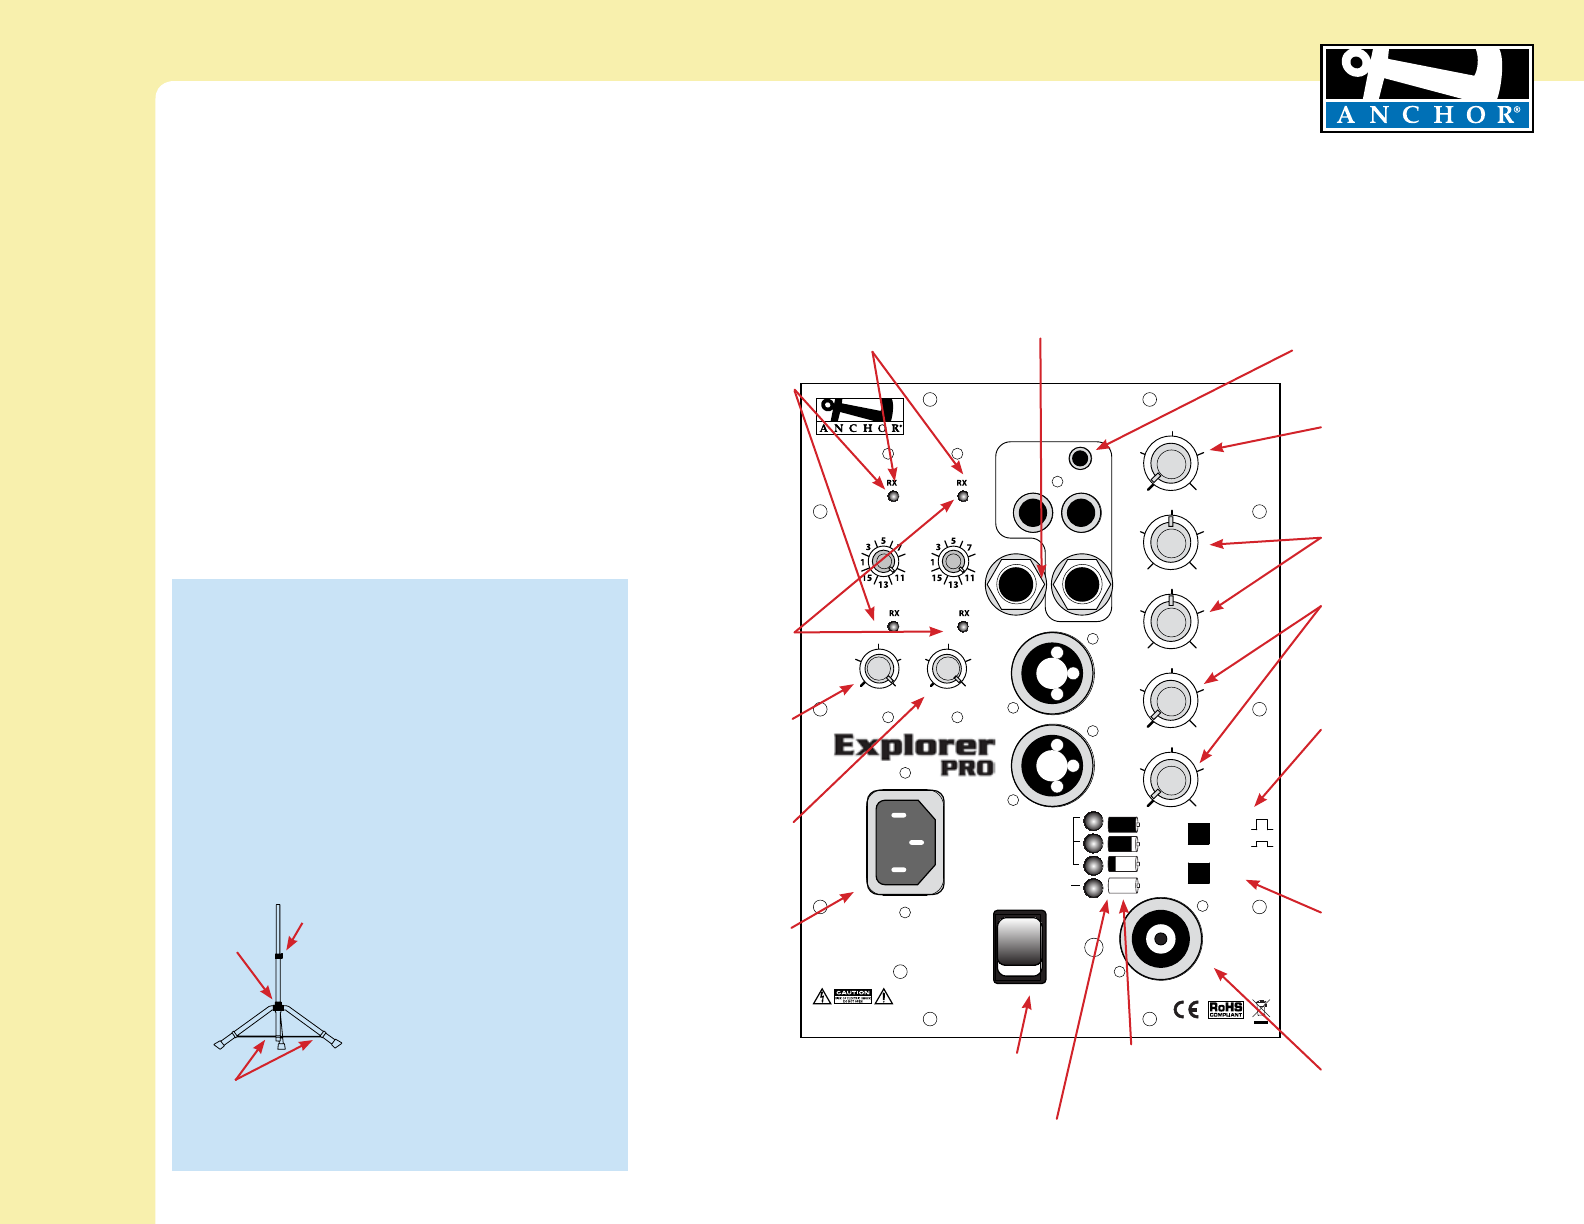
BACK PANEL OF EXP-7500U2
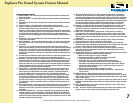
BASIC SYSTEM OPERATION
NOTE: Fully Charge Batteries Before First Use!
IMPORTANT: Make all connections with shielded
cables to avoid hum, buzzing or interference.
1. Set all Input Level Controls to minimum
& Tones Controls to flat or the middle
setting before turning your system on
2. Plug a wired microphone into the MIC
1 or MIC 2 jacks and/or plug an audio
source into the LINE-IN jack
3. Switch POWER to ON, the BATTERY LED
will light
4. Slowly increase the Level Control for the
input jacks used to the desired volume
5. Adjust BASS & TREBLE controls to
desired sound quality
WIRELESS RECEIVERS 4
(see page 6)
POWER SWITCH
LINE IN - INPUT JACKS
The 1/8” (3.5 mm) jack input is used to hook
up an iPod, a portable CD/ MP3/ tape player,
laptop computer, or similar external
audio source
The 1/4” unbalanced input can be used for
other communication devices including a
mixer or daisy chaining together multiple
Explorer speakers
AC POWER CORD INLET
SPEAKER OUT -
OUTPUT JACK
Connect the system to a
Explorer PRO unpowered
companion speaker
CHARGE INDICATOR LIGHT (AC/DC only)
LINE IN LEVEL CONTROL
MUSIC/ SPEECH BUTTON
In situations where you’re speaking to
a larger crowd or in a noisy environ-
ment, just push the Music/Speech
button in and give your voice an added
boost
To return back to normal use, just push
the Music/Speech button again
BATTERY LEVEL
INDICATOR LIGHT
(AC/DC only)
TONE CONTROLS - BASS/TREBLE
WIRED MIC LEVEL CONTROLS
LINE OUT - OUTPUT JACK
Balanced 1/4” – provides a combined
output of all active system inputs
Record your presentation or connect to
another powered sound system
VOICE OVER BUTTON
Push the “Voice Over” button in
to have the music automatically
lowered when you speak through a
connected microphone
Music will return to original level
when mic use/speaking stops
RX INDICATOR LIGHTS FOR
WIRELESS RECEIVER 1
A solid red light on one of the
RX Indicator Lights indicates
that the sound system is getting
good reception with the wireless
microphone
A solid red light on both RX
Indicator Lights indicates that
the sound system is a optimum
reception with the wireless
microphone
RX INDICATOR LIGHTS FOR
WIRELESS RECEIVER 2
WIRELESS MICROPHONE 1
LEVEL CONTROL
Adjust knob to control
wireless microphone levels
WIRELESS MICROPHONE 2
LEVEL CONTROL
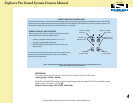
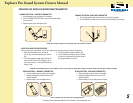
SPEAKER STAND SETUP
1. Loosen the Lower Collar Knob
2. Separate the stand legs until the leg support Cross
Braces are parallel to the floor
3. Tighten the Lower Collar Knob
4. Loosen the Upper Collar Knob and extend the
center pole
5. Adjust height and retighten the Upper Collar Knob
6. Place your Anchor sound system on the stand
SPEAKER STAND ADAPTER
The 1.5” diameter Speaker Stand
Adapter lets you mount the
Explorer on a speaker stand.
LOWER
COLLAR
KNOB
UPPER
COLLAR
KNOB
CROSS BRACES
1. Slide Speaker Stand Adapter
into slot on Explorer PRO
bottom
2. Tighten screw to secure
adapter
3. Place unit on stand carefully
4. Tighten screw on Adapter
collar securing Explorer PRO
on stand