


Table of Contents
Please Read First ............................................................ Page 2
Safety Instructions ........................................................ Page 2
Table of Contents .......................................................... Page 3
Introduction ................................................................... Page 3
Features........................................................................... Page 3
Unpacking ....................................................................... Page 3
Placement ....................................................................... Page 3
Handles and Rack Mounting ........................................ Page 3
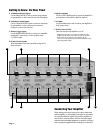
Getting to Know the Rear Panel .................................. Page 4
Connecting Your Amplifier........................................... Page 4
Input Connections ......................................................... Page 5
Speaker Connections..................................................... Page 5
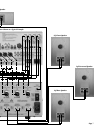
Making Rear Panel Connections ......................... Pages 6 & 7
Power Control Connections ......................................... Page 8
AC Line Connector and Power Cord ........................... Page 8
Amplifier Operation ...................................................... Page 8
Manual On ...................................................................... Page 8
Automatic On ................................................................. Page 8
Peak Indicator Light ...................................................... Page 8
Main Circuit Breaker ..................................................... Page 9
Protection Circuitry....................................................... Page 9
ATI Service Information ............................................... Page 9
Care and Maintenance .................................................. Page 9
Trouble Shooting ........................................................... Page 9
A Few Words About Hum and Noise.......................... Page 10
Potential Ground Loops in a Complex A/V System
...Page 10
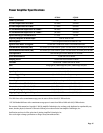
Power Amplifier Specifications ................................. Page 11
Warranty Terms and Conditions............................... Page 12
AT2000 & AT300 Series
Pure Balance Power Amplifiers
Congratulations! Thank you for purchasing an ATI Power
Amplifier. Designed, engineered and manufactured in the
United States, it has been carefully designed to deliver the
best possible audiophile-grade performance as well as the
most reliable operation.
The AT3000/AT2000 Series are comprised of twelve models;
AT3002/AT2002 two-channel amplifiers, AT3003/AT2003
three-channel amplifiers, AT3004/AT2004 four-channel
amplifiers, AT3005/AT2005 five-channel amplifiers, AT3006/
AT2006 six-channel amplifiers and the AT3007/AT2007
seven-channel amplifiers. This manual covers all twelve
models with the only difference being the number of channels
and/or power output.
In order to receive the maximum performance from your
new amplifier, please take a few minutes to read this manual.
This important information will help you make certain that the
amplifier is properly configured for operation with the rest
of the equipment in your system. If you have any questions
about this product, its installation or operation, please
contact us via e-mail at amptech@ix.netcom.com or via
telephone at 888-777-8507.
Features
Your new ATI amplifier is a state of the art, high performance,
audio component. It is built utilizing totally complementary
circuitry. A custom-designed, toroidal transformer drives the
high current power supply with multiple windings for each
channel. Each output module employs an advanced optically
coupled protection circuit that replaces the need for
bothersome fuse changes. The amplifier is cooled by convection
through the use of custom designed, efficient heat sinks.
Unpacking
The carton and packing materials used in shipping your new
amplifier were specially designed to protect it from the shock
and vibration of shipping. We strongly suggest that you save
the carton and packing materials to use if you move, or if the
unit ever needs to be shipped back to us for any reason. Should
you discover that your amplifier has been damaged
during
shipping, please contact your dealer or ATI immediately
and
request the name of the carrier so a written claim may be made.
THE RIGHT TO A CLAIM AGAINST A PUBLIC CARRIER CAN BE
FORFEITED IF THE CARRIER IS NOT NOTIFIED PROMPTLY IN
WRITING AND IF THE SHIPPING CARTON AND PACKING
MATERIALS ARE NOT AVAILABLE FOR INSPECTION BY THE
CARRIER. SAVE ALL PACKING MATERIALS UNTIL THE CLAIM
IS SETTLED.
Placement
During normal home operation the heat sinks on the amplifier
will become warm. However, there are instances during high
level playback into low impedance speakers when the heat
sinks will become much warmer than usual. To ensure the
amplifier’s trouble-free operation, it is necessary to provide
adequate ventilation for the heat sinks. Your amplifier should
be kept away from external sources of heat such as radiators
and hot-air ducts. The amplifier should never be placed with
other heat-producing components in a cabinet or enclosure
lacking free airflow. Do not stack other components on top of
your amplifier.
Handles and Rack Mounting
The handles on the AT3000/AT2000 Series may be removed
by using an Allen wrench. Carefully remove the four socket-head
cap screws and replace them with screws of the same diameter
and pitch, but only 1/2-inch long. Do not use longer bolts as
they may penetrate too deeply and damage internal parts.
Your amplifier may be mounted in a standard 19-inch rack by
using the optional 19-inch rack mount panel.
CAUTION: THE RACK MOUNT PANEL CANNOT SUPPORT THE
WEIGHT OF YOUR AMPLIFIER. BE SURE TO MOUNT THE UNIT
ON A STRONG, WELL-SUPPORTED SHELF.
Page 3