


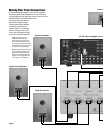

Power Control Connections
Your amplifier features a built-in remote turn-on system that
will automatically switch the amplifier on when another
device in the system is switched on.
Remote Turn-On Using Products
Equipped With a Low Voltage Trigger Jack
Press the front panel power switch on the amplifier so that it
is in the ON position. Then, using an accessory cable with a
3.5mm mono mini-plug on each end, connect the trigger-output
jack on the rear of the source device to the trigger input jack
on the back panel of the amplifier. When these connections
are made, the amplifier will automatically turn on whenever
the triggering device is turned on.
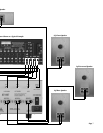
Remote Turn-On
Using External AC to DC Power Converter
If your source device does not have a dedicated trigger jack,
it is still possible to activate the unit for automatic turn on
when a Switched Outlet is available on the rear of the source
device. To control the amplifier in this fashion, you will need
a small AC to DC power converter, capable of delivering a 3.3
to 24 volt DC signal. The DC voltage should terminate in a
standard 3.5mm type mini plug. This type of converter may be
obtained as a Power Adapter from many electronics retailers.
When installing, press the Main Power Switch on the front
panel of the amplifier in so that it is in the ON position. Plug
the AC adapter into a switched outlet on the source device
that will be activated when you wish to have the amplifier
turn on. This may be the switched outlet at the rear of an AC
receiver or other audio equipment. Connect the 3.5mm mini-
plug from the adapter to the trigger-input jack on the back
panel of the amplifier. The amplifier will now turn on and off
automatically, based on the status of the controlling device.
Power Connection
Once all audio and system connections have been made,
connect the supplied power cord to the amplifier first, and
then connect it to an AC power source. Please make certain
that the amplifier is turned off and that the device connected
to the remote trigger input is off when connecting the power
cord and plugging it into an AC outlet.
CAUTION: Do not plug the amplifier directly into the “Switched
Accessory” outlet of another device! These outlets are intended for
use with low current draw products having a low current draw, such
as tuners, CD players or cassette decks. These cannot handle the high
current draw of a power amplifier. Using these outlets for a power
amplifier is a significant safety hazard.
NOTE: It is not recommended that you connect other power amplifiers,
or products with a high current draw, to the same AC power circuit
as the amplifier. If this is unavoidable, the Ultra-Soft-Start circuitry
of your amp will prevent excessively high inrush current.
Amplifier Operation
After all connections have been made you are ready for
operation. First, turn on the source components and processor
in your system. It is always a good idea to turn on your
amplifier LAST. This avoids the possibility of any turn on
pops or transients from other equipment being amplified and
sent to your speakers where they may cause damage. Always
start with a low volume level on your controller or preamp to
avoid damage to your speakers.
Manual On
Simply press the front panel power switch to the “up”
position. There will be a short pause from the time the
power is turned on until power is applied to the speakers.
This is intentional, and protects your speakers from damage
while the amplifier stabilizes. To turn the unit off, press the
Power button downward. The ON indicator light will go out
and the STANDBY light will illuminate.
Automatic On
Make certain that the connection to the controlling device is
correct. Whenever the controlling device is turned on, the
amplifier will automatically turn on after a short pause.
This pause is intentional, and it protects your speakers from
damage while the amplifier stabilizes. You may also hear a
relay click as during start up. This is also normal.
To turn off your amplifier, simply turn off the device feeding
the amplifier it’s audio signals. The amplifier will automatically
go into a standby mode in a few moments.
Peak Indicator Light
This indicator circuit continually monitors the output level of
your amplifier. This light will come on if the amplifier exceeds
its maximum output capability on any channel. While this
will not harm the amplifier, it does warn of potential harm to
your loudspeakers if the light stays illuminated continuously
for more than ten seconds. The volume setting from your
preamp or source device must be turned down if this occurs.
AC Line Connector and Power Cord
Your amplifier is supplied with an internationally approved
(IEC) power line connector that accepts the supplied
detachable, high-current capacity power cord.
WARNING: Under no circumstances should the round third prong
on the plug be cut, bent or in any other way defeated as this may
result in severe shock.
WARNING: Always turn off the amplifier and unplug the power cord
before making any electrical connections.
Page 8