


(a) SLEEP MODE PROTECTION: After 15 minutes in PAUSE or CUE Mode the CD drive mechanism will automatically go in to
sleep mode. This function shuts down the laser pick-up diode extending the life of the unit. During sleep mode the LCD screen
will flash repeatedly indicating sleep mode is activated - This is not a malfunction, to restart the drive simply press the Cue or
Play/Pause Buttons
(b) 60 SECOND TRANSPORT PROTECTION: Will automatically close transport if left open for more than 60 seconds to prevent
someone from walking by and breaking the transport.
(c) FLIP-FLOP: On the rear of the PRO DJ2 there is a control input jack, use a standard stereo mini plug to plug in one PRO DJ1
to another, via the control jacks. Set both of the CD players to single play mode. Play Disc 1, Disc 2 will immediately begin to
play when the track ends on disk 1. Disc 1 will return to cue mode and will begin to play at the end of disc 2 track. This function
will continue until the jacks are disconnected but may be overridden at any time through manual operation.
(d) Memory Backup: This will automatically save your last setting (SGL, CTN) even if you unplug AC- current.
(e) “Q” Start Control: This feature is used with American DJ “Q-Series” mixers featuring Fader Q Start. Connect a standard
American DJ mini plugs, from CD1 output on CD player to the “A” player control input on the rear of mixer. Then connect the
other mini plug from CD 2 output on CD player to the “B” player control input on the rear of mixer. By moving the mixer fader
from left to right you can start and pause Disc1 and Disc 2 respectively. In other words, when the cross-fader of the mixer is to
the left, and you move it 20% to the right, Disc 2 will begin to play. When the cross-fader is to the right, and you move it 20% to
the left, Disc 1 will begin to play. You can create great effects similar to scratching with this feature. “Q” Start control is easy to
use and mastering this feature will help you become a better DJ.
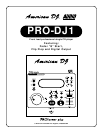
1. OPENING AND CLOSING THE DISC TRAY AND LOADING DISCS
• This operation only works when the power is on.
• Press the OPEN/CLOSE BUTTON (1) to open or close the disc tray, or, Press PLAY BUTTON (9) to close
the tray automatically when it is open.
• If the tray is not closed after 60 seconds it will close automatically and go into pause mode.
• The disc trays cannot be opened during playback to prevent playback from being interrupted if the OPEN/
CLOSE BUTTON (1) is pressed accidentally. Stop playback, then press the OPEN/CLOSE BUTTON (1)
2. LOADING DISCS
• Hold the disc by the edges and place it in the disc tray. Do not touch the signal surface (the glossy side).
• When using 5 inch/12 cm discs, place the disc in the outer tray guides and when using 3 inch/8 cm discs, place
them securely in the inner guides.
CAUTION:
• Do not place any foreign objects in the disc tray, and do not place more than one disc in the disc tray at
a time. Doing so may result in malfunction.
• Do not push the disc tray in manually when the power is off, as this may result in malfunction and
damage the player.
3. SELECTING TRACKS
• Press the TRACK BUTTONS (2/3) once to move to one higher or lower track or
• Hold the TRACK BUTTONS (2/3) in to change tracks continuously at a higher speed.
• When a new track is selected during playback, playback begins as soon as the search operation is completed.
4. STARTING PLAYBACK
• Press the PLAY/PAUSE BUTTON (9) during the pause or cue to start playback.
• The PLAY INDICATOR (26) lights when playback starts.
• The point at which playback starts is automatically stored in the memory as the cue point. The pickup then
returns to the cue point (the point at which playback started) when the CUE BUTTON (7) is pressed.
5. STOPPING PLAYBACK
• There are two ways to stop playback.
1) Press the PLAY/PAUSE BUTTON (9) during playback to pause at that point.
2) Press the CUE BUTTON (7) during playback to return to the position at which playback started.
6. PAUSING
• Press the PLAY/PAUSE BUTTON (9) to switch between play and pause.
• The PAUSE INDICATOR (37) lights when the pause mode is set.
7. CUEING
• “Cueing” is the action of preparing for playback. When the CUE BUTTON (7) is pressed, playback returns to
the cue point and enters pause mode. When the PLAY/PAUSE BUTTON (9) is pressed during the cue mode,
playback starts.
American DJ® AUDIO • PRO-DJ1 INSTRUCTIONS MANUAL • PAGE 7
BASIC OPERATIONS