


4
T
hank you for purchasing this Altec Lansing product. For generations, Altec
Lansing has been first in audio innovation. Today, our line of powered speakers
h
as received more performance awards than any other brand. In all kinds of
e
nvironments, in every price range, Altec Lansing offers sound of distinction —
giving even the most demanding customers the audio enjoyment they seek. Just
l
isten to this!
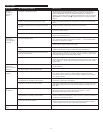
Box Contents
• Five speakers with removable stands
• One subwoofer
•
Infrared pod
•
Wireless remote
• 2 AAA (LR 03) batteries
•
Color-coded 3.5mm stereo cables
•
User’s guide and quick connect card
Placing Speakers
Subwoofer
A
ll stereo-encoded information is heard through the satellite speakers. The
subwoofer contains no stereo imaging, and its sound is non-directional. As a
re
sult, the subwoofer doesn’t have to be placed in any particular relationship to
t
he satellites. However, placing the subwoofer on the flo
or close to a wall or
room corner provides better bass efficiency and optimum sound.
Warning: The subwoofer is not magnetically shielded. As such, it SHOULD be
placed at least 2 feet (0.6m) from TVs, computer monitors, computer hard drives
or any other magnetic media (e.g., floppy disks, Zip disks, computer or audio
tapes, etc.).
Front Satellite Speakers
Arrange the front satellite speakers to suit your listening tastes — from right
next to the monitor to as far apart as the speaker cords allow. Use the key hole
on the back of each speaker if you choose to mount them on the wall.
Center Speaker
Place the center speaker either on top or below the center of the monitor. Use
the key holes on the back of the center speaker if you choose to mount it on
the wall.
Rear Satellite Speakers
The rear satellite speakers should be placed slightly behind you, or as far back as
the cords allow. Use the key hole on the back of each speaker if you choose to
mount them on the wall.
For optimum sound, all satellites should be placed at or slightly above ear level,
and in an arrangement that offers the most satisfying results.
Note: The satellite speakers ARE magnetically shielded and can be placed close to
video displays such as TVs and computer monitors without distorting the image.
Infrared Eye
The infrared “eye” can be placed anywhere on your desktop where it will be
able to “see” the wireless remote. The “eye” will recognize commands from the
wir
eless r
emote fr
om up to 26' (8 m) away
.
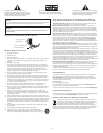
Making Connections
Warning: Do not insert the speaker system’s power plug into a wall outlet
until
all connections ar
e made. Also, tur
n of
f audio sour
ce (i.e., your PC, MP3
player, Sony PlayStation, etc.) before connecting the outputs to the speaker
system’s inputs.
To ensure first-time operation as expected, please carefully follow the connection
sequences described below in the or
der indicated.
Speaker System
To connect each satellite to the subwoofer, use the FRONT LEFT (front left),
F
RONT RIGHT (front right), REAR LEFT (rear left), REAR RIGHT (rear right) and
C
ENTER (center) identifiers on the back of each satellite to connect them to the
appropriate output on the back of the subwoofer. To make the connection,
d
epress the color-coded spring-clip on the back of the subwoofer and insert the
color-coded wire, and depress the black spring clip and insert black wire.
Inputs
V
arious connection schemes between your audio source and the speaker system
a
re available. Determine if you’ll be setting up the speaker system for PC
audio/PC gaming, DVD playback, console gaming or with portable audio devices
(
such as MP3 or portable CD players), then skip to the appropriate section.
PC Audio/PC Gaming/DVD Playback
Sound cards designed for PC gaming or DVD playback have unique audio
o
utputs. Typically, the outputs will be marked as “front output,” “rear output”
and “LFE/center output.” In some cases, slightly different terminology may be
u
sed. The sound card’s documentation should help you determine which outputs
t
o use with your speaker system.
6-Channel/5.1 Sound Card with analog outputs
• Locate the green, black, and orange cables.
•
Insert one end of the green, black, and orange cables into the computer
s
oundcard’s green, black, and orange outputs. Plug the other end of the
gr
een, black, and orange cables into the back of the subwoofer, as follows:
•
Plug the green cable into the input marked “Front Right/Left”
•
Plug the black cable into the input marked “Rear Right/Left”
• P
lug the orange cable into the input marked “Subwoofer/Center.”
2-Channel/Stereo Sound Cards|
• Locate the green cable.
• Insert one end of the green cable into the computer’s stereo (green) output,
and the other end into the input marked AUX on the subwoofer.
Console Gaming
(Requires the use of the Console Gaming Y-Adapter, which is not included. This
adapter can be purchased at www.alteclansing.com.)
Most console game systems feature dual-RCA outputs. To connect your speakers,
follow the steps below:
• Locate or purchase a Console Gaming Y-Adapter with a lime green 3.5 mm
stereo jack on one end and two RCA jacks on the other — one red and
one white.
• Locate the red and white RCA plugs on the end of the cable connected to the
back of your console gaming system. Connect them to the matching red and
white RCA jacks on the Console Gaming Y-Adapter.
• Locate the green cable included with this system.
• Insert one end of the green cable into the Console Gaming Y-adapter lime
green 3.5mm stereo jack, and the other end into the input marked AUX on
the subwoofer
.
Po
rtable Audio Devices (MP3, Portable CD Players, etc.)
• Locate the green cable.
• Insert one end of the green cable into the headphone or line-out jack of
the portable audio device, and the other end into the input marked AUX
on the subwoofer.
VS3251
six-Piece
Powered Audio System