


29
INITIAL SETUP
The LFE line sets the frequency for a low-pass filter that determines
what information is sent to the subwoofer for playback. Since the sub-
woofer output combines low-frequency information for all channels, in
order to make sure that no information is lost due to different speakers
having different capabilities, the subwoofer filter should be matched to
the highest crossover frequency used for any speaker group.
Looking at each of your three speaker-group settings in this menu,
determine which group is set to the highest frequency. Move the cursor
to the LFE line, and use the
‹/› Buttons to select that speaker group.
If all three speaker groups have the same setting, you may leave the
LFE filter to its factory default of the LEFT/RIGHT speaker group.
Move the cursor to the BACK TO MANUAL SETUP line and press the
Set Button to return to the Manual Setup menu.
Delay Adjust Menu
As explained above in Step Two – Measure Speaker Distances, some-
times the speakers are placed at different distances from the listening
position, which can muddy the sound, as sounds are heard earlier or
later than desired.
Even if all of your speakers are placed the same distance from the
listening position, you should not skip this menu.
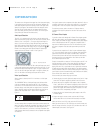
On the Manual Setup menu, move the cursor to the DELAY ADJUST
line and press the Set Button to display the Delay Adjust menu.
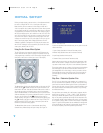
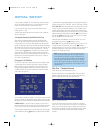
See Figure 37.
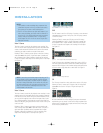
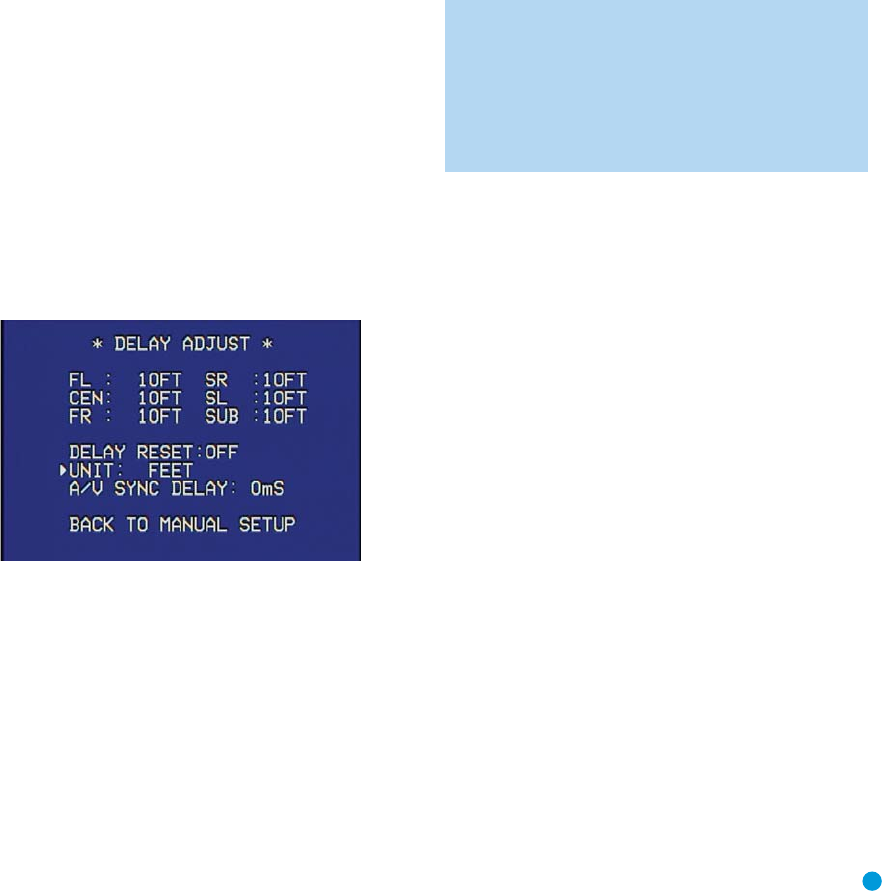
Figure 37 – Delay Adjust Menu Screen
This menu requires you to enter the distance from each speaker to the
listening position, which you measured in Step Two – Measure Speaker
Distances.
The default unit of measurement is in feet. If you wish to change the unit
to meters, move the cursor down to the UNIT line, and use the ‹/›
Buttons to change the unit to METER.
Use the
⁄/¤ Buttons to move the cursor to the FL (front left) line;
then use the ‹/› Buttons to change the measurement as needed.
Use the
⁄/¤ Buttons to move to each speaker in turn – CEN
(center), FR (front right), SR (surround right), SL (surround left) and
SUB (subwoofer).
DELAY RESET: This line is used if you wish to reset all of the speaker
delay settings to the factory default of 10 feet (3.0 meters) at once.
Use the ‹/› Buttons to change the setting of OFF to ON. If you
change any speaker’s setting, this line will automatically revert to OFF.
This will also reset the A/V Sync Delay setting to 0mS.
A/V SYNC DELAY: This line allows you to compensate for a situation in
which one of your source devices, or your video display, introduces a
significant amount of video processing that causes the audio and video
parts of the signal to get out of sync.This is known as a “lip sync” prob-
lem. You may delay the audio for all channels by up to 80 milliseconds
to compensate.
NOTE: We recommend that you adjust the A/V Sync Delay
using the Delay Button on the remote, rather than in this menu,
so that you can view the picture while adjusting the audio delay.
With the program playing, press the Delay Button, and the A/V
SYNC DELAY message will appear on the front panel and in the
semi-OSD display. Press the Set Button to display the current
delay setting, and use the
‹/› Buttons to adjust the setting
until the synchronization issue is resolved.
Move the cursor to the BACK TO MANUAL SETUP line and press the
Set Button to return to the Manual Setup menu, or simply press the
OSD Button to exit the menu system.
Step Four – Output Level Calibration
This is an important step in the configuration process, and should not
be skipped.
Many people assume that during a presentation, such as a movie, the
surround channels will sound as loud as the front channels. However,
this is usually not the case, as directors often steer only ambient or
background sounds to the surround channels. For example, during
a rainy scene you may only hear rain falling, with the occasional
thunderclap, from the surround speakers while the main dialogue is
heard from the center speakers.At times, you may not hear any
sounds at all from the surround channels.
In order to achieve these effects successfully, it is important that the
surround channels be calibrated to sound as loud as the other channels
when a test tone is played. Therefore, calibrating the speaker output
levels so that all speakers sound equally loud at the listening position
is a critical step in the setup process.
By now you should have connected all of your speakers and sources
and your video display. You should have turned on the receiver and
used the Manual Setup menus to configure each of your speakers.
Sit in the listening position with the remote control, and make sure to
eliminate external noises for the few minutes needed to calibrate the
output levels.
You may use a handheld SPL meter (available at most electronics stores)
set to the C-Weighting, Slow scale, or you may calibrate the levels by
ear.
Try to adjust the levels so that all channels sound equally loud.
HKP1482AVR144-om 9/7/06 3:12 PM Page 29