


E-22
E-22
E-23
English
MAIN MENU SCREEN 3
This page refers to zone 2 functions. These are required if your system
is installed to send audio and video to a separate ‘zone 2’ room, or you
wish to make use of the zone 2 headphone facility.
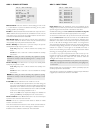
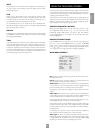
Main Menu Screen 3
Zone 2
Vol:--------------I--- +0
Headphone Out: Zone 1
Zone 2 Audio: Follow Zone 1
Zone 2 Video: Follow Zone 1
Zone 2 Status: On
Vol: Shows present volume being used in zone 2 and can be adjusted
from here. This is also the volume control for the headphones output
if it is assigned to Zone 2.
Headphone Out: Selects whether the audio signal being fed to the
headphone socket is the audio from zone 1 or zone 2.
Zone 2 Audio: Selects which audio source is sent to zone 2. The
source can be selected specifically, or can be set to Follow Zone 1.
Zone 2 Video: Only sources that have been allowed in the ‘Access’
line of ‘Zone 2 Settings’ in the Setup Menu can be selected. If zone 2 is
set to Follow Zone 1, and zone 1 is on a disallowed input, no audio or
video is available in zone 2.
Zone 2 Status: Turns zone 2 output On or Off. This should be set to
Off if no equipment is connected to the zone 2 outputs on the AV8.
NOTE: You cannot change the zone 2 audio or video inputs unless
zone 2 is on. It takes about five seconds to initialise zone 2.
USING ZONE 2
INTRODUCTION
Zone 2 provides the option for the occupants of the master bedroom,
children’s room or kitchen to view or listen to a different source at a
different volume level from the main zone (zone 1).
If a video feed is provided to zone 2, then the following menu, unique
to a zone 2 IR receiver, can be called up using the MENU button on a
CR80 remote control.
CONTROL VIA ZONE 2 MENU
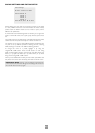
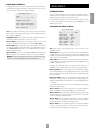
Zone 2 Main Menu
Vol:----------------I- +0dB
Audio Input : DVD
Video Input : DVD
Record to Tape: Source
Record to VCR : Source
Zone 1 Status : On
Zone 1 Volume : +0dB
Zone 1 Audio : CD
Zone 1 Video : DVD
Vol: Shows present volume being used in zone 2, which can be
adjusted from here.
Audio Input: This shows the current audio input source selected. The
current audio input can be changed when this line is highlighted, using
the
34
navigation buttons. Changing the audio input also changes the
video input to the same setting.
Video Input: This shows the current video input source selected. The
current video input can be changed when this line is highlighted, using
the
34
navigation buttons.
Changing the video input does not change the audio input, so it is
possible to watch a different input from the one you are listening to.
Record to Tape: Allows any analogue input to be directed to the tape
output, independently of the input being listened to. You cannot select
tape as a record source: if allowed, this would cause feedback through
the tape recorder.
Record to VCR: Allows any analogue audio input together with
Composite or S-video input to be directed to the VCR output. The
selection is independent of the input that is currently being listened to
or watched.
You cannot select ‘VCR’ as a record source: if allowed this would cause
feedback through the VCR.
Zone 1 Status: Shows the user status of zone 1 (the main zone). The
status can be On (i.e., being used) or Off (i.e., in standby mode).
Zone 1 Volume: Shows and allows adjustment of the volume in zone
1 (the main zone). This can be locked out with the ‘Zone 1 Control’ line
of ‘Zone 2 Settings’ in the Setup Menu.
Zone 1 Audio: Shows and allows adjustment of the audio selection
in zone 1 (the main zone). This can be locked out with the ‘Zone 1
Control’ line of ‘Zone 2 Settings’ in the Setup Menu.
Zone 1 Video: Shows and allows adjustment of the video selection
in zone 1 (the main zone). This can be locked out with the ‘Zone 1
Control’ line of ‘Zone 2 Settings’ in the Setup Menu.