


E-18
E-18
E-19
English
INTRODUCTION
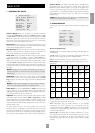
For information display we recommend you use the OSD on your
TV/screen whenever possible. However all key information is also
duplicated one line at a time on the front panel display of the AV8.
USING THE CONTROLS
SWITCHING ON
Press the power button in. Between one and five seconds later, the
power LED will then come on (first as yellow), the front panel display
window shows ‘ARCAM’, followed by ‘initialising’. This is followed by
the initial volume setting and the name of the input selected. After
initialisation is complete, the power LED changes colour to green.
Please wait until the unit has finished initialising before operating the
AV8. It is recommended that if the unit is switched off, you should wait
at least 10 seconds before switching the unit back on.
STANDBY
The AV8 has a standby mode which can be entered by pressing
STANDBY on the remote control. When in standby mode the display is
blank and the power LED glows red.
When not being used, the AV8 may be left in standby mode, as power
consumption is low. If you are not using your AV8 for several days we
recommend you switch the unit completely off at the front panel.
TO SWITCH ON FROM STANDBY
Press one of the source buttons on the front panel or on the remote
control, or use the standby button on the remote control.
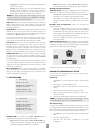
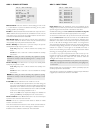
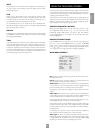
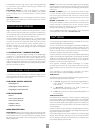
FRONT PANEL DISPLAY
The AV8 is ready for use after about four seconds. This display window
shows the processing mode and initial volume setting.
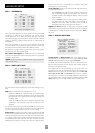
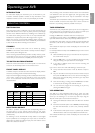
Output channels in digital processing modes are indicated in the format:
‘3/2.1’, where ‘3’ refers to the front channels, ‘2’ to the rear channels,
and ‘.1’ to the subwoofer channel. Some variants of this format are
described below.
Vol: +8 An. PLII
Movie
Tone
Recorded
format
Front
speakers
Surround
speakers
Sub-
woofer
Comment
3/2/1 3 2 Yes Full 5.1 sound
3/2/0 3 2 No 5-channel sound, no LFE
3/0/0 3 No No 3-channel sound, no LFE
2/0/0 2 No No Stereo (Dolby digital or
DTS encoded)
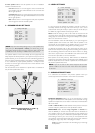
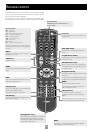
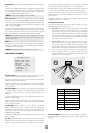
SELECTING A SOURCE
To select a particular source, press the corresponding button on
the front panel or on the remote control. There are nine inputs
available: DVD, Sat, AV, VCR, Phono/Aux, CD, Tuner, Tape and DVD-A
(multichannel).
On selecting a source, the AV8 will normally select an active digital
input in preference to an analogue input. If you want to override the
digital input and select the analogue input, press and hold the source
button for at least two seconds.
Operating your AV8
The processing mode and Stereo Direct functions are remembered
and recalled for each input. The digital input and high quality video
input associated with each source may be customised in the setup
procedure.
The DVD-A input is intended for direct analogue pass-through of DVD
Audio or SACD surround sources. Apart from volume control and
level trim, no processing modes are possible on this input.
TAPE OPERATION
The AV8 has a fully independent tape loop. This can be configured to
record the source you are listening to, or to record any other input
using the ‘Record to Tape’ option in ‘Main Menu Screen 2’.
Pressing the TAPE button will select audio from the tape input.
If the ‘Record to Tape’ option is set to Source (its default setting), the
tape LED will illuminate as well as the previously selected input.
If the ‘Record to Tape’ option is set to a specific input, the tape LED will
illuminate as well as the input selected in the ‘Record to Tape’ menu
item.
This indicates the tape loop is active and displays the source that will
be recorded.
For example, if ‘Record to Tape’ is set to Source and you want to record
the CD input:
Select the CD input then put your recorder into record pause so
that it will monitor its input.
Press the TAPE button – you can now listen to the sound actually
being recorded by your tape deck from the CD player.
If you select a different source from CD, the recording will
change to this source.
If you want to record from CD while listening to the Tuner input:
Call up the ‘Main Menu Screen 2’ and set ‘Record to Tape’ to
CD.
Put your recorder into record pause so that it monitors its input
then press the TAPE button. You can now start the recording and
listen to the sound actually being recorded by your tape deck
from the CD player.
Once the recording is running press the TUNER button to listen
to the Tuner, the recording of the CD will continue.
You can check the progress of the recording at any time by
pressing the TAPE button again.
VCR OPERATION
The AV8 has a fully independent VCR loop for audio and video
(Composite and S-video only). This can be configured to record the
source you are watching to or to record any other input using the
‘Record to VCR’ option in the ‘Main Menu Screen 2’.
Pressing the VCR button selects audio and video from the VCR
input.
If the ‘Record to VCR’ option is set to Source (its default setting),
the VCR LED illuminates as well as the previously selected
input.
If the ‘Record to VCR’ option is set to a specific input, the VCR
LED illuminates as well as the input selected in the VCR menu.
This indicates the VCR loop is active and displays the source that will
be recorded.