


E-14
E-14
E-15
English
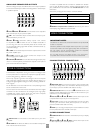
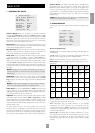
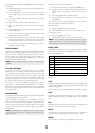
ADV 4 – ZONE 2 SETTINGS
Adv 4 - Zone 2 Settings
Max Vol 20-72: 72
Fix Vol: No
Max On Vol 0-72: 20
Zone 1 Standby: Local Only
Zone 2 Standby: Local Only
Local OSD: On
Zone 1 Control: Yes
Access: All
Max Vol 20–72: Limits the maximum volume setting for zone 2. This
is a useful feature to prevent accidental overdriving of low power-
handling speakers (for example).
Fix Vol: This selects between fixed and variable audio output to zone 2.
If No is selected, the output level can be controlled from zone 2 or the
main system. If you want to fix the volume level, first set the zone 2
volume to the desired level, then select Yes.
Max On Vol 0–72: Limits the maximum volume zone 2 operates at
when it is first switched on. Zone 2 comes on at this volume if the last
used (possibly very loud) volume exceeds this value.
Zone 1 Standby: This allows zone 1 (the main zone) to be put into
standby, either locally only or by zone 2 as well.
Local Only Only zone 1 will be switched into standby from
zone 1.
All Off Both zone 1 and zone 2 will be switched into standby
from zone 1.
NOTE: The setting for ‘Zone 1 Standby’ only applies for putting
the AV8 into standby mode. Re-activating zone 1 is always a local
function.
Zone 2 Standby: This allows zone 2 to be put into standby, either
locally only or by zone 1 as well.
Local Only Only zone 2 will be switched into standby from
zone 2.
All Off Both zone 1 and zone 2 can be switched into standby
from zone 2.
NOTE: The setting for ‘Zone 2 Standby’ only applies for putting
the AV8 into standby mode. Re-activating zone 2 is always a local
function.
Local OSD: Selects whether the zone 2 OSD is on or off.
When set to On‚ all user adjustments that are made during the
use of zone 2 are displayed on the zone 2 video. This includes the
adjustment of the volume control, the inputs selected and the
setup menus. It is recommended that zone 2 OSD turned On‚
as there is no other display available in zone 2.
When set to Off, all user adjustment displays are disabled, but
pressing the MENU key still displays the zone 2 control menu.
Zone 1 Control: If set to Yes this allows zone 2 to control and adjust
inputs and user controls for the main zone.
Access: This acts as a ‘parental control’ device to disable or enable
access to sources for zone 2.
Press the unwanted source button on the remote control handset or
front panel to disable it for zone 2. Press again to enable the source.
Enabled sources are listed on the ‘Access:’ line of the OSD.
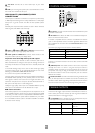
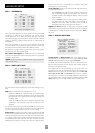
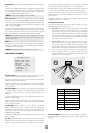
ADV 5 – INPUT TRIMS
Adv 5 - Input Trims
Aux: Reference 2V
DVD: Reference 2V
Sat: Reference 2V
AV: Reference 2V
VCR: Reference 2V
Tape: Reference 2V
CD: Reference 2V
Tuner: Reference 2V
DVD-A: Reference 2V
Input trims: Allows the adjustment of the input sensitivity of the
analogue inputs (in Volts rms) so that each one achieves the optimum
dynamic range and sounds similar in loudness to each other.
Available level settings are; Low 1V, Reference 2V, Medium 4V, High 8V.
The reference level of 2V should be appropriate for most inputs.
To ensure the correct level is set up, first ensure that all source levels
are set to Reference 2V. Find some loud music or use a 0dB reference
signal from each source. If the source activates the ‘Analogue CLIP’
indication at the bottom of the screen, then adjust its level upwards
to 4V or 8V, until the ‘Analogue CLIP’ indicator is no longer there.
Then repeat the adjustment process with every other input, selecting
the lowest voltage setting that does not activate the ‘Analogue CLIP’
indicator. If in doubt or a loud signal is not available, then leave a
source on the 2V setting. If you have a CD player with built-in HDCD
decoding, you should generally use the 4V setting.
If a source is very quiet compared with the other sources you can
increase its loudness by selecting the Low 1V setting. Once set, we
suggest you play some loud music from this source to check the
‘Analogue CLIP’ indicator does not come on.
NOTE: The ‘Analogue CLIP’ detector is only active in the ‘Input Trims’
menu, and only responds to the input indicated by the highlight bar
on the screen.
When the Aux input is converted into a Phono (turntable) input, the
sensitivity adjustment is still available.
The ‘Input Trims’ control is only available for analogue inputs. Whenever
a digital input is selected, this control is overridden.