


E-14
E-14
E-15
English
ADVANCED SETUP
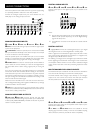
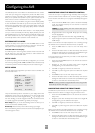
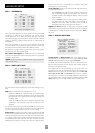
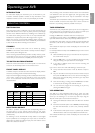
ADV 1 – SPEAKER EQ.
Adv 1 - Speaker Eq.
Bass Treble
FL: --I-- +0dB --I-- +0dB
C: --I-- +0dB --I-- +0dB
FR: --I-- +0dB --I-- +0dB
SR: --I-- +0dB --I-- +0dB
SBR: --I-- +0dB --I-- +0dB
SBL: --I-- +0dB --I-- +0dB
SL: --I-- +0dB --I-- +0dB
Auto Stereo Tone Bypass: Yes
Allows advanced adjustment of all the speakers for bass and treble
management in 1dB steps up to ±6dB. The tone control nominal
corner frequencies are at 100Hz and 8kHz, shelf type. Use these
adjustments sparingly to compensate for speaker response problems
caused by positioning, adjacent surface textures, or mixed brands of
loudspeakers.
Work with one speaker on at a time, and as an example, use the bass
control to reduce boom problems for speakers placed in corners, and
the treble control for speakers placed near reflective surfaces.
We recommend trying to obtain a good speaker response by speaker
placement first, then apply speaker eq. last.
Auto Stereo Tone Bypass: Set to Yes if you wish to automatically
have any tone adjustments made in ‘Main Menu Screen 1’ by-passed in
analogue or digital mode.
NOTE: This does not switch the AV8 into Direct mode, only sets the
tone controls to zero.
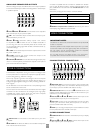
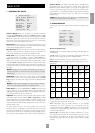
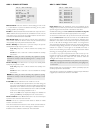
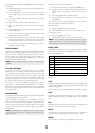
ADV 2 – VIDEO SETTINGS
Adv 2 - Video Settings
OSD: On
Video Input Aux: None
Video Input CD: None
Video Input Tuner: None
Video Input DVD-A: None
Audio and Video: Tracked
HQ Vid 1 Comp/RGB: None
HQ Vid 2 Comp/RGB: None
HQ Vid 3 Comp/RGB: None
This menu allows advanced adjustment of the video settings for your
AV8.
OSD: Selects whether the main zone OSD is on or off.
When set to On‚ all user adjustments that are made during the
general use of the AV8 are displayed on the screen. This includes
the adjustment of the volume control, the inputs selected and
the setup menus.
When set to Off‚ you will have no displays of the general user
adjustments – only the setup menus and the main menus are
displayed.
It is recommended you keep the OSD turned On‚ since if you cannot
see the front panel of the AV8 you will have no idea if any adjustments
you have made to the processor are correct or to your liking.
Video Inputs: Composite and S-video inputs for DVD, Sat, AV, VCR
and Tape have, by default, their audio and video assigned to track each
other. The four Video Input lines for Aux, CD, Tuner and DVD-A allow
you to assign a video source to these normally audio-only sources. You
can allocate the same video source to more than one audio input. This
facility allows you to listen to an audio source and view a separate video
source at the same time – for example, you can listen to radio while
watching TV for a sports simulcast.
Audio and Video: Applies to the audio and video assignments set up
in the ‘Main Menu Screen 1’.
If set to Separate, then audio and video signals for video sources
can be separately assigned (e.g., DVD sound with video from
a satellite receiver). Once assigned separate, audio and video
remain separate.
If set to Tracked, audio and video signals are linked together
(e.g., DVD audio and video). This setting is recommended for
simplicity. In this mode, audio and video sources can still be
separated temporarily by using ‘Main Menu Screen 1’.
HQ Vid 1, 2 and 3: Allocates the high quality component or RGB
video inputs to any source buttons. For example, to use the component
or RGB output on a DVD player with HQ Vid 1 input, select DVD in
the menu.
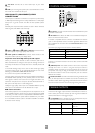
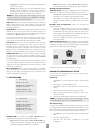
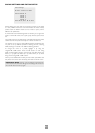
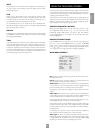
ADV 3 – DIGITAL SETTINGS
Adv 3 - Digital Settings
Coaxial Inputs
DVD input: DVD button
AV input: AV button
Tape input: Tape button
Tuner input: Tuner button
CD input: CD button
Optical Inputs
VCR input: VCR button
Sat input: Sat button
Coaxial inputs and Optical inputs. Each of the digital inputs can
be assigned to any of the eight stereo source buttons (AUX, CD, TUNER,
TAPE, DVD, SAT, AV and VCR), or can be assigned No button.
The OSD menu lists the physical inputs, as per the back panel, on the
left hand side of the screen, and the buttons used to select the inputs
are listed on the right hand side.
Each digital input can only be allocated to one source button. For
example, if you choose the ‘Coaxial DVD input’ to be assigned to the
DVD button, then the choices for the other digital inputs are: Aux, CD,
Tuner, Tape, Sat, AV, VCR and No button. If you wish to re-allocate
the DVD input to a button that is already assigned to the ‘AV input’
(for example), ‘AV input’ must be assigned to a different button (or No
button) before you can re-assign this new button to ‘DVD input’.